# 删除用户,发现家目录不在了 [root@centos7 ~]# userdel -r test003 [root@centos7 ~]# ls -ld /home/test003 ls: cannot access /home/test003: No such file or directory [root@centos7 ~]# id test003 id: test003: no such user [root@centos7 ~]#
2.3 修改用户
修改用户的 uid
1 2
usermod -u 新的uid 用户 usermod 用户 -u 新的uid
1 2 3 4 5 6 7 8 9 10 11 12 13 14 15
[root@centos7 ~]# id test004 uid=1011(test004) gid=1011(test004) groups=1011(test004) [root@centos7 ~]#
# 修改前 [root@centos7 ~]# id qiankong uid=1000(qiankong) gid=1000(qiankong) groups=1000(qiankong),10(wheel) [root@centos7 ~]# id qiankong666 id: qiankong666: no such user [root@centos7 ~]#
# 修改用户名,不允许修改正在被使用的用户 [root@centos7 ~]# usermod qiankong -l qiankong666 usermod: user qiankong is currently used by process 27443
# 修改后 [root@centos7 ~]# id qiankong id: qiankong: no such user [root@centos7 ~]# id qiankong666 uid=1000(qiankong666) gid=1000(qiankong) groups=1000(qiankong),10(wheel) [root@centos7 ~]#
# 修改前,小写L [root@centos7 ~]# chage -l qiankong Last password change : Oct 06, 2025 Password expires : never Password inactive : never Account expires : never Minimum number of days between password change : 0 Maximum number of days between password change : 99999 Number of days of warning before password expires : 7 [root@centos7 ~]#
# 修改后,小写L [root@centos7 ~]# chage -l qiankong Last password change : Oct 06, 2025 Password expires : never Password inactive : never Account expires : Nov 11, 2025 Minimum number of days between password change : 0 Maximum number of days between password change : 99999 Number of days of warning before password expires : 7 [root@centos7 ~]#
[root@centos7 ~]# id uid=0(root) gid=0(root) groups=0(root) [root@centos7 ~]#
[root@centos7 ~]# id qiankong uid=1000(qiankong) gid=1000(qiankong) groups=1000(qiankong),10(wheel) [root@centos7 ~]#
查用户的密码和有效期信息
1
chage -l 用户名
1 2 3 4 5 6 7 8 9
[root@centos7 ~]# chage -l qiankong Last password change : Oct 06, 2025 Password expires : never Password inactive : never Account expires : Nov 07, 2423 Minimum number of days between password change : 0 Maximum number of days between password change : 99999 Number of days of warning before password expires : 7 [root@centos7 ~]#
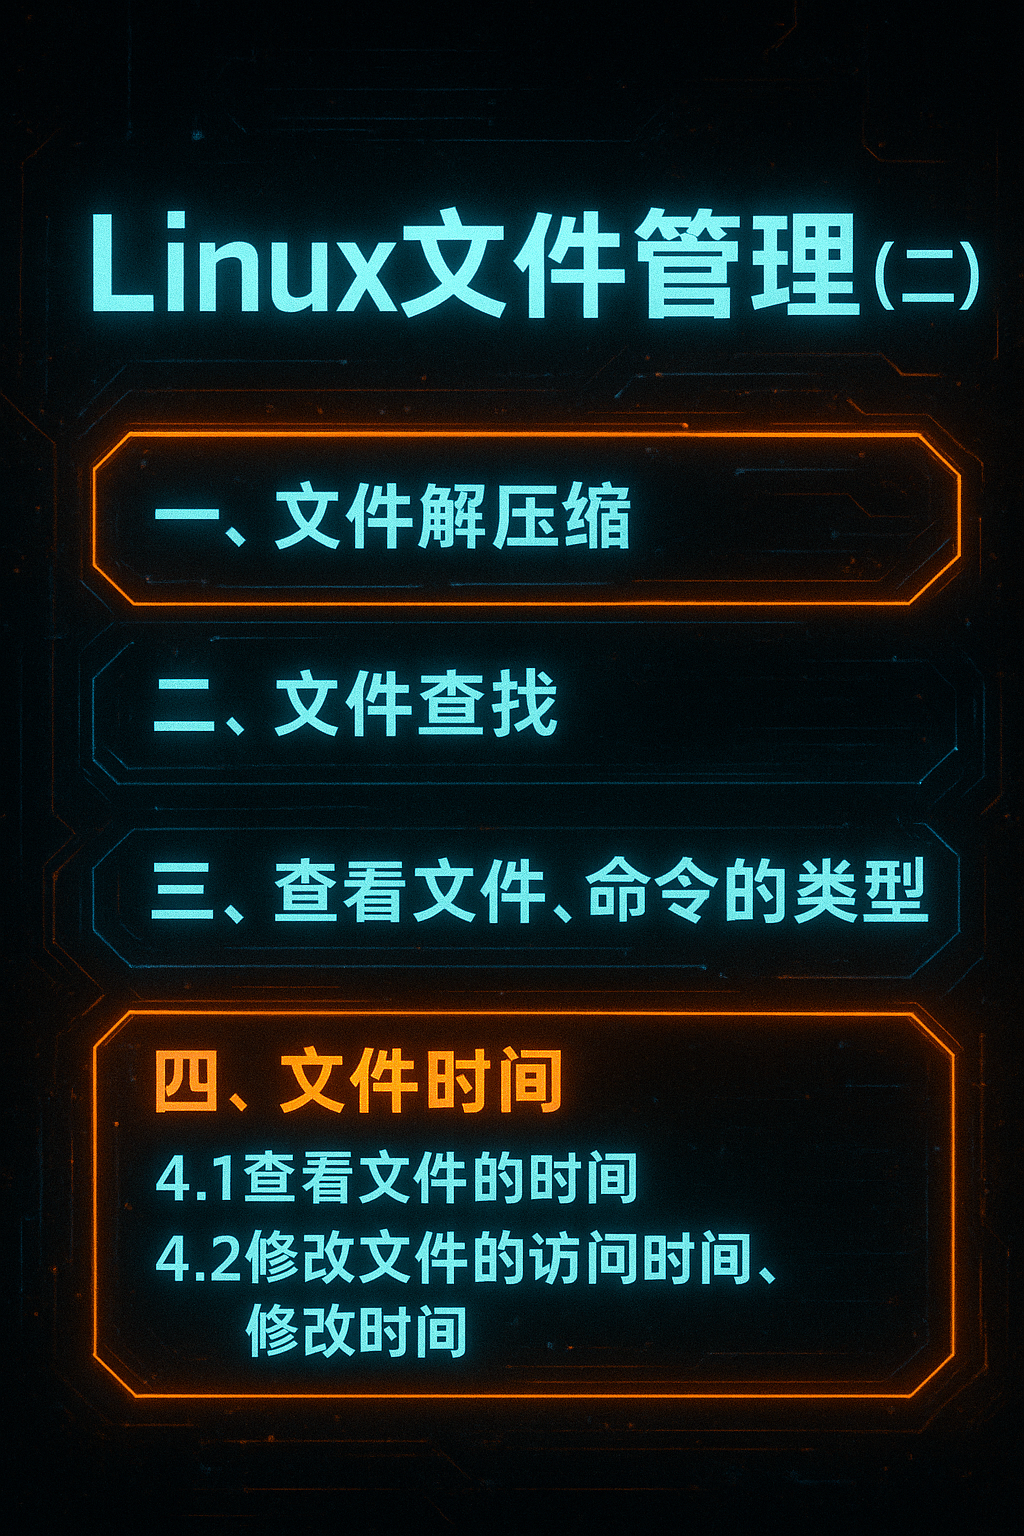
三、用户组内操作
3.1 组内添加用户
1
2
gpasswd -a 用户名 组名 gpasswd 组名 -a 用户名
1 2 3 4 5 6 7 8 9 10 11 12 13
# 添加前 [root@centos7 ~]# getent group IT IT:x:1002:test008,test007 [root@centos7 ~]#
# 添加 [root@centos7 ~]# gpasswd -a qiankong IT Adding user qiankong to group IT
# 添加后 [root@centos7 ~]# getent group IT IT:x:1002:test008,test007,qiankong [root@centos7 ~]#
3.2 组内删除用户
1 2
gpasswd -d 用户名 组名 gpasswd 组名 -d 用户名
1 2 3 4 5 6 7 8 9 10 11 12 13
# 删除前 [root@centos7 ~]# getent group IT IT:x:1002:test008,test007,qiankong,test009 [root@centos7 ~]#
# 删除 [root@centos7 ~]# gpasswd -d test009 IT Removing user test009 from group IT
# 删除后 [root@centos7 ~]# getent group IT IT:x:1002:test008,test007,qiankong [root@centos7 ~]#
[root@centos7 ~]# tar jcvf demo1.tar.bz2 anaconda-ks.cfg dir1/ init.sh nginx.rpm sshd_config tar (child): bzip2: Cannot exec: No such file or directory tar (child): Error is not recoverable: exiting now anaconda-ks.cfg dir1/ init.sh nginx.rpm
压缩
1
tar jcvf 文件.tar.bz2 文件1 文件2 ...
1 2 3 4 5 6 7 8 9 10 11 12 13 14 15 16
# 压缩前效果 [root@centos7 ~]# ls anaconda-ks.cfg dir1 init.sh nginx.rpm sshd_config
# wget https://www.rarlab.com/rar/rarlinux-x64-712.tar.gz
wget https://www.rarlab.com/rar/rarlinux-x64-612.tar.gz
tar zxvpf rarlinux-x64-612.tar.gz
cd rar
make
[root@centos7 ~]# rar
rar: /lib64/libstdc++.so.6: version `GLIBCXX_3.4.20' not found (required by rar)
rar: /lib64/libstdc++.so.6: version `GLIBCXX_3.4.21' not found (required by rar)
UNRAR 6.12 freeware Copyright (c) 1993-2022 Alexander Roshal
Extracting from demo.rar
Extracting tar6/anaconda-ks.cfg OK Creating tar6/dir1 OK Extracting tar6/dir1/111 OK Extracting tar6/init.sh OK Extracting tar6/nginx.rpm OK Extracting tar6/sshd_config OK All OK
UNRAR 6.12 freeware Copyright (c) 1993-2022 Alexander Roshal
Extracting from demo.rar
Extracting tar5/anaconda-ks.cfg OK Extracting tar5/111 OK Extracting tar5/init.sh OK Extracting tar5/nginx.rpm OK Extracting tar5/sshd_config OK All OK
[root@centos7 ~]# ls
anaconda-ks.cfg  dir1  init.sh  nginx.rpm  sshd_config  tar

# 参数带密码,法一
[root@centos7 ~]# 7z a -p123456 file1.7z nginx.rpm anaconda-ks.cfg

7-Zip [64] 16.02 : Copyright (c) 1999-2016 Igor Pavlov : 2016-05-21
p7zip Version 16.02 (locale=en_US.UTF-8,Utf16=on,HugeFiles=on,64 bits,2 CPUs Intel(R) Core(TM) i5-10200H CPU @ 2.40GHz (A0652),ASM,AES-NI)

Scanning the drive:
2 files, 544624 bytes (532 KiB)

Creating archive: file1.7z

Items to compress: 2


Files read from disk: 2
Archive size: 528615 bytes (517 KiB)
Everything is Ok

# 手动设置密码,法二
[root@centos7 ~]# 7z a -p file2.7z nginx.rpm anaconda-ks.cfg

7-Zip [64] 16.02 : Copyright (c) 1999-2016 Igor Pavlov : 2016-05-21
p7zip Version 16.02 (locale=en_US.UTF-8,Utf16=on,HugeFiles=on,64 bits,2 CPUs Intel(R) Core(TM) i5-10200H CPU @ 2.40GHz (A0652),ASM,AES-NI)

Scanning the drive:
2 files, 544624 bytes (532 KiB)

Creating archive: file2.7z

Items to compress: 2


Enter password (will not be echoed):
Verify password (will not be echoed) :

Files read from disk: 2
Archive size: 528615 bytes (517 KiB)
Everything is Ok
[root@centos7 ~]#
[root@centos7 ~]# find / \( -size 50M -o -size +50M \)
/boot/initramfs-0-rescue-fb975d108c4343c494c081818be2ebd7.img
/dev/1G.file
/proc/kcore
find: ‘/proc/11443/task/11443/fd/5’: No such file or directory
find: ‘/proc/11443/task/11443/fdinfo/5’: No such file or directory
find: ‘/proc/11443/fd/6’: No such file or directory
find: ‘/proc/11443/fdinfo/6’: No such file or directory
/sys/devices/pci0000:00/0000:00:0f.0/resource1_wc
/sys/devices/pci0000:00/0000:00:0f.0/resource1
/root/1G.file
/var/lib/rpm/Packages
/var/cache/yum/x86_64/7/epel/gen/filelists_db.sqlite
/var/cache/yum/x86_64/7/updates/gen/primary_db.sqlite
/var/cache/yum/x86_64/7/updates/gen/filelists_db.sqlite
/usr/lib/locale/locale-archive
[root@centos7 ~]#
# 查找qiankong用户的文件
[root@centos7 ~]# find / -user qiankong
find: ‘/proc/11661/task/11661/fd/5’: No such file or directory
find: ‘/proc/11661/task/11661/fdinfo/5’: No such file or directory
find: ‘/proc/11661/fd/6’: No such file or directory
find: ‘/proc/11661/fdinfo/6’: No such file or directory
/var/spool/mail/qiankong
/home/qiankong
/home/qiankong/.bash_logout
/home/qiankong/.bash_profile
/home/qiankong/.bashrc
[root@centos7 ~]#
dir1/: [root@centos7 ~]# find . -name "file*" -print0 | xargs -I haha mv haha dir1/ xargs: WARNING: a NUL character occurred in the input. It cannot be passed through in the argument list. Did you mean to use the --null option? mv: cannot stat ‘./file 2 n .txt’: No such file or directory [root@centos7 ~]# ls . dir1/ .: anaconda-ks.cfg dir1 file 2 \n .txt init.sh nginx.rpm sshd_config
# 查询python的详细信息 [root@centos7 ~]# rpm -qi python Name : python Version : 2.7.5 Release : 89.el7 Architecture: x86_64 Install Date: Sun 28 Sep 2025 04:05:12 PM CST Group : Development/Languages Size : 80835 License : Python Signature : RSA/SHA256, Thu 15 Oct 2020 02:59:06 AM CST, Key ID 24c6a8a7f4a80eb5 Source RPM : python-2.7.5-89.el7.src.rpm Build Date : Wed 14 Oct 2020 11:09:26 PM CST Build Host : x86-01.bsys.centos.org Relocations : (not relocatable) Packager : CentOS BuildSystem <http://bugs.centos.org> Vendor : CentOS URL : http://www.python.org/ Summary : An interpreted, interactive, object-oriented programming language Description : Python is an interpreted, interactive, object-oriented programming language often compared to Tcl, Perl, Scheme or Java. Python includes modules, classes, exceptions, very high level dynamic data types and dynamic typing. Python supports interfaces to many system calls and libraries, as well as to various windowing systems (X11, Motif, Tk, Mac and MFC).
Programmers can write new built-in modules for Python in C or C++. Python can be used as an extension language for applications that need a programmable interface.
Note that documentation for Python is provided in the python-docs package.
This package provides the "python" executable; most of the actual implementation is within the "python-libs" package. [root@centos7 ~]#
[root@centos7 ~]# yum install httpd -y Loaded plugins: fastestmirror Loading mirror speeds from cached hostfile * base: mirrors.aliyun.com * extras: mirrors.aliyun.com * updates: mirrors.aliyun.com Resolving Dependencies --> Running transaction check ---> Package httpd.x86_64 0:2.4.6-99.el7.centos.1 will be installed --> Processing Dependency: httpd-tools = 2.4.6-99.el7.centos.1 for package: httpd-2.4.6-99.el7.centos.1.x86_64 --> Processing Dependency: /etc/mime.types for package: httpd-2.4.6-99.el7.centos.1.x86_64 --> Processing Dependency: libaprutil-1.so.0()(64bit) for package: httpd-2.4.6-99.el7.centos.1.x86_64 --> Processing Dependency: libapr-1.so.0()(64bit) for package: httpd-2.4.6-99.el7.centos.1.x86_64 --> Running transaction check ---> Package apr.x86_64 0:1.4.8-7.el7 will be installed ---> Package apr-util.x86_64 0:1.5.2-6.el7_9.1 will be installed ---> Package httpd-tools.x86_64 0:2.4.6-99.el7.centos.1 will be installed ---> Package mailcap.noarch 0:2.1.41-2.el7 will be installed --> Finished Dependency Resolution
Dependencies Resolved
========================================================================================================================================================================= Package Arch Version Repository Size =========================================================================================================================================================================Installing: httpd x86_64 2.4.6-99.el7.centos.1 updates 2.7 M Installing for dependencies: apr x86_64 1.4.8-7.el7 base 104 k apr-util x86_64 1.5.2-6.el7_9.1 updates 92 k httpd-tools x86_64 2.4.6-99.el7.centos.1 updates 94 k mailcap noarch 2.1.41-2.el7 base 31 k
[root@centos7 ~]# yum update Loaded plugins: fastestmirror Loading mirror speeds from cached hostfile * base: mirrors.aliyun.com * extras: mirrors.aliyun.com * updates: mirrors.aliyun.com Resolving Dependencies --> Running transaction check ---> Package NetworkManager.x86_64 1:1.18.8-1.el7 will be updated ---> Package NetworkManager.x86_64 1:1.18.8-2.el7_9 will be an update ---> Package NetworkManager-libnm.x86_64 1:1.18.8-1.el7 will be updated ---> Package NetworkManager-libnm.x86_64 1:1.18.8-2.el7_9 will be an update ---> Package NetworkManager-team.x86_64 1:1.18.8-1.el7 will be updated ---> Package NetworkManager-team.x86_64 1:1.18.8-2.el7_9 will be an update ---> Package NetworkManager-tui.x86_64 1:1.18.8-1.el7 will be updated ---> Package NetworkManager-tui.x86_64 1:1.18.8-2.el7_9 will be an update ---> Package bash.x86_64 0:4.2.46-34.el7 will be updated ---> Package bash.x86_64 0:4.2.46-35.el7_9 will be an update ---> Package bind-export-libs.x86_64 32:9.11.4-26.P2.el7 will be updated ---> Package bind-export-libs.x86_64 32:9.11.4-26.P2.el7_9.16 will be an update ---> Package binutils.x86_64 0:2.27-44.base.el7 will be updated ---> Package binutils.x86_64 0:2.27-44.base.el7_9.1 will be an update ---> Package ca-certificates.noarch 0:2020.2.41-70.0.el7_8 will be updated ---> Package ca-certificates.noarch 0:2023.2.60_v7.0.306-72.el7_9 will be an update ---> Package centos-release.x86_64 0:7-9.2009.0.el7.centos will be updated ---> Package centos-release.x86_64 0:7-9.2009.2.el7.centos will be an update ---> Package coreutils.x86_64 0:8.22-24.el7 will be updated ---> Package coreutils.x86_64 0:8.22-24.el7_9.2 will be an update ---> Package cronie.x86_64 0:1.4.11-23.el7 will be updated ---> Package cronie.x86_64 0:1.4.11-25.el7_9 will be an update ---> Package cronie-anacron.x86_64 0:1.4.11-23.el7 will be updated ---> Package cronie-anacron.x86_64 0:1.4.11-25.el7_9 will be an update ---> Package cyrus-sasl-lib.x86_64 0:2.1.26-23.el7 will be updated ---> Package cyrus-sasl-lib.x86_64 0:2.1.26-24.el7_9 will be an update ---> Package device-mapper.x86_64 7:1.02.170-6.el7 will be updated ---> Package device-mapper.x86_64 7:1.02.170-6.el7_9.5 will be an update ---> Package device-mapper-event.x86_64 7:1.02.170-6.el7 will be updated ---> Package device-mapper-event.x86_64 7:1.02.170-6.el7_9.5 will be an update ---> Package device-mapper-event-libs.x86_64 7:1.02.170-6.el7 will be updated ---> Package device-mapper-event-libs.x86_64 7:1.02.170-6.el7_9.5 will be an update ---> Package device-mapper-libs.x86_64 7:1.02.170-6.el7 will be updated ---> Package device-mapper-libs.x86_64 7:1.02.170-6.el7_9.5 will be an update ---> Package device-mapper-persistent-data.x86_64 0:0.8.5-3.el7 will be updated ---> Package device-mapper-persistent-data.x86_64 0:0.8.5-3.el7_9.2 will be an update ---> Package dhclient.x86_64 12:4.2.5-82.el7.centos will be updated ---> Package dhclient.x86_64 12:4.2.5-83.el7.centos.2 will be an update ---> Package dhcp-common.x86_64 12:4.2.5-82.el7.centos will be updated ---> Package dhcp-common.x86_64 12:4.2.5-83.el7.centos.2 will be an update ---> Package dhcp-libs.x86_64 12:4.2.5-82.el7.centos will be updated ---> Package dhcp-libs.x86_64 12:4.2.5-83.el7.centos.2 will be an update ---> Package diffutils.x86_64 0:3.3-5.el7 will be updated ---> Package diffutils.x86_64 0:3.3-6.el7_9 will be an update ---> Package dmidecode.x86_64 1:3.2-5.el7 will be updated ---> Package dmidecode.x86_64 1:3.2-5.el7_9.1 will be an update ---> Package expat.x86_64 0:2.1.0-12.el7 will be updated ---> Package expat.x86_64 0:2.1.0-15.el7_9 will be an update ---> Package firewalld.noarch 0:0.6.3-11.el7 will be updated ---> Package firewalld.noarch 0:0.6.3-13.el7_9 will be an update ---> Package firewalld-filesystem.noarch 0:0.6.3-11.el7 will be updated ---> Package firewalld-filesystem.noarch 0:0.6.3-13.el7_9 will be an update ---> Package freetype.x86_64 0:2.8-14.el7 will be updated ---> Package freetype.x86_64 0:2.8-14.el7_9.1 will be an update ---> Package glib2.x86_64 0:2.56.1-7.el7 will be updated ---> Package glib2.x86_64 0:2.56.1-9.el7_9 will be an update ---> Package glibc.x86_64 0:2.17-317.el7 will be updated ---> Package glibc.x86_64 0:2.17-326.el7_9.3 will be an update ---> Package glibc-common.x86_64 0:2.17-317.el7 will be updated ---> Package glibc-common.x86_64 0:2.17-326.el7_9.3 will be an update ---> Package grub2.x86_64 1:2.02-0.86.el7.centos will be updated ---> Package grub2.x86_64 1:2.02-0.87.0.2.el7.centos.14 will be an update ---> Package grub2-common.noarch 1:2.02-0.86.el7.centos will be updated ---> Package grub2-common.noarch 1:2.02-0.87.0.2.el7.centos.14 will be an update ---> Package grub2-pc.x86_64 1:2.02-0.86.el7.centos will be updated ---> Package grub2-pc.x86_64 1:2.02-0.87.0.2.el7.centos.14 will be an update ---> Package grub2-pc-modules.noarch 1:2.02-0.86.el7.centos will be updated ---> Package grub2-pc-modules.noarch 1:2.02-0.87.0.2.el7.centos.14 will be an update ---> Package grub2-tools.x86_64 1:2.02-0.86.el7.centos will be updated ---> Package grub2-tools.x86_64 1:2.02-0.87.0.2.el7.centos.14 will be an update ---> Package grub2-tools-extra.x86_64 1:2.02-0.86.el7.centos will be updated ---> Package grub2-tools-extra.x86_64 1:2.02-0.87.0.2.el7.centos.14 will be an update ---> Package grub2-tools-minimal.x86_64 1:2.02-0.86.el7.centos will be updated ---> Package grub2-tools-minimal.x86_64 1:2.02-0.87.0.2.el7.centos.14 will be an update ---> Package gzip.x86_64 0:1.5-10.el7 will be updated ---> Package gzip.x86_64 0:1.5-11.el7_9 will be an update ---> Package initscripts.x86_64 0:9.49.53-1.el7 will be updated ---> Package initscripts.x86_64 0:9.49.53-1.el7_9.1 will be an update ---> Package iprutils.x86_64 0:2.4.17.1-3.el7 will be updated ---> Package iprutils.x86_64 0:2.4.17.1-3.el7_7 will be an update ---> Package iwl100-firmware.noarch 0:39.31.5.1-79.el7 will be updated ---> Package iwl100-firmware.noarch 0:39.31.5.1-83.el7_9 will be an update ---> Package iwl1000-firmware.noarch 1:39.31.5.1-79.el7 will be updated ---> Package iwl1000-firmware.noarch 1:39.31.5.1-83.el7_9 will be an update ---> Package iwl105-firmware.noarch 0:18.168.6.1-79.el7 will be updated ---> Package iwl105-firmware.noarch 0:18.168.6.1-83.el7_9 will be an update ---> Package iwl135-firmware.noarch 0:18.168.6.1-79.el7 will be updated ---> Package iwl135-firmware.noarch 0:18.168.6.1-83.el7_9 will be an update ---> Package iwl2000-firmware.noarch 0:18.168.6.1-79.el7 will be updated ---> Package iwl2000-firmware.noarch 0:18.168.6.1-83.el7_9 will be an update ---> Package iwl2030-firmware.noarch 0:18.168.6.1-79.el7 will be updated ---> Package iwl2030-firmware.noarch 0:18.168.6.1-83.el7_9 will be an update ---> Package iwl3160-firmware.noarch 0:25.30.13.0-79.el7 will be updated ---> Package iwl3160-firmware.noarch 0:25.30.13.0-83.el7_9 will be an update ---> Package iwl3945-firmware.noarch 0:15.32.2.9-79.el7 will be updated ---> Package iwl3945-firmware.noarch 0:15.32.2.9-83.el7_9 will be an update ---> Package iwl4965-firmware.noarch 0:228.61.2.24-79.el7 will be updated ---> Package iwl4965-firmware.noarch 0:228.61.2.24-83.el7_9 will be an update ---> Package iwl5000-firmware.noarch 0:8.83.5.1_1-79.el7 will be updated ---> Package iwl5000-firmware.noarch 0:8.83.5.1_1-83.el7_9 will be an update ---> Package iwl5150-firmware.noarch 0:8.24.2.2-79.el7 will be updated ---> Package iwl5150-firmware.noarch 0:8.24.2.2-83.el7_9 will be an update ---> Package iwl6000-firmware.noarch 0:9.221.4.1-79.el7 will be updated ---> Package iwl6000-firmware.noarch 0:9.221.4.1-83.el7_9 will be an update ---> Package iwl6000g2a-firmware.noarch 0:18.168.6.1-79.el7 will be updated ---> Package iwl6000g2a-firmware.noarch 0:18.168.6.1-83.el7_9 will be an update ---> Package iwl6000g2b-firmware.noarch 0:18.168.6.1-79.el7 will be updated ---> Package iwl6000g2b-firmware.noarch 0:18.168.6.1-83.el7_9 will be an update ---> Package iwl6050-firmware.noarch 0:41.28.5.1-79.el7 will be updated ---> Package iwl6050-firmware.noarch 0:41.28.5.1-83.el7_9 will be an update ---> Package iwl7260-firmware.noarch 0:25.30.13.0-79.el7 will be updated ---> Package iwl7260-firmware.noarch 0:25.30.13.0-83.el7_9 will be an update ---> Package kbd.x86_64 0:1.15.5-15.el7 will be updated ---> Package kbd.x86_64 0:1.15.5-16.el7_9 will be an update ---> Package kbd-legacy.noarch 0:1.15.5-15.el7 will be updated ---> Package kbd-legacy.noarch 0:1.15.5-16.el7_9 will be an update ---> Package kbd-misc.noarch 0:1.15.5-15.el7 will be updated ---> Package kbd-misc.noarch 0:1.15.5-16.el7_9 will be an update ---> Package kernel.x86_64 0:3.10.0-1160.119.1.el7 will be installed ---> Package kernel-tools.x86_64 0:3.10.0-1160.el7 will be updated ---> Package kernel-tools.x86_64 0:3.10.0-1160.119.1.el7 will be an update ---> Package kernel-tools-libs.x86_64 0:3.10.0-1160.el7 will be updated ---> Package kernel-tools-libs.x86_64 0:3.10.0-1160.119.1.el7 will be an update ---> Package kexec-tools.x86_64 0:2.0.15-51.el7 will be updated ---> Package kexec-tools.x86_64 0:2.0.15-51.el7_9.3 will be an update ---> Package kpartx.x86_64 0:0.4.9-133.el7 will be updated ---> Package kpartx.x86_64 0:0.4.9-136.el7_9 will be an update ---> Package krb5-libs.x86_64 0:1.15.1-50.el7 will be updated ---> Package krb5-libs.x86_64 0:1.15.1-55.el7_9 will be an update ---> Package less.x86_64 0:458-9.el7 will be updated ---> Package less.x86_64 0:458-10.el7_9 will be an update ---> Package libblkid.x86_64 0:2.23.2-65.el7 will be updated ---> Package libblkid.x86_64 0:2.23.2-65.el7_9.1 will be an update ---> Package libcroco.x86_64 0:0.6.12-4.el7 will be updated ---> Package libcroco.x86_64 0:0.6.12-6.el7_9 will be an update ---> Package libmount.x86_64 0:2.23.2-65.el7 will be updated ---> Package libmount.x86_64 0:2.23.2-65.el7_9.1 will be an update ---> Package libsmartcols.x86_64 0:2.23.2-65.el7 will be updated ---> Package libsmartcols.x86_64 0:2.23.2-65.el7_9.1 will be an update ---> Package libssh2.x86_64 0:1.8.0-4.el7 will be updated ---> Package libssh2.x86_64 0:1.8.0-4.el7_9.1 will be an update ---> Package libuuid.x86_64 0:2.23.2-65.el7 will be updated ---> Package libuuid.x86_64 0:2.23.2-65.el7_9.1 will be an update ---> Package libxml2.x86_64 0:2.9.1-6.el7.5 will be updated ---> Package libxml2.x86_64 0:2.9.1-6.el7_9.6 will be an update ---> Package linux-firmware.noarch 0:20200421-79.git78c0348.el7 will be updated ---> Package linux-firmware.noarch 0:20200421-83.git78c0348.el7_9 will be an update ---> Package lvm2.x86_64 7:2.02.187-6.el7 will be updated ---> Package lvm2.x86_64 7:2.02.187-6.el7_9.5 will be an update ---> Package lvm2-libs.x86_64 7:2.02.187-6.el7 will be updated ---> Package lvm2-libs.x86_64 7:2.02.187-6.el7_9.5 will be an update ---> Package microcode_ctl.x86_64 2:2.1-73.el7 will be updated ---> Package microcode_ctl.x86_64 2:2.1-73.20.el7_9 will be an update ---> Package nspr.x86_64 0:4.21.0-1.el7 will be updated ---> Package nspr.x86_64 0:4.35.0-1.el7_9 will be an update ---> Package nss.x86_64 0:3.44.0-7.el7_7 will be updated ---> Package nss.x86_64 0:3.90.0-2.el7_9 will be an update ---> Package nss-pem.x86_64 0:1.0.3-7.el7 will be updated ---> Package nss-pem.x86_64 0:1.0.3-7.el7_9.1 will be an update ---> Package nss-softokn.x86_64 0:3.44.0-8.el7_7 will be updated ---> Package nss-softokn.x86_64 0:3.90.0-6.el7_9 will be an update ---> Package nss-softokn-freebl.x86_64 0:3.44.0-8.el7_7 will be updated ---> Package nss-softokn-freebl.x86_64 0:3.90.0-6.el7_9 will be an update ---> Package nss-sysinit.x86_64 0:3.44.0-7.el7_7 will be updated ---> Package nss-sysinit.x86_64 0:3.90.0-2.el7_9 will be an update ---> Package nss-tools.x86_64 0:3.44.0-7.el7_7 will be updated ---> Package nss-tools.x86_64 0:3.90.0-2.el7_9 will be an update ---> Package nss-util.x86_64 0:3.44.0-4.el7_7 will be updated ---> Package nss-util.x86_64 0:3.90.0-1.el7_9 will be an update ---> Package open-vm-tools.x86_64 0:11.0.5-3.el7 will be updated ---> Package open-vm-tools.x86_64 0:11.0.5-3.el7_9.9 will be an update ---> Package openldap.x86_64 0:2.4.44-22.el7 will be updated ---> Package openldap.x86_64 0:2.4.44-25.el7_9 will be an update ---> Package openssh.x86_64 0:7.4p1-21.el7 will be updated ---> Package openssh.x86_64 0:7.4p1-23.el7_9 will be an update ---> Package openssh-clients.x86_64 0:7.4p1-21.el7 will be updated ---> Package openssh-clients.x86_64 0:7.4p1-23.el7_9 will be an update ---> Package openssh-server.x86_64 0:7.4p1-21.el7 will be updated ---> Package openssh-server.x86_64 0:7.4p1-23.el7_9 will be an update ---> Package openssl.x86_64 1:1.0.2k-19.el7 will be updated ---> Package openssl.x86_64 1:1.0.2k-26.el7_9 will be an update ---> Package openssl-libs.x86_64 1:1.0.2k-19.el7 will be updated ---> Package openssl-libs.x86_64 1:1.0.2k-26.el7_9 will be an update ---> Package polkit.x86_64 0:0.112-26.el7 will be updated ---> Package polkit.x86_64 0:0.112-26.el7_9.1 will be an update ---> Package python-firewall.noarch 0:0.6.3-11.el7 will be updated ---> Package python-firewall.noarch 0:0.6.3-13.el7_9 will be an update ---> Package python-perf.x86_64 0:3.10.0-1160.el7 will be updated ---> Package python-perf.x86_64 0:3.10.0-1160.119.1.el7 will be an update ---> Package rpm.x86_64 0:4.11.3-45.el7 will be updated ---> Package rpm.x86_64 0:4.11.3-48.el7_9 will be an update ---> Package rpm-build-libs.x86_64 0:4.11.3-45.el7 will be updated ---> Package rpm-build-libs.x86_64 0:4.11.3-48.el7_9 will be an update ---> Package rpm-libs.x86_64 0:4.11.3-45.el7 will be updated ---> Package rpm-libs.x86_64 0:4.11.3-48.el7_9 will be an update ---> Package rpm-python.x86_64 0:4.11.3-45.el7 will be updated ---> Package rpm-python.x86_64 0:4.11.3-48.el7_9 will be an update ---> Package rsyslog.x86_64 0:8.24.0-55.el7 will be updated ---> Package rsyslog.x86_64 0:8.24.0-57.el7_9.3 will be an update ---> Package selinux-policy.noarch 0:3.13.1-268.el7 will be updated ---> Package selinux-policy.noarch 0:3.13.1-268.el7_9.2 will be an update ---> Package selinux-policy-targeted.noarch 0:3.13.1-268.el7 will be updated ---> Package selinux-policy-targeted.noarch 0:3.13.1-268.el7_9.2 will be an update ---> Package sudo.x86_64 0:1.8.23-10.el7 will be updated ---> Package sudo.x86_64 0:1.8.23-10.el7_9.3 will be an update ---> Package systemd.x86_64 0:219-78.el7 will be updated ---> Package systemd.x86_64 0:219-78.el7_9.9 will be an update ---> Package systemd-libs.x86_64 0:219-78.el7 will be updated ---> Package systemd-libs.x86_64 0:219-78.el7_9.9 will be an update ---> Package systemd-sysv.x86_64 0:219-78.el7 will be updated ---> Package systemd-sysv.x86_64 0:219-78.el7_9.9 will be an update ---> Package tuned.noarch 0:2.11.0-9.el7 will be updated ---> Package tuned.noarch 0:2.11.0-12.el7_9 will be an update ---> Package tzdata.noarch 0:2020a-1.el7 will be updated ---> Package tzdata.noarch 0:2024a-1.el7 will be an update ---> Package util-linux.x86_64 0:2.23.2-65.el7 will be updated ---> Package util-linux.x86_64 0:2.23.2-65.el7_9.1 will be an update ---> Package vim-minimal.x86_64 2:7.4.629-7.el7 will be updated ---> Package vim-minimal.x86_64 2:7.4.629-8.el7_9 will be an update ---> Package virt-what.x86_64 0:1.18-4.el7 will be updated ---> Package virt-what.x86_64 0:1.18-4.el7_9.1 will be an update ---> Package wpa_supplicant.x86_64 1:2.6-12.el7 will be updated ---> Package wpa_supplicant.x86_64 1:2.6-12.el7_9.2 will be an update ---> Package xmlsec1.x86_64 0:1.2.20-7.el7_4 will be updated ---> Package xmlsec1.x86_64 0:1.2.20-8.el7_9 will be an update ---> Package xmlsec1-openssl.x86_64 0:1.2.20-7.el7_4 will be updated ---> Package xmlsec1-openssl.x86_64 0:1.2.20-8.el7_9 will be an update ---> Package xz.x86_64 0:5.2.2-1.el7 will be updated ---> Package xz.x86_64 0:5.2.2-2.el7_9 will be an update ---> Package xz-libs.x86_64 0:5.2.2-1.el7 will be updated ---> Package xz-libs.x86_64 0:5.2.2-2.el7_9 will be an update ---> Package zlib.x86_64 0:1.2.7-18.el7 will be updated ---> Package zlib.x86_64 0:1.2.7-21.el7_9 will be an update --> Finished Dependency Resolution
Dependencies Resolved
========================================================================================================================================================================= Package Arch Version Repository Size =========================================================================================================================================================================Installing: kernel x86_64 3.10.0-1160.119.1.el7 updates 52 M Updating: NetworkManager x86_64 1:1.18.8-2.el7_9 updates 1.9 M NetworkManager-libnm x86_64 1:1.18.8-2.el7_9 updates 1.7 M NetworkManager-team x86_64 1:1.18.8-2.el7_9 updates 165 k NetworkManager-tui x86_64 1:1.18.8-2.el7_9 updates 329 k bash x86_64 4.2.46-35.el7_9 updates 1.0 M bind-export-libs x86_64 32:9.11.4-26.P2.el7_9.16 updates 1.1 M binutils x86_64 2.27-44.base.el7_9.1 updates 5.9 M ca-certificates noarch 2023.2.60_v7.0.306-72.el7_9 updates 923 k centos-release x86_64 7-9.2009.2.el7.centos updates 27 k coreutils x86_64 8.22-24.el7_9.2 updates 3.3 M cronie x86_64 1.4.11-25.el7_9 updates 92 k cronie-anacron x86_64 1.4.11-25.el7_9 updates 36 k cyrus-sasl-lib x86_64 2.1.26-24.el7_9 updates 156 k device-mapper x86_64 7:1.02.170-6.el7_9.5 updates 297 k device-mapper-event x86_64 7:1.02.170-6.el7_9.5 updates 192 k device-mapper-event-libs x86_64 7:1.02.170-6.el7_9.5 updates 192 k device-mapper-libs x86_64 7:1.02.170-6.el7_9.5 updates 325 k device-mapper-persistent-data x86_64 0.8.5-3.el7_9.2 updates 423 k dhclient x86_64 12:4.2.5-83.el7.centos.2 updates 286 k dhcp-common x86_64 12:4.2.5-83.el7.centos.2 updates 177 k dhcp-libs x86_64 12:4.2.5-83.el7.centos.2 updates 133 k diffutils x86_64 3.3-6.el7_9 updates 322 k dmidecode x86_64 1:3.2-5.el7_9.1 updates 82 k expat x86_64 2.1.0-15.el7_9 updates 83 k firewalld noarch 0.6.3-13.el7_9 updates 449 k firewalld-filesystem noarch 0.6.3-13.el7_9 updates 51 k freetype x86_64 2.8-14.el7_9.1 updates 380 k glib2 x86_64 2.56.1-9.el7_9 updates 2.5 M glibc x86_64 2.17-326.el7_9.3 updates 3.6 M glibc-common x86_64 2.17-326.el7_9.3 updates 12 M grub2 x86_64 1:2.02-0.87.0.2.el7.centos.14 updates 35 k grub2-common noarch 1:2.02-0.87.0.2.el7.centos.14 updates 733 k grub2-pc x86_64 1:2.02-0.87.0.2.el7.centos.14 updates 35 k grub2-pc-modules noarch 1:2.02-0.87.0.2.el7.centos.14 updates 861 k grub2-tools x86_64 1:2.02-0.87.0.2.el7.centos.14 updates 1.8 M grub2-tools-extra x86_64 1:2.02-0.87.0.2.el7.centos.14 updates 1.0 M grub2-tools-minimal x86_64 1:2.02-0.87.0.2.el7.centos.14 updates 178 k gzip x86_64 1.5-11.el7_9 updates 130 k initscripts x86_64 9.49.53-1.el7_9.1 updates 440 k iprutils x86_64 2.4.17.1-3.el7_7 updates 243 k iwl100-firmware noarch 39.31.5.1-83.el7_9 updates 156 k iwl1000-firmware noarch 1:39.31.5.1-83.el7_9 updates 215 k iwl105-firmware noarch 18.168.6.1-83.el7_9 updates 235 k iwl135-firmware noarch 18.168.6.1-83.el7_9 updates 243 k iwl2000-firmware noarch 18.168.6.1-83.el7_9 updates 237 k iwl2030-firmware noarch 18.168.6.1-83.el7_9 updates 246 k iwl3160-firmware noarch 25.30.13.0-83.el7_9 updates 1.5 M iwl3945-firmware noarch 15.32.2.9-83.el7_9 updates 97 k iwl4965-firmware noarch 228.61.2.24-83.el7_9 updates 110 k iwl5000-firmware noarch 8.83.5.1_1-83.el7_9 updates 290 k iwl5150-firmware noarch 8.24.2.2-83.el7_9 updates 152 k iwl6000-firmware noarch 9.221.4.1-83.el7_9 updates 172 k iwl6000g2a-firmware noarch 18.168.6.1-83.el7_9 updates 305 k iwl6000g2b-firmware noarch 18.168.6.1-83.el7_9 updates 305 k iwl6050-firmware noarch 41.28.5.1-83.el7_9 updates 242 k iwl7260-firmware noarch 25.30.13.0-83.el7_9 updates 14 M kbd x86_64 1.15.5-16.el7_9 updates 347 k kbd-legacy noarch 1.15.5-16.el7_9 updates 466 k kbd-misc noarch 1.15.5-16.el7_9 updates 1.4 M kernel-tools x86_64 3.10.0-1160.119.1.el7 updates 8.2 M kernel-tools-libs x86_64 3.10.0-1160.119.1.el7 updates 8.1 M kexec-tools x86_64 2.0.15-51.el7_9.3 updates 351 k kpartx x86_64 0.4.9-136.el7_9 updates 81 k krb5-libs x86_64 1.15.1-55.el7_9 updates 810 k less x86_64 458-10.el7_9 updates 120 k libblkid x86_64 2.23.2-65.el7_9.1 updates 183 k libcroco x86_64 0.6.12-6.el7_9 updates 105 k libmount x86_64 2.23.2-65.el7_9.1 updates 185 k libsmartcols x86_64 2.23.2-65.el7_9.1 updates 143 k libssh2 x86_64 1.8.0-4.el7_9.1 updates 88 k libuuid x86_64 2.23.2-65.el7_9.1 updates 84 k libxml2 x86_64 2.9.1-6.el7_9.6 updates 668 k linux-firmware noarch 20200421-83.git78c0348.el7_9 updates 80 M lvm2 x86_64 7:2.02.187-6.el7_9.5 updates 1.3 M lvm2-libs x86_64 7:2.02.187-6.el7_9.5 updates 1.1 M microcode_ctl x86_64 2:2.1-73.20.el7_9 updates 6.8 M nspr x86_64 4.35.0-1.el7_9 updates 128 k nss x86_64 3.90.0-2.el7_9 updates 905 k nss-pem x86_64 1.0.3-7.el7_9.1 updates 75 k nss-softokn x86_64 3.90.0-6.el7_9 updates 383 k nss-softokn-freebl x86_64 3.90.0-6.el7_9 updates 321 k nss-sysinit x86_64 3.90.0-2.el7_9 updates 67 k nss-tools x86_64 3.90.0-2.el7_9 updates 557 k nss-util x86_64 3.90.0-1.el7_9 updates 80 k open-vm-tools x86_64 11.0.5-3.el7_9.9 updates 680 k openldap x86_64 2.4.44-25.el7_9 updates 356 k openssh x86_64 7.4p1-23.el7_9 updates 510 k openssh-clients x86_64 7.4p1-23.el7_9 updates 655 k openssh-server x86_64 7.4p1-23.el7_9 updates 459 k openssl x86_64 1:1.0.2k-26.el7_9 updates 494 k openssl-libs x86_64 1:1.0.2k-26.el7_9 updates 1.2 M polkit x86_64 0.112-26.el7_9.1 updates 170 k python-firewall noarch 0.6.3-13.el7_9 updates 355 k python-perf x86_64 3.10.0-1160.119.1.el7 updates 8.2 M rpm x86_64 4.11.3-48.el7_9 updates 1.2 M rpm-build-libs x86_64 4.11.3-48.el7_9 updates 108 k rpm-libs x86_64 4.11.3-48.el7_9 updates 279 k rpm-python x86_64 4.11.3-48.el7_9 updates 84 k rsyslog x86_64 8.24.0-57.el7_9.3 updates 622 k selinux-policy noarch 3.13.1-268.el7_9.2 updates 498 k selinux-policy-targeted noarch 3.13.1-268.el7_9.2 updates 7.0 M sudo x86_64 1.8.23-10.el7_9.3 updates 844 k systemd x86_64 219-78.el7_9.9 updates 5.1 M systemd-libs x86_64 219-78.el7_9.9 updates 419 k systemd-sysv x86_64 219-78.el7_9.9 updates 98 k tuned noarch 2.11.0-12.el7_9 updates 270 k tzdata noarch 2024a-1.el7 updates 497 k util-linux x86_64 2.23.2-65.el7_9.1 updates 2.0 M vim-minimal x86_64 2:7.4.629-8.el7_9 updates 443 k virt-what x86_64 1.18-4.el7_9.1 updates 30 k wpa_supplicant x86_64 1:2.6-12.el7_9.2 updates 1.2 M xmlsec1 x86_64 1.2.20-8.el7_9 updates 177 k xmlsec1-openssl x86_64 1.2.20-8.el7_9 updates 76 k xz x86_64 5.2.2-2.el7_9 updates 229 k xz-libs x86_64 5.2.2-2.el7_9 updates 103 k zlib x86_64 1.2.7-21.el7_9 updates 90 k
[root@centos7 ~]# yum search httpd Loaded plugins: fastestmirror Loading mirror speeds from cached hostfile * base: mirrors.aliyun.com * extras: mirrors.aliyun.com * updates: mirrors.aliyun.com ========================================================================== N/S matched: httpd ===========================================================================dmlite-apache-httpd.x86_64 : Apache HTTPD frontend for dmlite iipsrv-httpd-fcgi.noarch : Apache HTTPD files for iipsrv keycloak-httpd-client-install.noarch : Tools to configure Apache HTTPD as Keycloak client libmicrohttpd-devel.i686 : Development files for libmicrohttpd libmicrohttpd-devel.x86_64 : Development files for libmicrohttpd libmicrohttpd-doc.noarch : Documentation for libmicrohttpd lighttpd-fastcgi.x86_64 : FastCGI module and spawning helper for lighttpd and PHP configuration lighttpd-mod_authn_gssapi.x86_64 : Authentication module for lighttpd that uses GSSAPI lighttpd-mod_authn_mysql.x86_64 : Authentication module for lighttpd that uses a MySQL database lighttpd-mod_authn_pam.x86_64 : Authentication module for lighttpd that uses PAM lighttpd-mod_geoip.x86_64 : GeoIP module for lighttpd to use for location lookups lighttpd-mod_mysql_vhost.x86_64 : Virtual host module for lighttpd that uses a MySQL database pagure-web-apache-httpd.noarch : Apache HTTPD configuration for Pagure python2-keycloak-httpd-client-install.noarch : Tools to configure Apache HTTPD as Keycloak client radicale-httpd.noarch : httpd config for Radicale sympa-lighttpd.x86_64 : Sympa with lighttpd darkhttpd.x86_64 : A secure, lightweight, fast, single-threaded HTTP/1.1 server httpd.x86_64 : Apache HTTP Server httpd-devel.x86_64 : Development interfaces for the Apache HTTP server httpd-itk.x86_64 : MPM Itk for Apache HTTP Server httpd-manual.noarch : Documentation for the Apache HTTP server httpd-tools.x86_64 : Tools for use with the Apache HTTP Server libmicrohttpd.i686 : Lightweight library for embedding a webserver in applications libmicrohttpd.x86_64 : Lightweight library for embedding a webserver in applications lighttpd.x86_64 : Lightning fast webserver with light system requirements mirmon-httpd.noarch : Apache configuration for mirmon mod_auth_mellon.x86_64 : A SAML 2.0 authentication module for the Apache Httpd Server mod_dav_svn.x86_64 : Apache httpd module for Subversion server opensips-httpd.x86_64 : HTTP transport layer implementation perl-Test-Fake-HTTPD.noarch : Fake HTTP server module for testing python2-sphinxcontrib-httpdomain.noarch : Sphinx domain for documenting HTTP APIs sympa-httpd.x86_64 : Sympa with Apache HTTP Server sysusage-httpd.noarch : Apache configuration for sysusage thttpd.x86_64 : A tiny, turbo, throttleable lightweight HTTP server viewvc-httpd-fcgi.noarch : ViewVC configuration for Apache/mod_fcgid viewvc-httpd-wsgi.noarch : ViewVC configuration for Apache/mod_wsgi web-assets-httpd.noarch : Web Assets aliases for the Apache HTTP daemon
Name and summary matches only, use "search all"for everything. [root@centos7 ~]#