Linux文件管理

整理笔记,一边学习,加油!

一、基本概念

1.1 Linux文件结构介绍

Linux一切皆文件。

Linux文件结构

这是一张Linux文件解构示意图,Linux系统下,所有的文件都会挂载到 / 目录下。

每个文件夹的作用

  • bin 存放二进制命令
  • boot 系统启动相关的文件
  • dev 设备相关的文件,例如 硬盘、U盘等
  • etc 配置类文件
  • home 普通用户的家目录
  • root 超级管理员的家目录
  • run 程序运行时的文件
  • sbin 超级管理员相关的二进制命令
  • tmp 临时目录,任何人都可使用
  • usr 软件安装的目录,类似于windows 上的 program files
  • proc 内存的映射,是一个虚拟目录
  • mnt 挂载目录,一般挂载到这里
  • opt 常用于安装第三方应用程序
  • ……

1.2 路径

1.2.1 家目录

每个用户登录后都会有自己的家目录,作为自己的工作目录。例如 alice 用户的家目录是 /home/alice

1.2.2 上一级目录

Linux下使用 .. 来代表上一级目录

1.2.3 当前目录

Linux下使用 . 来代表当前目录

1.2.4 绝对路径

从根目录 / 开始写的目录,例如 alice 用户的家目录的绝对路径是 /home/alice

1.2.5 相对路径

假如当前的工作目录在/home/bob 目录下,那么 alice 的家目录的绝对路径是 ../alice

二、ls-pwd-cd

最基础的命令。

2.1 ls

list 的缩写。查看文件、文件夹信息的一个命令。不加参数的话,默认是查看当前目录的目录。

1
ls
1
2
3
[root@centos7 ~]# ls
1.TXT anaconda-ks.cfg init.sh nginx-1.12.2-2.el7.x86_64.rpm telnet-0.17-66.el7.x86_64.rpm
[root@centos7 ~]#
  • -a 可以查看隐藏目录

  • -l 长信息显示文件、目录的信息

  • -h 以人类容易理解的方式显示文件大小,而不是字节

  • -i 查看文件的 inode 号码

  • -S 以文件的大小排序,从大到小

  • -r 逆序输出

  • -t 以修改时间排序,最近修改的在前

  • -d 查看目录的信息,而不是里面的文件

1
2
3
4
5
6
7
8
9
10
11
12
13
14
15
16
17
18
19
20
21
22
23
24
25
26
27
28
29
30
31
32
33
34
35
36
37
38
39
40
41
42
43
44
45
46
47
48
49
50
51
52
53
54
55
56
57
58
59
60
61
62
63
64
65
66
67
68
69
70
71
72
73
74
75
76
77
78
79
80
81
82
# -a参数
[root@centos7 ~]# ls -a
. anaconda-ks.cfg .bash_profile init.sh .tcshrc
.. .bash_history .bashrc nginx-1.12.2-2.el7.x86_64.rpm telnet-0.17-66.el7.x86_64.rpm
1.TXT .bash_logout .cshrc .pki .viminfo
[root@centos7 ~]#

# -l参数,一般会设置一个别名 alias ll='ls -l --color=auto'
[root@centos7 ~]# ls -l
total 612
-rw-r--r-- 1 root root 584 Oct 3 18:12 1.TXT
-rw-------. 1 root root 1492 Sep 28 16:07 anaconda-ks.cfg
-rw-r--r--. 1 root root 575 Sep 28 16:12 init.sh
-rw-r--r-- 1 root root 543132 Jan 18 2021 nginx-1.12.2-2.el7.x86_64.rpm
-rw-r--r-- 1 root root 65932 Nov 18 2020 telnet-0.17-66.el7.x86_64.rpm
[root@centos7 ~]#

# -h 参数,显式的查看文件大小
[root@centos7 ~]# ls -lh
total 612K
-rw-r--r-- 1 root root 584 Oct 3 18:12 1.TXT
-rw-------. 1 root root 1.5K Sep 28 16:07 anaconda-ks.cfg
-rw-r--r--. 1 root root 575 Sep 28 16:12 init.sh
-rw-r--r-- 1 root root 531K Jan 18 2021 nginx-1.12.2-2.el7.x86_64.rpm
-rw-r--r-- 1 root root 65K Nov 18 2020 telnet-0.17-66.el7.x86_64.rpm
[root@centos7 ~]#

# -i,查看inode号码
[root@centos7 ~]# ls -il
total 612
67200514 -rw-r--r-- 1 root root 584 Oct 3 18:12 1.TXT
67146820 -rw-------. 1 root root 1492 Sep 28 16:07 anaconda-ks.cfg
67146828 -rw-r--r--. 1 root root 575 Sep 28 16:12 init.sh
67193653 -rw-r--r-- 1 root root 543132 Jan 18 2021 nginx-1.12.2-2.el7.x86_64.rpm
67193656 -rw-r--r-- 1 root root 65932 Nov 18 2020 telnet-0.17-66.el7.x86_64.rpm
[root@centos7 ~]#

# -S 以文件大小排序,从大到小
[root@centos7 ~]# ls -Sl
total 612
-rw-r--r-- 1 root root 543132 Jan 18 2021 nginx-1.12.2-2.el7.x86_64.rpm
-rw-r--r-- 1 root root 65932 Nov 18 2020 telnet-0.17-66.el7.x86_64.rpm
-rw-------. 1 root root 1492 Sep 28 16:07 anaconda-ks.cfg
-rw-r--r-- 1 root root 584 Oct 3 18:12 1.TXT
-rw-r--r--. 1 root root 575 Sep 28 16:12 init.sh
[root@centos7 ~]#

# -r 逆序输出,从小到大
[root@centos7 ~]# ls -Slr
total 612
-rw-r--r--. 1 root root 575 Sep 28 16:12 init.sh
-rw-r--r-- 1 root root 584 Oct 3 18:12 1.TXT
-rw-------. 1 root root 1492 Sep 28 16:07 anaconda-ks.cfg
-rw-r--r-- 1 root root 65932 Nov 18 2020 telnet-0.17-66.el7.x86_64.rpm
-rw-r--r-- 1 root root 543132 Jan 18 2021 nginx-1.12.2-2.el7.x86_64.rpm
[root@centos7 ~]#

# -t 最近修改时间排序
[root@centos7 ~]# ls -tl
total 612
-rw-r--r-- 1 root root 584 Oct 3 18:12 1.TXT
-rw-r--r--. 1 root root 575 Sep 28 16:12 init.sh
-rw-------. 1 root root 1492 Sep 28 16:07 anaconda-ks.cfg
-rw-r--r-- 1 root root 543132 Jan 18 2021 nginx-1.12.2-2.el7.x86_64.rpm
-rw-r--r-- 1 root root 65932 Nov 18 2020 telnet-0.17-66.el7.x86_64.rpm
[root@centos7 ~]#


# 查看目录的信息
[root@centos7 ~]# ls -ld
dr-xr-x---. 3 root root 265 Oct 3 18:12 .
[root@centos7 ~]#

# 显示长时间格式的文件列表
[root@centos7 ~]# ls -l --time-style=long-iso
total 544
-rw------- 1 root root 1492 2025-09-28 16:07 anaconda-ks.cfg
drwxr-xr-x 2 root root 38 2025-10-05 14:04 dir1
-rw-r--r-- 1 root root 575 2025-10-05 13:38 init.sh
-rw-r--r-- 1 root root 543132 2021-01-18 21:09 nginx.rpm
-rw------- 1 root root 3471 2025-10-04 22:59 sshd_config
[root@centos7 ~]#

2.2 pwd

print work directory 的缩写,输出当前所在的工作目录。

1
pwd
1
2
3
[root@centos7 ~]# pwd
/root
[root@centos7 ~]#

2.3 cd

change directory 的缩写,改变工作目录。不加参数,默认回到家目录。

1
cd 目标目录

~ 家目录

- 上一次的工作目录

. 代表当前目录

.. 代表上一级目录

1
2
3
4
5
6
7
8
9
10
11
12
13
14
15
16
17
18
19
20
21
22
23
24
25
26
27
28
29
30
31
32
33
34
35
36
# 切换到家目录
[root@centos7 ~]# cd
[root@centos7 ~]# pwd
/root
[root@centos7 ~]#

# 切换到根目录
[root@centos7 ~]# cd /
[root@centos7 /]# pwd
/
[root@centos7 /]#

# 切换到家目录
[root@centos7 /]# cd ~
[root@centos7 ~]# pwd
/root
[root@centos7 ~]#

# 切换到当前目录(无效果)
[root@centos7 ~]# cd .
[root@centos7 ~]# pwd
/root
[root@centos7 ~]#

# 切换到上一级目录
[root@centos7 ~]# cd ..
[root@centos7 /]# pwd
/
[root@centos7 /]#

# 切换到上次的工作目录
root@centos7 /]# cd -
/root
[root@centos7 ~]# pwd
/root
[root@centos7 ~]#

三、touch-mkdir-rmdir-rm

创建和删除

3.1 touch

创建文件的命令。

1
touch 文件名
  • 文件不存在的话,会创建新文件;

  • 文件存在的话,会刷新文件的访问时间atime

1
2
3
4
5
6
7
8
9
10
11
12
13
14
15
16
17
18
# 创建1.txt文件
[root@centos7 ~]# touch 1.txt
[root@centos7 ~]# ls -l 1.txt
-rw-r--r-- 1 root root 0 Oct 4 12:49 1.txt
[root@centos7 ~]#

# 创建多个文件,法一
[root@centos7 ~]# touch file{20..29}.txt
[root@centos7 ~]# ls file2*
file20.txt file22.txt file24.txt file26.txt file28.txt
file21.txt file23.txt file25.txt file27.txt file29.txt
[root@centos7 ~]#

# 创建多个文件,法二
[root@centos7 ~]# touch file{30,31}.txt
[root@centos7 ~]# ls file3*
file30.txt file31.txt
[root@centos7 ~]#
  • {1..10} 代表1-10
  • {1,2,3} 代表 1,2,3

这种形式的命令,会展开后作为参数传递给命令。

3.2 mkdir

make directory 的缩写,创建一个文件夹。

1
mkdir 文件夹
  • -p 递归创建,默认不能创建多级文件夹。
1
2
3
4
5
6
7
8
9
10
11
12
13
14
15
16
17
# 创建文件夹
[root@centos7 ~]# mkdir dir1
[root@centos7 ~]# ls
anaconda-ks.cfg dir1 init.sh nginx-1.12.2-2.el7.x86_64.rpm telnet-0.17-66.el7.x86_64.rpm
[root@centos7 ~]#

# 默认不能创建多级目录
[root@centos7 ~]# mkdir dir2/dir2/dir2
mkdir: cannot create directory ‘dir2/dir2/dir2’: No such file or directory
[root@centos7 ~]#

# -p,创建多级文件夹
[root@centos7 ~]# mkdir dir2/dir2/dir2 -p
[root@centos7 ~]# ls dir2/dir2/ -l
total 0
drwxr-xr-x 2 root root 6 Oct 4 12:59 dir2
[root@centos7 ~]#

3.3 rmdir

remove directory 的缩写,删除空文件夹。

1
rmdir 待删除的文件夹
1
2
3
4
5
6
# 删除dir1
[root@centos7 ~]# ls -l |grep dir1
drwxr-xr-x 2 root root 6 Oct 4 12:57 dir1
[root@centos7 ~]# rmdir dir1
[root@centos7 ~]# ls -l |grep dir1
[root@centos7 ~]#

3.4 rm

remove 的缩写,用于删除文件、文件夹。

1
rm 待删除的文件
  • -r 递归删除。一般作用域文件夹。
  • -f 强制删除,不提示。默认删除每个文件都需要输入y 确认。
1
2
3
4
5
6
7
# 删除文件夹、文件
[root@centos7 ~]# ls
anaconda-ks.cfg dir2 init.sh nginx-1.12.2-2.el7.x86_64.rpm telnet-0.17-66.el7.x86_64.rpm
[root@centos7 ~]# rm -rf dir2/
[root@centos7 ~]# ls
anaconda-ks.cfg init.sh nginx-1.12.2-2.el7.x86_64.rpm telnet-0.17-66.el7.x86_64.rpm
[root@centos7 ~]#

四、mv-cp

移动哈拷贝。

4.1 mv

move 的缩写。移动文件、文件夹的命令。

1
move 文件源路径 文件目的路径

如果源路径、目的路径在同一个目录下,那就是重命名的效果。

1
2
3
4
5
6
7
8
9
10
11
12
13
14
15
16
17
18
19
20
21
22
23
# 重命名nginx.rpm
[root@centos7 ~]# ls
anaconda-ks.cfg init.sh nginx-1.12.2-2.el7.x86_64.rpm telnet-0.17-66.el7.x86_64.rpm
[root@centos7 ~]# mv nginx-1.12.2-2.el7.x86_64.rpm nginx.rpm
[root@centos7 ~]# ls
anaconda-ks.cfg init.sh nginx.rpm telnet-0.17-66.el7.x86_64.rpm
[root@centos7 ~]#

# 移动telnet.rpm 到tmp目录
[root@centos7 ~]# ls
anaconda-ks.cfg init.sh nginx.rpm telnet-0.17-66.el7.x86_64.rpm
[root@centos7 ~]# mv telnet-0.17-66.el7.x86_64.rpm /tmp
[root@centos7 ~]# ls /tmp .
.:
anaconda-ks.cfg init.sh nginx.rpm

/tmp:
ks-script-0vwe6q vmware-root_699-3979839557 yum_save_tx.2025-10-03.17-33.25eehG.yumtx
telnet-0.17-66.el7.x86_64.rpm yum.log yum_save_tx.2025-10-03.17-36.i6P5K9.yumtx
vmware-root_667-3980363901 yum_save_tx.2025-09-28.16-19.CJz_n2.yumtx yum_save_tx.2025-10-03.17-37.JJW2AO.yumtx
vmware-root_673-3988556249 yum_save_tx.2025-10-03.17-29._CS0XL.yumtx yum_save_tx.2025-10-03.17-39.wN2qC0.yumtx
vmware-root_680-2689143817 yum_save_tx.2025-10-03.17-31.MI7XeH.yumtx
[root@centos7 ~]#

4.2 cp

copy 的缩写。复制文件或文件夹。目的必须是路径。

1
cp 文件源路径 文件目的路径
  • -r 递归复制,用于复制文件夹。
1
2
3
4
5
6
7
8
9
10
11
12
13
14
15
16
17
18
19
20
21
22
23
24
25
26
27
28
29
30
31
32
33
34
35
36
37
38
39
40
41
[root@centos7 ~]# ls . /tmp -l
.:
total 540
-rw-------. 1 root root 1492 Sep 28 16:07 anaconda-ks.cfg
drwxr-xr-x 2 root root 19 Oct 4 13:20 dir1
-rw-r--r--. 1 root root 575 Sep 28 16:12 init.sh
-rw-r--r-- 1 root root 543132 Jan 18 2021 nginx.rpm

/tmp:
total 0

# 复制文件
[root@centos7 ~]# cp nginx.rpm /tmp/
[root@centos7 ~]# ls . /tmp -l
.:
total 540
-rw-------. 1 root root 1492 Sep 28 16:07 anaconda-ks.cfg
drwxr-xr-x 2 root root 19 Oct 4 13:20 dir1
-rw-r--r--. 1 root root 575 Sep 28 16:12 init.sh
-rw-r--r-- 1 root root 543132 Jan 18 2021 nginx.rpm

/tmp:
total 532
-rw-r--r-- 1 root root 543132 Oct 4 13:20 nginx.rpm
[root@centos7 ~]#

# 复制文件夹。
[root@centos7 ~]# cp -r dir1/ /tmp/
[root@centos7 ~]# ls . /tmp -l
.:
total 540
-rw-------. 1 root root 1492 Sep 28 16:07 anaconda-ks.cfg
drwxr-xr-x 2 root root 19 Oct 4 13:20 dir1
-rw-r--r--. 1 root root 575 Sep 28 16:12 init.sh
-rw-r--r-- 1 root root 543132 Jan 18 2021 nginx.rpm

/tmp:
total 532
drwxr-xr-x 2 root root 19 Oct 4 13:21 dir1
-rw-r--r-- 1 root root 543132 Oct 4 13:20 nginx.rpm
[root@centos7 ~]#

五、cat-head-tail-more-less

5.1 cat

查看文本文件。

1
cat 文件名
  • -n 显示行号
1
2
3
4
5
6
7
8
9
10
11
12
13
14
15
16
17
18
19
20
21
22
23
24
25
26
27
28
29
30
31
32
33
34
35
36
37
38
39
40
41
42
43
44
45
46
47
48
49
50
51
52
53
54
55
56
57
58
59
60
61
62
63
64
65
66
67
68
69
70
71
72
73
74
75
# 查看/etc/passwd
[root@centos7 ~]# cat /etc/passwd
root:x:0:0:root:/root:/bin/bash
bin:x:1:1:bin:/bin:/sbin/nologin
daemon:x:2:2:daemon:/sbin:/sbin/nologin
adm:x:3:4:adm:/var/adm:/sbin/nologin
lp:x:4:7:lp:/var/spool/lpd:/sbin/nologin
sync:x:5:0:sync:/sbin:/bin/sync
shutdown:x:6:0:shutdown:/sbin:/sbin/shutdown
halt:x:7:0:halt:/sbin:/sbin/halt
mail:x:8:12:mail:/var/spool/mail:/sbin/nologin
operator:x:11:0:operator:/root:/sbin/nologin
games:x:12:100:games:/usr/games:/sbin/nologin
ftp:x:14:50:FTP User:/var/ftp:/sbin/nologin
nobody:x:99:99:Nobody:/:/sbin/nologin
systemd-network:x:192:192:systemd Network Management:/:/sbin/nologin
dbus:x:81:81:System message bus:/:/sbin/nologin
polkitd:x:999:998:User for polkitd:/:/sbin/nologin
sshd:x:74:74:Privilege-separated SSH:/var/empty/sshd:/sbin/nologin
postfix:x:89:89::/var/spool/postfix:/sbin/nologin
qiankong:x:1000:1000:qiankong:/home/qiankong:/bin/bash
yangge:x:1001:1001::/home/yangge:/bin/bash
rpc:x:32:32:Rpcbind Daemon:/var/lib/rpcbind:/sbin/nologin
rpcuser:x:29:29:RPC Service User:/var/lib/nfs:/sbin/nologin
nfsnobody:x:65534:65534:Anonymous NFS User:/var/lib/nfs:/sbin/nologin
apache:x:48:48:Apache:/usr/share/httpd:/sbin/nologin
[root@centos7 ~]#

# 查看文件的同时,显示行号
[root@centos7 ~]# cat -n /etc/passwd
1 root:x:0:0:root:/root:/bin/bash
2 bin:x:1:1:bin:/bin:/sbin/nologin
3 daemon:x:2:2:daemon:/sbin:/sbin/nologin
4 adm:x:3:4:adm:/var/adm:/sbin/nologin
5 lp:x:4:7:lp:/var/spool/lpd:/sbin/nologin
6 sync:x:5:0:sync:/sbin:/bin/sync
7 shutdown:x:6:0:shutdown:/sbin:/sbin/shutdown
8 halt:x:7:0:halt:/sbin:/sbin/halt
9 mail:x:8:12:mail:/var/spool/mail:/sbin/nologin
10 operator:x:11:0:operator:/root:/sbin/nologin
11 games:x:12:100:games:/usr/games:/sbin/nologin
12 ftp:x:14:50:FTP User:/var/ftp:/sbin/nologin
13 nobody:x:99:99:Nobody:/:/sbin/nologin
14 systemd-network:x:192:192:systemd Network Management:/:/sbin/nologin
15 dbus:x:81:81:System message bus:/:/sbin/nologin
16 polkitd:x:999:998:User for polkitd:/:/sbin/nologin
17 sshd:x:74:74:Privilege-separated SSH:/var/empty/sshd:/sbin/nologin
18 postfix:x:89:89::/var/spool/postfix:/sbin/nologin
19 qiankong:x:1000:1000:qiankong:/home/qiankong:/bin/bash
20 yangge:x:1001:1001::/home/yangge:/bin/bash
21 rpc:x:32:32:Rpcbind Daemon:/var/lib/rpcbind:/sbin/nologin
22 rpcuser:x:29:29:RPC Service User:/var/lib/nfs:/sbin/nologin
23 nfsnobody:x:65534:65534:Anonymous NFS User:/var/lib/nfs:/sbin/nologin
24 apache:x:48:48:Apache:/usr/share/httpd:/sbin/nologin
[root@centos7 ~]#

5.2 head

查看文本文件的的头信息。

1
head 文本文件
  • -n 可以指定查看多少行。默认是10
1
2
3
4
5
6
7
8
9
10
11
12
13
14
15
16
17
18
19
20
21
22
# 查看/etc/passwd 的前10行
[root@centos7 ~]# head /etc/passwd
root:x:0:0:root:/root:/bin/bash
bin:x:1:1:bin:/bin:/sbin/nologin
daemon:x:2:2:daemon:/sbin:/sbin/nologin
adm:x:3:4:adm:/var/adm:/sbin/nologin
lp:x:4:7:lp:/var/spool/lpd:/sbin/nologin
sync:x:5:0:sync:/sbin:/bin/sync
shutdown:x:6:0:shutdown:/sbin:/sbin/shutdown
halt:x:7:0:halt:/sbin:/sbin/halt
mail:x:8:12:mail:/var/spool/mail:/sbin/nologin
operator:x:11:0:operator:/root:/sbin/nologin
[root@centos7 ~]#

# 查看文件的前5行
[root@centos7 ~]# head /etc/passwd -n5
root:x:0:0:root:/root:/bin/bash
bin:x:1:1:bin:/bin:/sbin/nologin
daemon:x:2:2:daemon:/sbin:/sbin/nologin
adm:x:3:4:adm:/var/adm:/sbin/nologin
lp:x:4:7:lp:/var/spool/lpd:/sbin/nologin
[root@centos7 ~]#

5.3 tail

查看文本文件最后几行。

1
tail 文本文件
  • -n 执行查看几行。默认是10
  • -f 实时查看。一般常用于最新的日志。
1
2
3
4
5
6
7
8
9
10
11
12
13
14
15
16
17
18
19
20
21
22
23
24
25
26
27
28
29
30
# 查看/var/log/secure的最后10行
[root@centos7 ~]# tail /var/log/secure
Oct 3 17:21:15 centos7 groupadd[1949]: new group: name=apache, GID=48
Oct 3 17:21:15 centos7 useradd[1953]: new user: name=apache, UID=48, GID=48, home=/usr/share/httpd, shell=/sbin/nologin
Oct 3 17:33:46 centos7 useradd[2009]: failed adding user 'apache', exit code: 9
Oct 3 18:35:35 centos7 sshd[1373]: pam_unix(sshd:session): session closed for user root
Oct 4 12:19:01 centos7 sshd[2228]: Accepted password for root from 192.168.10.1 port 5763 ssh2
Oct 4 12:19:01 centos7 sshd[2228]: pam_unix(sshd:session): session opened for user root by (uid=0)
Oct 4 12:19:02 centos7 sshd[2231]: Accepted password for root from 192.168.10.1 port 5766 ssh2
Oct 4 12:19:02 centos7 sshd[2231]: pam_unix(sshd:session): session opened for user root by (uid=0)
Oct 4 12:24:37 centos7 sshd[4226]: Accepted password for root from 192.168.10.1 port 7334 ssh2
Oct 4 12:24:37 centos7 sshd[4226]: pam_unix(sshd:session): session opened for user root by (uid=0)
[root@centos7 ~]#

# 查看/var/log/secure的最后三行
[root@centos7 ~]# tail -n3 /var/log/secure
Oct 4 12:19:02 centos7 sshd[2231]: pam_unix(sshd:session): session opened for user root by (uid=0)
Oct 4 12:24:37 centos7 sshd[4226]: Accepted password for root from 192.168.10.1 port 7334 ssh2
Oct 4 12:24:37 centos7 sshd[4226]: pam_unix(sshd:session): session opened for user root by (uid=0)
[root@centos7 ~]#

# 查看最新的日志,空格后是最新的日志
[root@centos7 ~]# tail -f /var/log/secure -n1
Oct 4 12:24:37 centos7 sshd[4226]: pam_unix(sshd:session): session opened for user root by (uid=0)


Oct 4 13:30:25 centos7 sshd[28013]: Accepted password for root from 192.168.10.1 port 13653 ssh2
Oct 4 13:30:25 centos7 sshd[28013]: pam_unix(sshd:session): session opened for user root by (uid=0)
Oct 4 13:30:26 centos7 sshd[28018]: Accepted password for root from 192.168.10.1 port 13654 ssh2
Oct 4 13:30:26 centos7 sshd[28018]: pam_unix(sshd:session): session opened for user root by (uid=0)

5.4 more

分页查看文本文件,查看大文件时可以一页一页查看。

1
more 文件名
  • space 空格,向下翻一页。
  • enter 回车键,向下翻一行。
  • q 退出查看

5.5 less

more的升级版,功能更加强大,可以向上翻页。

1
less 文件名
  • space 空格,向下翻一页。
  • enter 回车键,向下翻一行。
  • q 退出查看
  • b 向上翻一页
  • y 向上翻一行
  • -N 显示行号,这个参数必须在文件名前。
  • g 回到文件开始
  • G 切到文件末尾
  • / 向下搜索
  • ? 向上搜索
  • n 下一个搜索结果
  • N 上一个搜索结果

愈发觉得这些快捷键都是通用的,和vim 一模一样。

六、bash快捷键

有一些好用的快捷键,有些已经内化了,有些还没有。

  • Ctrl + a 移动光标到行首
  • Ctrl + e 移动光标到行尾
  • Ctrl + r 搜索历史命令
  • Ctrl + u 从光标位置删到行首
  • Ctrl + k 从光标位置删到行尾
  • Esc + . 快速输入上一条命令的最后的参数

七、封面图

封面图

部署jupyter服务

喜欢使用docker compose部署。部署时遇到了一点小波折。

一、环境介绍

docker compose 部署 jupyter 后,映射出一个端口,然后 nginx 反向代理后,直接通过域名访问。并且也套了 CloudFlare 的 CDN。

二、docker-compose配置

记得换自己的域名,换一个token。

1
2
3
4
5
6
7
8
9
10
11
12
13
14
15
16
17
18
19
20
21
22
23
24
25
26
version: '3'

services:
jupyter:
image: jupyter/scipy-notebook:latest
container_name: jupyter-lab
restart: always
ports:
- "3086:8888" # 映射到主机 3086 端口
volumes:
- ./data:/home/jovyan/work
environment:
- NB_UID=1000
- NB_GID=100
- CHOWN_HOME=yes
- CHOWN_HOME_OPTS='-R'
- JUPYTER_ENABLE_LAB=yes
- JUPYTER_TOKEN=dhaslkdsahdjshadgashdaioazxhasdisad # 【重要】请修改为一个更安全的密码

# --- 【关键修复】 ---
# 覆盖默认命令,告诉 Jupyter 信任来自你的域名的请求
# 这对于防止 WebSocket 因 Origin 检查失败而导致的“白板”至关重要
command: >
start-notebook.sh
--NotebookApp.allow_origin='https://python.bravexist.cn'
--NotebookApp.allow_origin_pat='https://python\\.bravexist\\.cn'

三、nginx反向代理配置

1
2
3
4
5
6
7
8
9
10
11
12
13
14
15
16
17
18
19
20
21
22
23
24
25
26
27
28
29
location / {
# 代理到你在 docker-compose.yml 中设置的主机端口 3086
proxy_pass http://127.0.0.1:3086;

# ----------------------------------------------------
# --- 【核心】WebSocket 代理所需配置 ---
# ----------------------------------------------------
# 1. 声明使用 HTTP 1.1 (WebSocket 必须)
proxy_http_version 1.1;
# 2. 传递 Upgrade 请求头 (告诉后端“我想升级到WebSocket”)
proxy_set_header Upgrade $http_upgrade;
# 3. 传递 Connection 请求头 (告诉后端“升级连接”)
proxy_set_header Connection "upgrade";
# --- WebSocket 配置结束 ---


# --- 推荐的额外代理请求头 ---
# 告诉后端 Jupyter 真实的 Host
proxy_set_header Host $host;
# 传递客户端真实 IP
proxy_set_header X-Real-IP $remote_addr;
proxy_set_header X-Forwarded-For $proxy_add_x_forwarded_for;
# 告诉后端 Jupyter 是通过 https 访问的
proxy_set_header X-Forwarded-Proto $scheme;

# 延长超时时间,防止内核长时间运行被 Nginx 断开
proxy_read_timeout 86400s;
proxy_send_timeout 86400s;
}

四、问题

4.1 问题一

问题描述

可以输入密码,正确的话就会进去,但是是白板,查看网络请求,发现有内容。

解决方案

关闭CloudflareRocket Loader 功能。

1
域名 ---> 速度 ---> 设置 ---> 内容优化 ---> Rocket Loader™(一定要关闭)

4.2 问题二

问题描述

没有权限创建新文件。

解决方案

修改映射的 data 目录

1
chown -R 1000.1000 data

五、封面图

封面图

MySQL数据库安装

着重安装、基础SQL语句操作。

一、介绍

MySQL是一款开源的关系型数据库,应用非常广泛。自从被Oracle收购,有闭源风险,所有有MariaDB 作为社区分支。

二、CentOS7安装MySQL5.7

有多种安装方式,源码安装、配置YUM 源安装。这里以mysql 5.7 为例。

2.1 源码编译安装

1
hostnamectl set-hostname source-mysql

2.1.1 安装前准备

  1. 关闭防火墙
1
2
systemctl stop firewalld
systemctl disable firewalld
  1. 关闭SELinux
1
2
setenforce 0
sed -i 's/^SELINUX=*/SELINUX=disable/g' /etc/selinux/config
  1. 配置yum
1
yum repolist
  1. 清理之前的环境
  • 清理之前的mysql
1
yum -y remove mariadb mariadb-server mariadb-libs mariadb-devel
  • 删除mysql用户
1
userdel -r mysql
  • 删除myqsl 相关目录
1
2
rm -rf /var/lib/mysql
rm -rf /etc/my*
  1. 创建mysql用户
1
useradd -r mysql -M -s /bin/false

2.1.2 下载安装

  1. 安装编译工具
1
yum -y install ncurses ncurses-devel openssl-devel bison gcc gcc-c++ make cmake
  1. 下载源码包
1
wget https://dev.mysql.com/get/Downloads/MySQL-5.7/mysql-boost-5.7.27.tar.gz
  1. 解压
1
tar xf mysql-boost-5.7.27.tar.gz
  1. 编译安装前检查,及参数设置
1
2
3
4
5
6
7
8
9
10
11
12
13
14
15
16
17
18
19
cd  mysql-5.7.27

cmake . \
-DWITH_BOOST=boost/boost_1_59_0/ \
-DCMAKE_INSTALL_PREFIX=/usr/local/mysql \
-DSYSCONFDIR=/etc \
-DMYSQL_DATADIR=/usr/local/mysql/data \
-DPID_FILE=/usr/local/mysql/data/mysqld.pid \
-DINSTALL_MANDIR=/usr/share/man \
-DMYSQL_TCP_PORT=3306 \
-DMYSQL_UNIX_ADDR=/tmp/mysql.sock \
-DDEFAULT_CHARSET=utf8 \
-DEXTRA_CHARSETS=all \
-DDEFAULT_COLLATION=utf8_general_ci \
-DWITH_READLINE=1 \
-DWITH_SSL=system \
-DWITH_EMBEDDED_SERVER=1 \
-DENABLED_LOCAL_INFILE=1 \
-DWITH_INNOBASE_STORAGE_ENGINE=1 \
  • -DWITH_BOOST :依赖Boost库,告诉cmake Boost 库的位置。
  • -DCMAKE_INSTALL_PREFIX :安装路径
  • -DSYSCONFDIR: 配置文件的路径
  • -DMYSQL_DATADIR :数据存储的路径
  • -DPID_FILE mysqld :服务的PID 路径
  • -DINSTALL_MANDIR :帮助文档的路径
  • -DMYSQL_TCP_PORT: TCP端口
  • -DMYSQL_UNIX_ADDRUNIX 套接字文件路径
  • -DDEFAULT_CHARSET:默认字符集
  • -DEXTRA_CHARSETS:所有额外的字符集
  • -DDEFAULT_COLLATION :默认字符集排序
  • -DWITH_READLINE:让MySQL命令行支持命令历史、行编辑等交互功能
  • -DWITH_SSL :指定SSL支持来源为系统,而不是MySQL自带的版本
  • -DWITH_EMBEDDED_SERVER:启用嵌入式服务器的构建。可以把MySQL嵌入应用
  • -DENABLED_LOCAL_INFILE:允许从本地文件导入数据
  • -DWITH_INNOBASE_STORAGE_ENGINE:启用 InnoDB 存储引擎

最终执行结果如下

1
2
3
4
5
6
7
8
9
10
11
12
13
14
....

-- CMAKE_CXX_FLAGS_RELWITHDEBINFO: -O3 -g -fabi-version=2 -fno-omit-frame-pointer -fno-strict-aliasing -DDBUG_OFF
-- Configuring done
-- Generating done
CMake Warning:
Manually-specified variables were not used by the project:

PID_FILE
WITH_READLINE


-- Build files have been written to: /root/mysql-5.7.27
[root@source-mysql mysql-5.7.27]#
  1. 编译安装,大概半个小时
1
make && make install

最终效果如下

1
2
3
4
5
6
7
8
...


-- Installing: /usr/local/mysql/support-files/mysql-log-rotate
-- Installing: /usr/local/mysql/support-files/magic
-- Installing: /usr/local/mysql/share/aclocal/mysql.m4
-- Installing: /usr/local/mysql/support-files/mysql.server
[root@source-mysql mysql-5.7.27]#

2.1.3 基础配置

  1. 修改文件夹权限,初始化,会显示root密码
1
2
3
4
cd /usr/local/mysql
chown -R mysql.mysql .

./bin/mysqld --initialize --user=mysql --basedir=/usr/local/mysql --datadir=/usr/local/mysql/data
1
2
3
4
5
6
7
8
9
[root@source-mysql mysql]# ./bin/mysqld --initialize --user=mysql --basedir=/usr/local/mysql --datadir=/usr/local/mysql/data
2025-10-13T12:00:08.000667Z 0 [Warning] TIMESTAMP with implicit DEFAULT value is deprecated. Please use --explicit_defaults_for_timestamp server option (see documentation for more details).
2025-10-13T12:00:08.153045Z 0 [Warning] InnoDB: New log files created, LSN=45790
2025-10-13T12:00:08.179711Z 0 [Warning] InnoDB: Creating foreign key constraint system tables.
2025-10-13T12:00:08.234856Z 0 [Warning] No existing UUID has been found, so we assume that this is the first time that this server has been started. Generating a new UUID: 29d529ae-a82c-11f0-9b66-000c29e8cb85.
2025-10-13T12:00:08.235246Z 0 [Warning] Gtid table is not ready to be used. Table 'mysql.gtid_executed' cannot be opened.
2025-10-13T12:00:08.559344Z 0 [Warning] CA certificate ca.pem is self signed.
2025-10-13T12:00:08.713531Z 1 [Note] A temporary password is generated for root@localhost: Btj/X,X18arj
[root@source-mysql mysql]#
  1. 新建配置文件
1
vim /etc/my.cnf
1
2
3
4
5
6
7
8
9
10
11
12
13
[client]
port = 3306
socket = /tmp/mysql.sock
# default-character-set = utf8 --- mysqlbinlog无法使用旧的字符集参数

[mysqld]
port = 3306
user = mysql
basedir = /usr/local/mysql
datadir = /usr/local/mysql/data
socket = /tmp/mysql.sock
character_set_server = utf8
pid-file=/usr/local/mysql/mysql.pid
  1. 临时启动
1
/usr/local/mysql/bin/mysqld --user=mysql &

验证

1
ps aux |grep mysql

登录验证,需要上面的密码

1
/usr/local/mysql/bin/mysql -uroot -p
  1. 修改root密码
1
/usr/local/mysql/bin/mysqladmin -u root -p'旧密码'  password '新密码'
  1. 加入环境变量
1
2
3
4
cat >> /etc/profile <<EOL

export PATH=$PATH:/usr/local/mysql/bin
EOL

加载环境变量

1
source /etc/profile
  1. 登录
1
mysql -uroot -p

2.1.4 systemd管理

  1. 杀掉 mysql 进程
1
2
ps aux |grep mysql
kill mysql进程号
  1. 编辑service 文件
1
2
3
4
5
6
7
8
9
10
11
12
13
14
15
cat > /etc/systemd/system/mysqld.service <<EOL
[Unit]
Description=MySQL Server

[Service]
ExecStart=/usr/local/mysql/bin/mysqld
User=mysql
Group=mysql
Restart=always
RestartSec=3
LimitNOFILE=infinity

[Install]
WantedBy=multi-user.target
EOL
  1. 重载systemd配置文件
1
systemctl daemon-reload
  1. 开机自启mysql,名字与上一步的名称对应
1
systemctl enable --now mysqld
  1. 登录验证
1
mysql -uroot -p

2.2 YUM安装

1
hostnamectl set-hostname yum-mysql

2.2.1 安装前准备

  1. 关闭防火墙
1
2
systemctl stop firewalld
systemctl disable firewalld
  1. 关闭SELinux
1
2
setenforce 0
sed -i 's/^SELINUX=*/SELINUX=disable/g' /etc/selinux/config
  1. 配置yum
1
yum repolist
  1. 清理之前的环境
  • 清理之前的mysql
1
yum -y remove mariadb mariadb-server mariadb-libs mariadb-devel
  • 删除mysql用户
1
userdel -r mysql
  • 删除myqsl 相关目录
1
2
rm -rf /var/lib/mysql
rm -rf /etc/my*

2.2.2 YUM安装

  1. 配置MSQL安装源
1
2
3
4
5
6
7
wget https://dev.mysql.com/get/mysql80-community-release-el7-3.noarch.rpm

rpm -ivh mysql80-community-release-el7-3.noarch.rpm

yum -y install yum-utils
yum-config-manager --enable mysql57-community
yum-config-manager --disable mysql80-community
  1. 导入GPG密钥,验证密钥文件存在
1
2
3
# rpm --import https://repo.mysql.com/RPM-GPG-KEY-mysql
sudo rpm --import https://repo.mysql.com/RPM-GPG-KEY-mysql-2022
ls -l /etc/pki/rpm-gpg/RPM-GPG-KEY-mysql
  1. 安装
1
yum -y install mysql-community-server
1
2
3
4
5
6
7
8
9
...

Installed:
mysql-community-server.x86_64 0:5.7.44-1.el7
Dependency Installed:
mysql-community-client.x86_64 0:5.7.44-1.el7 mysql-community-common.x86_64 0:5.7.44-1.el7 mysql-community-libs.x86_64 0:5.7.44-1.el7

Complete!
[root@yum-mysql ~]# systemctl enable mysqld --now
  1. 启动
1
systemctl enable mysqld --now
  1. 查找临时密码
1
grep password /var/log/mysqld.log
1
2
[root@yum-mysql ~]# grep password /var/log/mysqld.log
2025-10-13T12:58:16.949323Z 1 [Note] A temporary password is generated for root@localhost: .z=8eWU*KW+V
  1. 修改密码,编译安装的不能弱密码
1
2
mysqladmin -u root -p'Polish21..' password 'Root21..'
mysqladmin -u root -p'旧密码' password '新密码'

或者登录mysql

1
alter user root@localhost identified by '新密码';
  1. 验证
1
mysql -uroot -p

2.3 两种安装方式对比

两种安装方式对比 源码安装 YUM源安装
配置文件 /etc/my.cnf,可自定义 /etc/my.cnf
数据库目录 /var/local/mysql/data,可自定义 /var/lib/mysql
systemd管理 需要自行配置 默认支持
初始化 手动 自动
难易程度 一般 简单
安装所需时间 大约半个小时 几分钟

三、CentOS7安装MySQL80/84

1
hostnamectl set-hostname yum-mysql8

3.1 YUM安装

  1. 卸载旧的组件
1
yum remove mariadb* -y
  1. 添加MySQL官方的仓库

MySQL官网MySQL repo服务器找对应系统的 rpm

  • mysql80
1
2
wget https://dev.mysql.com/get/mysql80-community-release-el7-11.noarch.rpm
yum localinstall mysql80-community-release-el7-11.noarch.rpm -y
  • mysql84
1
https://dev.mysql.com/get/mysql84-community-release-el7-2.noarch.rpm
  1. 验证已经添加仓库
1
yum repolist enabled | grep mysql
1
2
3
4
5
6
[root@yum-mysql8 ~]# yum repolist enabled | grep mysql

mysql-connectors-community/x86_64 MySQL Connectors Community 286
mysql-tools-community/x86_64 MySQL Tools Community 116
mysql80-community/x86_64 MySQL 8.0 Community Server 579
[root@yum-mysql8 ~]#
  1. 安装 MySQL-Server
1
yum install mysql-community-server -y
  1. 开机启动
1
2
systemctl start mysqld
systemctl enable mysqld
  1. 验证启动成功
1
systemctl status mysqld

启动成功效果

1
2
3
4
5
6
7
8
9
10
11
12
13
14
[root@yum-mysql8 ~]# systemctl status mysqld
● mysqld.service - MySQL Server
Loaded: loaded (/usr/lib/systemd/system/mysqld.service; enabled; vendor preset: disabled)
Active: active (running) since Tue 2025-10-14 10:06:58 CST; 17s ago
Docs: man:mysqld(8)
http://dev.mysql.com/doc/refman/en/using-systemd.html
Main PID: 4928 (mysqld)
Status: "Server is operational"
CGroup: /system.slice/mysqld.service
└─4928 /usr/sbin/mysqld

Oct 14 10:06:53 yum-mysql8 systemd[1]: Starting MySQL Server...
Oct 14 10:06:58 yum-mysql8 systemd[1]: Started MySQL Server.
[root@yum-mysql8 ~]#
  1. 从日志中获取临时密码
1
grep 'temporary password' /var/log/mysqld.log
1
2
3
[root@yum-mysql8 ~]# grep 'temporary password' /var/log/mysqld.log
2025-10-14T02:06:54.878116Z 6 [Note] [MY-010454] [Server] A temporary password is generated for root@localhost: FkSpsqblF1.a
[root@yum-mysql8 ~]#
  1. 登录mysql 后改密码
1
mysql -u root -p
1
ALTER USER 'root'@'localhost' IDENTIFIED BY '新密码';
1
ALTER USER 'root'@'localhost' IDENTIFIED BY 'Root21..';
  1. 验证新密码
1
mysql -u root -p'Root21..'
1
2
3
4
5
6
7
8
9
10
11
12
13
14
15
16
[root@yum-mysql8 ~]# mysql -u root -p'Root21..'
mysql: [Warning] Using a password on the command line interface can be insecure.
Welcome to the MySQL monitor. Commands end with ; or \g.
Your MySQL connection id is 8
Server version: 8.0.43 MySQL Community Server - GPL

Copyright (c) 2000, 2025, Oracle and/or its affiliates.

Oracle is a registered trademark of Oracle Corporation and/or its
affiliates. Other names may be trademarks of their respective
owners.

Type 'help;' or '\h' for help. Type '\c' to clear the current input statement.

mysql>

四、debian系安装MySQL

选项 说明 适用场景
mysql-8.0 MySQL 8.0 版本的普通服务器 大多数生产环境,稳定可靠
mysql-innovation MySQL 最新创新版本(实验性功能) 测试新特性,不建议生产环境
mysql-8.4-lts MySQL 8.4 LTS(长期支持) 适合希望用新功能但又要稳定的环境
mysql-cluster-8.0 MySQL Cluster 8.0 用于需要高可用和分布式集群的场景
mysql-cluster-innovation MySQL Cluster 最新创新版本 测试分布式集群新功能
mysql-cluster-8.4-lts MySQL Cluster 8.4 LTS 高可用集群的长期支持版本
None 不安装服务器,只配置客户端等工具 只想用 MySQL 客户端或工具,不安装数据库
  1. MySQL官网仓库,安装deb 包时可以文本图形化选择不同的数据库版本。
1
2
3
wget https://dev.mysql.com/get/mysql-apt-config_0.8.32-1_all.deb
sudo dpkg -i mysql-apt-config_0.8.32-1_all.deb
sudo apt update
  1. 安装最新版本
1
sudo apt install mysql-server
  1. 安全设置
1
sudo mysql_secure_installation
1
2
3
4
5
6
7
8
9
10
11
12
13
14
15
16
17
18
19
20
21
22
23
24
25
26
27
28
29
30
31
32
33
34
35
36
37
38
39
40
41
42
43
44
45
46
47
48
49
50
51
52
53
54
55
56
57
58
59
60
61
62
63
64
65
66
ubuntu@sg-oracle-2c12g-01:~$ sudo mysql_secure_installation

Securing the MySQL server deployment.
## 1. 首先需要验证root密码
Enter password for user root:

VALIDATE PASSWORD COMPONENT can be used to test passwords
and improve security. It checks the strength of password
and allows the users to set only those passwords which are
secure enough. Would you like to setup VALIDATE PASSWORD component?

Press y|Y for Yes, any other key for No: y

There are three levels of password validation policy:

LOW Length >= 8
MEDIUM Length >= 8, numeric, mixed case, and special characters
STRONG Length >= 8, numeric, mixed case, special characters and dictionary file
# 2. 是否启用“密码强度验证组件(VALIDATE PASSWORD)按0,1,2来选择不同的密码强度
Please enter 0 = LOW, 1 = MEDIUM and 2 = STRONG: 1
Using existing password for root.

Estimated strength of the password: 100
# 3. 是否要 修改 root 用户的密码。
Change the password for root ? ((Press y|Y for Yes, any other key for No) : n

... skipping.
By default, a MySQL installation has an anonymous user,
allowing anyone to log into MySQL without having to have
a user account created for them. This is intended only for
testing, and to make the installation go a bit smoother.
You should remove them before moving into a production
environment.
# 4. 是否删除匿名用户。
Remove anonymous users? (Press y|Y for Yes, any other key for No) : y
Success.


Normally, root should only be allowed to connect from
'localhost'. This ensures that someone cannot guess at
the root password from the network.
# 5. 是否禁止 root 用户远程登录。
Disallow root login remotely? (Press y|Y for Yes, any other key for No) : y
Success.

By default, MySQL comes with a database named 'test' that
anyone can access. This is also intended only for testing,
and should be removed before moving into a production
environment.

# 6. 默认会有一个名为 test 的数据库,是否删除它
Remove test database and access to it? (Press y|Y for Yes, any other key for No) : y
- Dropping test database...
Success.

- Removing privileges on test database...
Success.

Reloading the privilege tables will ensure that all changes
made so far will take effect immediately.
# 7. 是否立即重新加载权限表(privilege tables
Reload privilege tables now? (Press y|Y for Yes, any other key for No) : y
Success.

All done!
ubuntu@sg-oracle-2c12g-01:~$
  1. 设置密码
1
2
ALTER USER 'root'@'localhost' IDENTIFIED WITH mysql_native_password BY '你的密码';
FLUSH PRIVILEGES;
  1. 登录验证
1
mysql -u root -p

五、封面图

封面图

Web服务器之Nginx

一、介绍

Nginx是一款高性能的Web服务器,广泛用于网站搭建。

二、安装

有好多种安装方法,安装包安装、源码编译安装、配置 YUM APT 官方源安装。

2.1 配置官方APT安装

进入官网,点击安装,选择Linux Package,选择对应的Ubuntu系统Debian系统,按照提示一步一步来。

  1. 按照先决条件,依赖包
1
sudo apt install curl gnupg2 ca-certificates lsb-release debian-archive-keyring
  1. 导入官方nginx签名密钥,以便apt能够沿着软件包的真实性
1
2
curl https://nginx.org/keys/nginx_signing.key | gpg --dearmor \
| sudo tee /usr/share/keyrings/nginx-archive-keyring.gpg >/dev/null
  1. 验证下载的文件是否含有正确的密钥
1
gpg --dry-run --quiet --no-keyring --import --import-options import-show /usr/share/keyrings/nginx-archive-keyring.gpg

输出应该带有完整的指纹。

1
2
3
4
5
6
7
8
9
10
11
12
13
14
root@sg-oracle-2c12g-01:~# gpg --dry-run --quiet --no-keyring --import --import-options import-show /usr/share/keyrings/nginx-archive-keyring.gpg
pub rsa4096 2024-05-29 [SC]
8540A6F18833A80E9C1653A42FD21310B49F6B46
uid nginx signing key <signing-key-2@nginx.com>

pub rsa2048 2011-08-19 [SC] [expires: 2027-05-24]
573BFD6B3D8FBC641079A6ABABF5BD827BD9BF62
uid nginx signing key <signing-key@nginx.com>

pub rsa4096 2024-05-29 [SC]
9E9BE90EACBCDE69FE9B204CBCDCD8A38D88A2B3
uid nginx signing key <signing-key-3@nginx.com>

root@sg-oracle-2c12g-01:~#

和下面的官方签名密钥保持一致。

1
2
3
pub   rsa2048 2011-08-19 [SC] [expires: 2027-05-24]
573BFD6B3D8FBC641079A6ABABF5BD827BD9BF62
uid nginx signing key <signing-key@nginx.com>
  1. 为稳定版 nginx 设置仓库
1
2
3
echo "deb [signed-by=/usr/share/keyrings/nginx-archive-keyring.gpg] \
http://nginx.org/packages/debian `lsb_release -cs` nginx" \
| sudo tee /etc/apt/sources.list.d/nginx.list
  1. 主线版本的nginx 仓库
1
2
3
echo "deb [signed-by=/usr/share/keyrings/nginx-archive-keyring.gpg] \
http://nginx.org/packages/mainline/ubuntu `lsb_release -cs` nginx" \
| sudo tee /etc/apt/sources.list.d/nginx.list
  1. 优先使用 nginx 官网提供的软件仓库,而不是ubuntudebian 提供的仓库。
1
2
echo -e "Package: *\nPin: origin nginx.org\nPin: release o=nginx\nPin-Priority: 900\n" \
| sudo tee /etc/apt/preferences.d/99nginx
  1. 安装
1
2
sudo apt update
sudo apt install nginx
  1. 启动
1
systemctl enable --now nginx

2.2 配置官方YUM 安装

进入官网,点击安装,选择Linux Package,选择对应的RHEL红帽系,按照提示一步一步来。

  1. 安装依赖,yum-utils
1
sudo yum install yum-utils
  1. 编辑文件/etc/yum.repos.d/nginx.repo
1
vim /etc/yum.repos.d/nginx.repo
1
2
3
4
5
6
7
8
9
10
11
12
13
14
15
[nginx-stable]
name=nginx stable repo
baseurl=http://nginx.org/packages/centos/$releasever/$basearch/
gpgcheck=1
enabled=1
gpgkey=https://nginx.org/keys/nginx_signing.key
module_hotfixes=true

[nginx-mainline]
name=nginx mainline repo
baseurl=http://nginx.org/packages/mainline/centos/$releasever/$basearch/
gpgcheck=1
enabled=0
gpgkey=https://nginx.org/keys/nginx_signing.key
module_hotfixes=true
  1. 默认使用稳定版本,如需切换到主线版本
1
sudo yum-config-manager --enable nginx-mainline
  1. 安装
1
sudo yum install nginx
1
2
3
4
5
6
7
8
9
10
11
12
13
14
15
16
17
18
19
20
21
22
23
24
25
26
27
28
29
30
31
32
33
34
35
36
37
38
39
40
41
42
43
44
45
46
47
48
49
50
51
52
53
54
55
56
57
58
59
60
61
62
63
64
65
66
67
68
69
70
71
[root@centos9 ~]# sudo yum install nginx
nginx stable repo 22 kB/s | 54 kB 00:02
Dependencies resolved.
===================================================================================================
Package Architecture Version Repository Size
==================================================================================================
Installing:
nginx x86_64 2:1.28.0-1.el9.ngx nginx-stable 1.0 M

Transaction Summary
==================================================================================================
Install 1 Package

Total download size: 1.0 M
Installed size: 3.4 M
Is this ok [y/N]: y
Downloading Packages:
nginx-1.28.0-1.el9.ngx.x86_64.rpm 132 kB/s | 1.0 MB 00:07
------------------------------------------------------------------------------------------------
Total 132 kB/s | 1.0 MB 00:07
nginx stable repo 9.8 kB/s | 12 kB 00:01
Importing GPG key 0xB49F6B46:
Userid : "nginx signing key <signing-key-2@nginx.com>"
Fingerprint: 8540 A6F1 8833 A80E 9C16 53A4 2FD2 1310 B49F 6B46
From : https://nginx.org/keys/nginx_signing.key
Is this ok [y/N]: y
Key imported successfully
Importing GPG key 0x7BD9BF62:
Userid : "nginx signing key <signing-key@nginx.com>"
Fingerprint: 573B FD6B 3D8F BC64 1079 A6AB ABF5 BD82 7BD9 BF62
From : https://nginx.org/keys/nginx_signing.key
Is this ok [y/N]: y
Key imported successfully
Importing GPG key 0x8D88A2B3:
Userid : "nginx signing key <signing-key-3@nginx.com>"
Fingerprint: 9E9B E90E ACBC DE69 FE9B 204C BCDC D8A3 8D88 A2B3
From : https://nginx.org/keys/nginx_signing.key
Is this ok [y/N]: y
Key imported successfully
Running transaction check
Transaction check succeeded.
Running transaction test
Transaction test succeeded.
Running transaction
Preparing : 1/1
Running scriptlet: nginx-2:1.28.0-1.el9.ngx.x86_64 1/1
Installing : nginx-2:1.28.0-1.el9.ngx.x86_64 1/1
Running scriptlet: nginx-2:1.28.0-1.el9.ngx.x86_64 1/1
----------------------------------------------------------------------

Thanks for using nginx!

Please find the official documentation for nginx here:
* https://nginx.org/en/docs/

Please subscribe to nginx-announce mailing list to get
the most important news about nginx:
* https://nginx.org/en/support.html

Commercial subscriptions for nginx are available on:
* https://nginx.com/products/

----------------------------------------------------------------------

Verifying : nginx-2:1.28.0-1.el9.ngx.x86_64 1/1

Installed:
nginx-2:1.28.0-1.el9.ngx.x86_64

Complete!
[root@centos9 ~]#
  1. 启动
1
systemctl enable --now nginx

2.3 验证启动

1
2
3
4
5
6
7
8
9
10
11
12
13
14
15
16
17
18
19
20
21
22
23
24
# 法一,看端口
root@sg-oracle-2c12g-01:~# netstat -tlnp |grep nginx
tcp 0 0 0.0.0.0:80 0.0.0.0:* LISTEN 20400/nginx: master
tcp6 0 0 :::80 :::* LISTEN 20400/nginx: master
root@sg-oracle-2c12g-01:~#

# 法二,看服务状态
root@sg-oracle-2c12g-01:~# systemctl status nginx
● nginx.service - A high performance web server and a reverse proxy server
Loaded: loaded (/lib/systemd/system/nginx.service; enabled; vendor preset: enabled)
Active: active (running) since Sun 2025-10-12 07:03:36 UTC; 14min ago
Docs: man:nginx(8)
Main PID: 20400 (nginx)
Tasks: 3 (limit: 14231)
Memory: 3.2M
CPU: 23ms
CGroup: /system.slice/nginx.service
├─20400 "nginx: master process /usr/sbin/nginx -g daemon on; master_process on;"
├─20401 "nginx: worker process" "" "" "" "" "" "" "" "" "" "" "" "" "" "" "" "" "" "" ""
└─20402 "nginx: worker process" "" "" "" "" "" "" "" "" "" "" "" "" "" "" "" "" "" "" ""

Oct 12 07:03:36 sg-oracle-2c12g-01 systemd[1]: Starting A high performance web server and a reverse proxy server...
Oct 12 07:03:36 sg-oracle-2c12g-01 systemd[1]: Started A high performance web server and a reverse proxy server.
root@sg-oracle-2c12g-01:~#

2.4 测试访问

需放行80端口,或关闭防火墙

1
2
3
4
5
# 红帽系 防火墙
systemctl stop firewalld

# debian 系防火墙
systemctl stop ufw

nginx默认页

三、基本使用

3.1 配置文件

3.1.1 整体配置文件

默认配置文件夹在 /etc/nginx,主配置文件是 nginx.conf ,它内部引用配置目录 conf.d/

1
2
3
4
5
6
7
8
9
10
11
12
13
14
15
16
17
18
19
20
21
22
23
24
25
26
27
28
29
30
31
32
33
34
35
36
37
38
39
40
41
42
43
44
45
46
47
48
49
50
51
# ubuntu 22.04 nginx官方源
root@sg-oracle-2c12g-01:~# ls -l /etc/nginx/
total 64
drwxr-xr-x 2 root root 4096 Oct 12 06:33 conf.d
-rw-r--r-- 1 root root 1125 May 30 2023 fastcgi.conf
-rw-r--r-- 1 root root 1055 May 30 2023 fastcgi_params
-rw-r--r-- 1 root root 2837 May 30 2023 koi-utf
-rw-r--r-- 1 root root 2223 May 30 2023 koi-win
-rw-r--r-- 1 root root 3957 May 30 2023 mime.types
drwxr-xr-x 2 root root 4096 Aug 22 12:46 modules-available
drwxr-xr-x 2 root root 4096 Oct 12 05:41 modules-enabled
-rw-r--r-- 1 root root 1447 May 30 2023 nginx.conf
-rw-r--r-- 1 root root 180 May 30 2023 proxy_params
-rw-r--r-- 1 root root 636 May 30 2023 scgi_params
drwxr-xr-x 2 root root 4096 Oct 12 05:41 sites-available
drwxr-xr-x 2 root root 4096 Oct 12 05:41 sites-enabled
drwxr-xr-x 2 root root 4096 Oct 12 05:41 snippets
-rw-r--r-- 1 root root 664 May 30 2023 uwsgi_params
-rw-r--r-- 1 root root 3071 May 30 2023 win-utf
root@sg-oracle-2c12g-01:~#


# centos9,nginx官方源
[root@centos9 nginx]# ls
conf.d fastcgi_params mime.types modules nginx.conf scgi_params uwsgi_params
[root@centos9 nginx]#


# centos7 阿里云EPEL源
[root@centos7 nginx]# ls -al
total 84
drwxr-xr-x 4 root root 4096 Oct 12 15:23 .
drwxr-xr-x. 81 root root 8192 Oct 12 15:23 ..
drwxr-xr-x 2 root root 6 Nov 11 2022 conf.d
drwxr-xr-x 2 root root 6 Nov 11 2022 default.d
-rw-r--r-- 1 root root 1077 Nov 11 2022 fastcgi.conf
-rw-r--r-- 1 root root 1077 Nov 11 2022 fastcgi.conf.default
-rw-r--r-- 1 root root 1007 Nov 11 2022 fastcgi_params
-rw-r--r-- 1 root root 1007 Nov 11 2022 fastcgi_params.default
-rw-r--r-- 1 root root 2837 Nov 11 2022 koi-utf
-rw-r--r-- 1 root root 2223 Nov 11 2022 koi-win
-rw-r--r-- 1 root root 5231 Nov 11 2022 mime.types
-rw-r--r-- 1 root root 5231 Nov 11 2022 mime.types.default
-rw-r--r-- 1 root root 2336 Nov 11 2022 nginx.conf
-rw-r--r-- 1 root root 2656 Nov 11 2022 nginx.conf.default
-rw-r--r-- 1 root root 636 Nov 11 2022 scgi_params
-rw-r--r-- 1 root root 636 Nov 11 2022 scgi_params.default
-rw-r--r-- 1 root root 664 Nov 11 2022 uwsgi_params
-rw-r--r-- 1 root root 664 Nov 11 2022 uwsgi_params.default
-rw-r--r-- 1 root root 3610 Nov 11 2022 win-utf
[root@centos7 nginx]#

3.1.2 主配置文件解读

1
egrep '^[ ]*#|^$' -v /etc/nginx/nginx.conf 
1
2
3
4
5
6
7
8
9
10
11
12
13
14
15
16
17
18
19
20
[root@centos9 conf.d]# egrep '^[ ]*#|^$' -v /etc/nginx/nginx.conf 
user nginx;
worker_processes auto;
error_log /var/log/nginx/error.log notice;
pid /run/nginx.pid;
events {
worker_connections 1024;
}
http {
include /etc/nginx/mime.types;
default_type application/octet-stream;
log_format main '$remote_addr - $remote_user [$time_local] "$request" '
'$status $body_bytes_sent "$http_referer" '
'"$http_user_agent" "$http_x_forwarded_for"';
access_log /var/log/nginx/access.log main;
sendfile on;
keepalive_timeout 65;
include /etc/nginx/conf.d/*.conf;
}
[root@centos9 conf.d]#
  • include /etc/nginx/conf.d/*.conf; 包含子配置文件

3.2 最小配置文件部署站点001

创建新网站,在conf.d 目录下新建子配置文件,

1
2
mkdir -p /www/wwwroot/web-server-01
vim /etc/nginx/conf.d/web-server-01.conf
1
2
3
4
5
6
7
8
9
10
11
server {
listen 80;
server_name web-server-01.域名;
access_log /var/log/nginx/web-server-01.log;

location / {
root /www/wwwroot/web-server-01;
index index.html;
}

}
1
2
3
cat > /www/wwwroot/web-server-01/index.html << EOL
Hello World!
EOL
1
2
3
4
5
nginx -t

# 配置文件没问题
# nginx: the configuration file /etc/nginx/nginx.conf syntax is ok
# nginx: configuration file /etc/nginx/nginx.conf test is successful
1
nginx -s reload

访问 http://web-server-01.域名

3.3 部署方式

3.3.1 基于IP

1
2
3
4
5
6
7
8
9
10
11
server {
listen 1.1.1.1:80;
server_name web-server-01.域名;
access_log /var/log/nginx/web-server-01.log;

location / {
root /www/wwwroot/web-server-01;
index index.html;
}

}

3.3.2 基于端口

1
2
3
4
5
6
7
8
9
10
11
server {
listen 8080;
server_name web-server-01.域名;
access_log /var/log/nginx/web-server-01.log;

location / {
root /www/wwwroot/web-server-01;
index index.html;
}

}

3.3.3 基于域名

1
2
3
4
5
6
7
8
9
10
11
server {
listen 80;
server_name web-server-02.域名;
access_log /var/log/nginx/web-server-01.log;

location / {
root /www/wwwroot/web-server-02;
index index.html;
}

}

四、常见配合

4.1 LNMP

Linux + Nginx + MySQL/Mariadb +PHP

4.2 LAMP

Linux + APache + MySQL/Mariadb +PHP

五、封面图

封面图

Linux防火墙

ufwfirewalld 的简单使用。

一、ufw

  1. 启动,重启,重载,停止
1
2
3
4
5
6
7
8
systemctl start ufw
ufw enable

systemctl restart ufw
ufw reload

systemctl stop ufw
ufw disable
  1. 开启自启,关闭开机自启
1
2
3
4
5
systemctl enable ufw
systemctl enable --now ufw

systemctl disable ufw
systemctl disable --now ufw
  1. 查看防火墙状态,当前规则
1
2
systemctl status ufw
ufw status
  1. 放行单个端口
1
2
3
4
5
# 不带协议
ufw allow 端口

# 带协议
ufw allow 端口/协议
1
2
ufw allow 80
ufw allow 443/tcp
  1. 放行端口范围
1
ufw allow 端口1:端口2/tcp
1
ufw allow 80:90/tcp
  1. 按照源IP放行
1
ufw allow from ip或网段 to any port 22
1
2
ufw allow from 192.168.1.100 to any port 22
ufw allow from 192.168.1.0/24 to any port 22
  1. 删除规则
1
ufw delete allow 80
  1. 查看详细规则列表
1
ufw status numbered

删除某条规则

1
ufw delete 1

二、firewalld

  1. 启动,重启,停止,状态,重载配置
1
2
3
4
5
6
7
systemctl start firewalld
systemctl restart firewalld
systemctl stop firewalld

systemctl status firewalld
firewall-cmd --state
sudo firewall-cmd --reload
  1. 开启自启,关闭开机自启
1
2
3
4
5
systemctl enable firewalld
systemctl enable --now firewalld

systemctl disable firewalld
systemctl disable --now firewalld
  1. 查看当前开放的端口
1
firewall-cmd --list-ports

查看当前 zone 的完整配置

1
firewall-cmd --list-all
  1. 放行单个端口
1
firewall-cmd --zone=public --add-port=80/tcp --permanent
  • --zone=public:指定作用的区域(默认是 public)

  • --add-port=80/tcp:开放 TCP 协议的 80 端口

  • --permanent:永久生效(不加此参数则只临时生效)

  1. 放行多个端口
1
2
firewall-cmd --zone=public --add-port=80/tcp --add-port=443/tcp --permanent
firewall-cmd --zone=public --add-port=10000-20000/tcp --permanent
  1. 按照服务名放行
1
2
3
4
5
6
firewall-cmd --zone=public --add-service=http --permanent
firewall-cmd --zone=public --add-service=https --permanent

# 简写
firewall-cmd --permanent --add-service=http
firewall-cmd --permanent --add-service=https
  1. 按照来意限制访问
1
firewall-cmd --permanent --zone=public --add-rich-rule='rule family="ipv4" source address="192.168.1.100" port port="22" protocol="tcp" accept'
  1. 删除已添加的端口,服务
1
firewall-cmd --zone=public --remove-port=8080/tcp --permanent
1
firewall-cmd --zone=public --remove-service=http --permanent
  1. 查看防火墙规则,查看所有的 zone
1
2
firewall-cmd --list-all
firewall-cmd --list-all-zones

三、封面图

封面图

IO重定向和管道符

简单记录一下IO重定向和管道符,这个很酷。

一、IO重定向

1.1 文件描述符

Linux一切皆文件。

文件描述符

到处都在说,Linux一切皆文件,甚至,键盘输入也是一个文件、屏幕输出也是文件,屏幕上的错误输出也是文件。

  • 0 标准输入
  • 1 标准输出
  • 2 标准错误输出

1.2 输出重定向

1.2.1 覆盖重定向 >

覆盖重定向 `>`

创建新文件(如文件已经存在,会覆盖掉源文件)

1
2
3
4
5
# 创建新文件
> 文件名

# 将程序输出文件,而不是屏幕
命令 > 文件名
1
2
3
4
5
6
7
8
9
10
11
12
13
# 创建新文件
[root@centos9 ~]# ls
anaconda-ks.cfg
[root@centos9 ~]# > test.txt
[root@centos9 ~]# ls
anaconda-ks.cfg test.txt
[root@centos9 ~]#

# 将程序输出文件,而不是屏幕
[root@centos9 ~]# date > date.txt
[root@centos9 ~]# cat date.txt
Fri Oct 10 05:27:06 PM CST 2025
[root@centos9 ~]#

1.2.1 追加重定向 >>

追加重定向 `>>`

如文件已经存在,会将命令结果输出追加到文件末尾。如文件还不存在,会创建新文件

1
命令 >> 文件名
1
2
3
4
5
6
7
8
9
10
11
12
13
14
# 追加前查看
[root@centos9 ~]# cat date.txt
Fri Oct 10 05:27:06 PM CST 2025
[root@centos9 ~]#

# 追加
[root@centos9 ~]# date >> date.txt
[root@centos9 ~]#

# 追加后查看
[root@centos9 ~]# cat date.txt
Fri Oct 10 05:27:06 PM CST 2025
Fri Oct 10 05:41:13 PM CST 2025
[root@centos9 ~]#

1.3 输出重定向案例

1.3.1 find排除错误输出

错误重定向

有些情况,会有报错输出,影响阅读。可以重定向错误输出到 /dev/null 或文件中

1
2
命令 2> /dev/null
命令 2> error.txt
1
2
find / -size +50M 2> /dev/null
find / -size +50M 2> error.txt

例如,find 查找大于50M文件。

1
2
3
4
5
6
7
8
9
10
[root@centos9 ~]#  find /   -size +50M 
/boot/initramfs-0-rescue-7ed357ca5a7e42419dd56d6e3dbb1f24.img
/proc/kcore
find: ‘/proc/1961/task/1961/fd/6’: No such file or directory
find: ‘/proc/1961/task/1961/fdinfo/6’: No such file or directory
find: ‘/proc/1961/fd/5’: No such file or directory
find: ‘/proc/1961/fdinfo/5’: No such file or directory
/sys/devices/pci0000:00/0000:00:0f.0/resource1
/sys/devices/pci0000:00/0000:00:0f.0/resource1_wc
[root@centos9 ~]#
  • /dev/null 类似于垃圾桶,直接丢弃
1
2
3
4
5
6
7
8
9
10
11
12
13
14
15
16
17
18
19
20
21
22
[root@centos9 ~]# find / -size +50M 2> /dev/null
/boot/initramfs-0-rescue-7ed357ca5a7e42419dd56d6e3dbb1f24.img
/proc/kcore
/sys/devices/pci0000:00/0000:00:0f.0/resource1
/sys/devices/pci0000:00/0000:00:0f.0/resource1_wc
[root@centos9 ~]#

# 错误信息输出到文件中
[root@centos9 ~]# find / -size +50M 2> error.txt
/boot/initramfs-0-rescue-7ed357ca5a7e42419dd56d6e3dbb1f24.img
/proc/kcore
/sys/devices/pci0000:00/0000:00:0f.0/resource1
/sys/devices/pci0000:00/0000:00:0f.0/resource1_wc
[root@centos9 ~]#

# 查看文件中的错误输出
[root@centos9 ~]# cat error.txt
find: ‘/proc/2008/task/2008/fd/6’: No such file or directory
find: ‘/proc/2008/task/2008/fdinfo/6’: No such file or directory
find: ‘/proc/2008/fd/5’: No such file or directory
find: ‘/proc/2008/fdinfo/5’: No such file or directory
[root@centos9 ~]#

1.3.2 标准输出/标准错误分开重定向

1
命令 > correct.txt 2> error.txt
1
2
3
4
5
6
7
8
9
10
11
12
13
14
15
16
17
# 分开重定向
[root@centos9 ~]# find / -size +50M > correct.txt 2> error.txt

# 查看正确输出
[root@centos9 ~]# cat correct.txt
/boot/initramfs-0-rescue-7ed357ca5a7e42419dd56d6e3dbb1f24.img
/proc/kcore
/sys/devices/pci0000:00/0000:00:0f.0/resource1
/sys/devices/pci0000:00/0000:00:0f.0/resource1_wc

# 查看标准错误输出
[root@centos9 ~]# cat error.txt
find: ‘/proc/1997/task/1997/fd/6’: No such file or directory
find: ‘/proc/1997/task/1997/fdinfo/6’: No such file or directory
find: ‘/proc/1997/fd/5’: No such file or directory
find: ‘/proc/1997/fdinfo/5’: No such file or directory
[root@centos9 ~]#

1.3.3 合并重定向

法一,混合重定向

法一,混合重定向

1
命令 &> all.txt
1
2
3
4
5
6
7
8
9
10
11
[root@centos9 ~]# find / -size +50M &> all.txt
[root@centos9 ~]# cat all.txt
/boot/initramfs-0-rescue-7ed357ca5a7e42419dd56d6e3dbb1f24.img
/proc/kcore
find: ‘/proc/2001/task/2001/fd/6’: No such file or directory
find: ‘/proc/2001/task/2001/fdinfo/6’: No such file or directory
find: ‘/proc/2001/fd/5’: No such file or directory
find: ‘/proc/2001/fdinfo/5’: No such file or directory
/sys/devices/pci0000:00/0000:00:0f.0/resource1
/sys/devices/pci0000:00/0000:00:0f.0/resource1_wc
[root@centos9 ~]#

法二,混合重定向

法二,混合重定向,标准错误重定向到标准输出。

1
命令 > all.txt 2>&1
1
2
3
4
5
6
7
8
9
10
11
[root@centos9 ~]# find / -size +50M > all.txt 2>&1
[root@centos9 ~]# cat all.txt
/boot/initramfs-0-rescue-7ed357ca5a7e42419dd56d6e3dbb1f24.img
/proc/kcore
find: ‘/proc/2005/task/2005/fd/6’: No such file or directory
find: ‘/proc/2005/task/2005/fdinfo/6’: No such file or directory
find: ‘/proc/2005/fd/5’: No such file or directory
find: ‘/proc/2005/fdinfo/5’: No such file or directory
/sys/devices/pci0000:00/0000:00:0f.0/resource1
/sys/devices/pci0000:00/0000:00:0f.0/resource1_wc
[root@centos9 ~]#

1.4 输入重定向

1.4.1 文件重定向 <

有时候需要从文件中读取内容,作为命令的参数。

  1. 查看文件内容
1
2
3
4
[root@centos9 ~]# cat < /etc/hosts
127.0.0.1 localhost localhost.localdomain localhost4 localhost4.localdomain4
::1 localhost localhost.localdomain localhost6 localhost6.localdomain6
[root@centos9 ~]#
  1. 配置邮件服务
1
2
3
4
5
6
7
8
9
10
11
12
13
14
# centos7
yum install mailx

# centos9
dnf install s-nail -y

# centos9配置邮箱
~/.mailrc
set from="你的邮箱@qq.com(昵称)"
set smtp="smtps://smtp.qq.com:465"
set smtp-auth=login
set smtp-auth-user="你的邮箱@qq.com"
set smtp-auth-password="你的授权码"
set ssl-verify=ignore
  1. 发送邮件

输入重定向文件内容给 mail

1
mail -s "测试标题" 收件人@example.com < body.txt
1
2
3
4
5
6
7
8
9
[root@centos9 ~]# mail -s "测试标题" **********@qq.com < body.txt
s-nail: Warning: variable superseded or obsoleted: smtp
s-nail: Warning: variable superseded or obsoleted: smtp-auth-user
s-nail: Warning: variable superseded or obsoleted: smtp-auth-password
s-nail: Warning: variable superseded or obsoleted: ssl-verify
s-nail: Obsoletion warning: please do not use *smtp*, instead assign a smtp:// URL to *mta*!
s-nail: Obsoletion warning: Use of old-style credentials, which will vanish in v15!
s-nail: Please read the manual section "On URL syntax and credential lookup"
[root@centos9 ~]#

成功接收邮件

1.4.2 文件终止符 <<

创建并写入文件内容,常用于脚本中。

1
2
3
4
5
cat > 文件 << EOF
行1
行2
行3
EOF
1
2
3
4
5
6
7
8
9
10
11
12
13
14
15
# 写入文件内容
[root@centos9 ~]# cat > file.txt << EOF
> 11111
> 2222222
> 33333333333
> 44444444
> EOF

# 验证写入的内容
[root@centos9 ~]# cat file.txt
11111
2222222
33333333333
44444444
[root@centos9 ~]#

1.4.3 字符输入 <<<

预估脚本交互式界面,需要输入一些字符时,可以这么做。

1
命令 <<< 期望命令执行过程中需要输入的字符

对照组。

1
2
3
4
5
6
7
8
9
10
11
12
13
14
15
16
17
18
19
20
21
# 对照 
[root@centos9 ~]# yum install vim
Last metadata expiration check: 0:36:30 ago on Fri 10 Oct 2025 06:37:33 PM CST.
Dependencies resolved.
============================================================================================
Package Architecture Version Repository Size
============================================================================================
Installing:
vim-enhanced x86_64 2:8.2.2637-22.el9 appstream 1.7 M
Installing dependencies:
gpm-libs x86_64 1.20.7-29.el9 appstream 21 k
vim-common x86_64 2:8.2.2637-22.el9 appstream 7.0 M
vim-filesystem noarch 2:8.2.2637-22.el9 baseos 13 k

Transaction Summary
=============================================================================================
Install 4 Packages

Total download size: 8.8 M
Installed size: 34 M
Is this ok [y/N]:
1
2
3
4
5
6
7
8
9
10
11
12
13
14
15
16
17
18
19
20
21
22
23
24
25
26
27
28
29
30
31
32
33
34
35
36
37
38
39
40
41
42
43
44
45
46
47
48
49
50
51
# 字符输入
[root@centos9 ~]# yum install vim <<< y
Last metadata expiration check: 0:39:04 ago on Fri 10 Oct 2025 06:37:33 PM CST.
Dependencies resolved.
====================================================================================================
Package Architecture Version Repository Size
====================================================================================================
Installing:
vim-enhanced x86_64 2:8.2.2637-22.el9 appstream 1.7 M
Installing dependencies:
gpm-libs x86_64 1.20.7-29.el9 appstream 21 k
vim-common x86_64 2:8.2.2637-22.el9 appstream 7.0 M
vim-filesystem noarch 2:8.2.2637-22.el9 baseos 13 k

Transaction Summary
====================================================================================================
Install 4 Packages

Total download size: 8.8 M
Installed size: 34 M
Is this ok [y/N]: Downloading Packages:
(1/4): gpm-libs-1.20.7-29.el9.x86_64.rpm 33 kB/s | 21 kB 00:00
(2/4): vim-enhanced-8.2.2637-22.el9.x86_64.rpm 906 kB/s | 1.7 MB 00:01
(3/4): vim-filesystem-8.2.2637-22.el9.noarch.rpm 4.5 kB/s | 13 kB 00:02
(4/4): vim-common-8.2.2637-22.el9.x86_64.rpm 778 kB/s | 7.0 MB 00:09
-----------------------------------------------------------------------------------------------------
Total 771 kB/s | 8.8 MB 00:11
Running transaction check
Transaction check succeeded.
Running transaction test
Transaction test succeeded.
Running transaction
Preparing : 1/1
Installing : gpm-libs-1.20.7-29.el9.x86_64 1/4
Installing : vim-filesystem-2:8.2.2637-22.el9.noarch 2/4
Installing : vim-common-2:8.2.2637-22.el9.x86_64 3/4
Installing : vim-enhanced-2:8.2.2637-22.el9.x86_64 4/4
Running scriptlet: vim-enhanced-2:8.2.2637-22.el9.x86_64 4/4
Verifying : vim-filesystem-2:8.2.2637-22.el9.noarch 1/4
Verifying : gpm-libs-1.20.7-29.el9.x86_64 2/4
Verifying : vim-common-2:8.2.2637-22.el9.x86_64 3/4
Verifying : vim-enhanced-2:8.2.2637-22.el9.x86_64 4/4

Installed:
gpm-libs-1.20.7-29.el9.x86_64
vim-common-2:8.2.2637-22.el9.x86_64
vim-enhanced-2:8.2.2637-22.el9.x86_64
vim-filesystem-2:8.2.2637-22.el9.noarch

Complete!
[root@centos9 ~]#

二、管道符 |

管道符

管道符,前面命令的标准输出,作为参数传入到管道右边的命令。

1
命令1 | 命令2

2.1 常见案例

  1. 过滤文件信息
1
cat /etc/passwd |grep root
1
2
3
4
[root@centos9 ~]# cat /etc/passwd |grep root
root:x:0:0:root:/root:/bin/bash
operator:x:11:0:operator:/root:/sbin/nologin
[root@centos9 ~]#
  1. 查找某个进程
1
ps aux |grep firewalld
1
2
3
4
[root@centos9 ~]# ps aux |grep firewalld
root 691 0.0 2.2 125072 40140 ? Ssl 11:25 0:00 /usr/bin/python3 -s /usr/sbin/firewalld --nofork --nopid
root 11813 0.0 0.1 6400 2244 pts/1 S+ 19:24 0:00 grep --color=auto firewalld
[root@centos9 ~]#
  1. 修改密码
1
echo "用户名:密码" | sudo chpasswd
1
2
[root@centos9 ~]# echo "qiankong:1234567" | sudo chpasswd
[root@centos9 ~]#
  1. centos系列系统改密码
1
echo "newpassword" | sudo passwd --stdin username

2.2 分流 tee

分流tee

tee,将标准输出通过管道后,分流(镜像)出一份,输出到屏幕或文件中。

1
2
命令 | tee 文件
命令 | tee -a 文件
  • tee 后面什么也没有,代表输出到屏幕
  • tee 后面的参数会作为文件
  • -a 追加到文件中
1
命令1  | 	命令2  |  命令3  | 	命令4  |  命令5

对于一长串的命令,为了调试,想要查看某个中间过程的输出,只需要插入 tee 文件名称 即可。

1
命令1  | 	命令2  |   tee   命令2输出.log   |  命令3  | 	命令4  |  命令5

三、封面图

封面图

FTP-文件传输协议

一文彻底搞清楚FTP。

一、介绍

FTP(File Transfer Protocol),文件传输协议,诞生于1971年,用于在网络间交换文件。主要又两种工作模式。

1.1 主动模式

最开始只有主动模式,工作模式如下,

  • 客户端随机端口 —>>> 服务器 21 控制端口
  • 客户端开启高位随机端口,告诉服务器,并等待服务器连接
  • 服务器 20 数据端口 —>>> 客户端高位随机端口,使用此连接进行数据传输

主动模式的 主动 就是指 服务器主动去连接客户端,进行数据传输。

问题

刚开始计算机都有公网IP,这种模式运行良好;但是,随着时代的发展,公网IP越来越少,人们开始使用内网IP、NAT技术、防火墙等,导致服务器无法成功连接客户端,此时添加了一种模式,被动模式。

1.2 被动模式

被动模式的工作模式如下,

  • 客户端随机端口 —>>> 服务器 21 控制端口
  • 服务器开启高位随机端口,告诉客户端,并等待客户端连接
  • 客户端随机端口 —>>> 服务器的高位随机端口,使用此链接进行数据传输

被动模式的 被动 就是指 服务器 被动等待客户端来连接,进行数据传输。

二、服务器端

这里不想搞得太复杂,把SELinux关了,不然权限很繁琐。

1
2
setenforce 0
vim /etc/selinux/config
1
SELINUX=disabled

2.1 vsftpd

vsftpd (Very Secure),在Linux系统上,一款非常安全的 ftp 服务端软件,用于部署 FTP服务器

2.1.1 安装

  1. 安装
1
yum install -y vsftpd
  1. 启动
1
systemctl enable --now vsftpd
  1. 验证
1
ss -tnlp
1
2
3
4
5
6
[root@centos9 ~]# ss -tnlp
State Recv-Q Send-Q Local Address:Port Peer Address:Port Process
LISTEN 0 128 0.0.0.0:22 0.0.0.0:* users:(("sshd",pid=819,fd=3))
LISTEN 0 32 *:21 *:* users:(("vsftpd",pid=11092,fd=3))
LISTEN 0 128 [::]:22 [::]:* users:(("sshd",pid=819,fd=4))
[root@centos9 ~]#
  1. 防火墙放行FTP
1
2
3
firewall-cmd --permanent --add-service=ftp
firewall-cmd --permanent --add-port=20/tcp
firewall-cmd --reload

2.1.2 配置

不同版本间默认配置不一样,需要自行查看修改。配置文件在 /etc/vsftpd/vsftpd.conf 中,修改配置后需要重载配置。

2.1.2.1 匿名用户配置

匿名用户 anonymous 会映射成 ftp。默认用户在

1
2
3
4
5
6
7
8
9
10
11
12
13
14
15
16
17
18
# 全局可写配置
write_enable=YES

# 是否启用匿名用户
anonymous_enable=YES

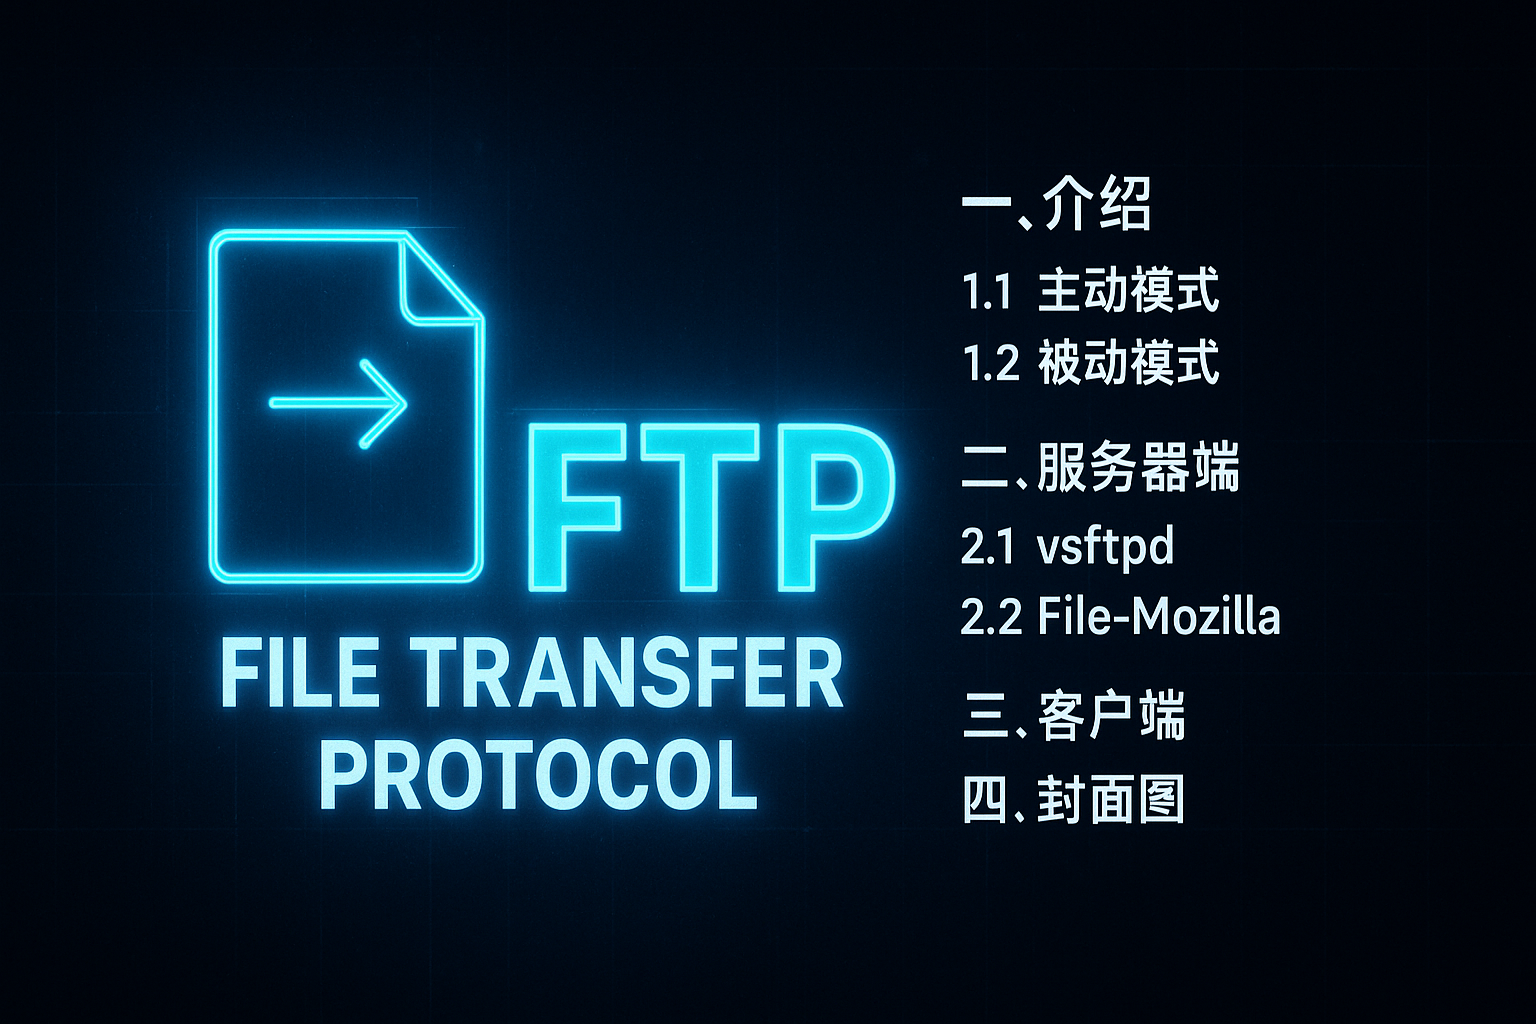
# Uncomment this to allow the anonymous FTP user to upload files. This only
# has an effect if the above global write enable is activated. Also, you will
# obviously need to create a directory writable by the FTP user.
# When SELinux is enforcing check for SE bool allow_ftpd_anon_write, allow_ftpd_full_access
# 需要全局可写激活,需要目录被ftp用户可写,需要selinux 权限通过
# 匿名用户是否可上传文件
anon_upload_enable=YES

# Uncomment this if you want the anonymous FTP user to be able to create new directories.
# 允许匿名用户创建文件夹
# 匿名用户是否可创建文件夹
anon_mkdir_write_enable=YES
1
2
3
[root@centos9 ~]# mkdir /var/ftp/upload
[root@centos9 ~]# chown ftp.ftp /var/ftp/upload/
[root@centos9 ~]#

这样就可以匿名用户上传或者下载文件,在upload 目录下。

默认文件权限为600,默认文件夹权限为 700

2.1.2.2 本地用户配置
1
2
3
4
5
6
7
8
9
10
11
12
13
14
15
16
17
18
19
20
21
22
23
# Uncomment this to allow local users to log in.
# 是否启用本地用户
local_enable=YES
#

# 全局写权限
# Uncomment this to enable any form of FTP write command.
write_enable=YES
#

# Default umask for local users is 077. You may wish to change this to 022,
# if your users expect that (022 is used by most other ftpd's)
# 默认去掉的权限
local_umask=022

# You may specify an explicit list of local users to chroot() to their home
# directory. If chroot_local_user is YES, then this list becomes a list of
# users to NOT chroot().
# (Warning! chroot'ing can be very dangerous. If using chroot, make sure that
# the user does not have write access to the top level directory within the
# chroot)
# 限制用户只能访问自己的家目录,从2.3.5版本开始,出于安全考虑,默认禁止用户在其 chroot 目录(即 FTP 根目录)拥有写权限。
chroot_local_user=YES

限制用户只能访问自己的家目录,从2.3.5版本开始,出于安全考虑,默认禁止用户在其 chroot 目录(即 FTP 根目录)拥有写权限。

1
2
lftp qiankong@192.168.10.30:~> ls
ls: Login failed: 500 OOPS: vsftpd: refusing to run with writable root inside chroot()

两种解决方案

方案一,对限制的家目录,u-w,家目录下创建文件夹,作为ftp的上传目录。

注意ubuntu 新建用户需要 -m 参数才能创建用户家目录

1
2
3
4
5
6
7
8
useradd ftptest
mkdir /home/ftptest/dir1
passwd ftptest

chmod u-w /home/ftptest

mkdir /home/ftptest/dir1
chown ftptest.ftptest /home/ftptest/dir1

客户端就可以在 /home/ftptest/dir1 目录下上传文件。

上传的文件夹权限为755,文件权限为644

方案二,直接允许根目录可写,跳过检查,但是这种方式不安全。

1
allow_writeable_chroot=YES

:这两种解决方案感觉都不好,方案一、用户失去对家目录的写权限;方案二,不安全。

方案三

最佳实践

  1. 在用户目录下创建 ftp 目录作为ftp根目录
  2. ftp 目录所有者改为nobody:nogroup ,去掉 ftp 所有者的写权限。
  3. ftp 目录下创建files 目录作为登录ftp后,可写的目录
  4. 修改配置。
1
2
3
4
5
6
7
8
9
10
11
12
13
14
# 启用本地用户
local_enable=YES

# 启用写权限
write_enable=YES

# 限制根目录
chroot_local_user=YES

# 当某个用户登录时,把配置文件里所有出现 $USER 的地方自动替换成该登录用户名。
user_sub_token=$USER

# 设置根目录
local_root=/home/$USER/ftp
2.1.2.3 额外易混淆配置
1
2
3
4
5
6
7
8
9
10
11
# vsftpd 用户列表
# 如果 userlist_deny=NO,则仅允许此文件中的用户访问。
# 如果 userlist_deny=YES(默认),则绝不允许此文件中的用户访问,并且
# 甚至不提示输入密码。
# 请注意,默认的 vsftpd pam 配置还会检查 /etc/vsftpd/ftpusers
# 中被拒绝的用户。
/etc/vsftpd/user_list

# Users that are not allowed to login via ftp
# 不允许通过 ftp 登录的用户
/etc/vsftpd/ftpusers
1
2
3
4
5
6
7
8
# 启用用户列表
userlist_enable=YES

# 用户列表的位置,ubuntu、centos位置不一样。
userlist_file=/etc/vsftpd.userlist

# 逻辑标识,不拒绝,就是允许,在列表中允许的用户才能连接ftp。
userlist_deny=NO

2.1.3 被动模式

1
2
3
4
5
6
被动模式FTP的数据端口不是20,默认是随机。
为了配合防火墙开放相应的端口,建议限制数据端为一个范围。

pasv_enable=YES # 启用被动模式
pasv_min_port=30000 # 被动模式最小端口
pasv_max_port=31000 # 被动模式最大端口
1
2
3
4
5
# 服务器防火墙配置(被动模式)
firewall-cmd --permanent --add-service=ftp # 开放控制端口21
firewall-cmd --permanent --add-port=20/tcp # 开放控制端口20
firewall-cmd --permanent --add-port=30000-31000/tcp # 开放被动模式限定的端口
firewall-cmd --reload

2.1.4 禁用shell登录

这个好玩,简单几行。

1
vim /bin/ftponly
1
2
#!/bin/sh
echo "This account is limited to FTP access only."
1
2
3
chmod a+x /bin/ftponly
echo "/bin/ftponly" >> /etc/shells
usermod ftptest -s /bin/ftponly

2.2 File-Mozilla

这款软件用server版,也有客户端版。之后补充。

官网

三 、客户端

File-Mozilla,跨平台的连接工具,常用于Windows。

lftp,Linux连接工具,

1
2
3
4
5
6
7
8
9
10
11
12
13
14
15
16
17
# 连接
lftp 用户名:密码@主机

# 下载
get 文件

# 上传
put 文件 目标名称

# 切换
cd

# 创建文件夹
mkdir

# 列出文件
ls

四、封面图

封面图

Linux网络管理

一直觉得Linux网络管理相关的命令繁杂,今天就试着整理一下吧。

网络是块大内容,这里仅把Linux网络相关的命令做整理,网络相关的知识暂不作整理。

一、查网络基本配置

1.1 查ip

有多种方式查系统的 IP 地址

1
2
3
4
ip address
ifconfig
ifconfig 网卡名
hostname -I

可简写成 ip aip addr

1
2
3
4
5
6
7
8
9
10
11
12
13
14
15
16
17
18
19
20
21
22
23
24
25
26
27
28
29
30
31
32
33
34
35
36
37
38
39
40
41
42
43
44
45
46
47
48
49
50
51
52
53
54
55
# ip address
[root@centos7 ~]# ip address
1: lo: <LOOPBACK,UP,LOWER_UP> mtu 65536 qdisc noqueue state UNKNOWN group default qlen 1000
link/loopback 00:00:00:00:00:00 brd 00:00:00:00:00:00
inet 127.0.0.1/8 scope host lo
valid_lft forever preferred_lft forever
inet6 ::1/128 scope host
valid_lft forever preferred_lft forever
2: ens33: <BROADCAST,MULTICAST,UP,LOWER_UP> mtu 1500 qdisc pfifo_fast state UP group default qlen 1000
link/ether 00:0c:29:bc:5e:c7 brd ff:ff:ff:ff:ff:ff
inet 192.168.10.10/24 brd 192.168.10.255 scope global noprefixroute ens33
valid_lft forever preferred_lft forever
inet6 fe80::6e66:1e1e:5c59:86dc/64 scope link noprefixroute
valid_lft forever preferred_lft forever
[root@centos7 ~]#

# ifconfig
[root@centos7 ~]# ifconfig
ens33: flags=4163<UP,BROADCAST,RUNNING,MULTICAST> mtu 1500
inet 192.168.10.10 netmask 255.255.255.0 broadcast 192.168.10.255
inet6 fe80::6e66:1e1e:5c59:86dc prefixlen 64 scopeid 0x20<link>
ether 00:0c:29:bc:5e:c7 txqueuelen 1000 (Ethernet)
RX packets 193591 bytes 53716386 (51.2 MiB)
RX errors 0 dropped 0 overruns 0 frame 0
TX packets 309342 bytes 221017197 (210.7 MiB)
TX errors 0 dropped 0 overruns 0 carrier 0 collisions 0

lo: flags=73<UP,LOOPBACK,RUNNING> mtu 65536
inet 127.0.0.1 netmask 255.0.0.0
inet6 ::1 prefixlen 128 scopeid 0x10<host>
loop txqueuelen 1000 (Local Loopback)
RX packets 20 bytes 4414 (4.3 KiB)
RX errors 0 dropped 0 overruns 0 frame 0
TX packets 20 bytes 4414 (4.3 KiB)
TX errors 0 dropped 0 overruns 0 carrier 0 collisions 0

[root@centos7 ~]#

# hostname -I
[root@centos7 ~]# hostname -I
192.168.10.10
[root@centos7 ~]#

# ifconfig 网卡名
[root@centos7 ~]# ifconfig ens33
ens33: flags=4163<UP,BROADCAST,RUNNING,MULTICAST> mtu 1500
inet 192.168.10.10 netmask 255.255.255.0 broadcast 192.168.10.255
inet6 fe80::f1b0:3c25:52f9:4811 prefixlen 64 scopeid 0x20<link>
ether 00:0c:29:bc:5e:c7 txqueuelen 1000 (Ethernet)
RX packets 201105 bytes 60075622 (57.2 MiB)
RX errors 0 dropped 0 overruns 0 frame 0
TX packets 313473 bytes 221592583 (211.3 MiB)
TX errors 0 dropped 0 overruns 0 carrier 0 collisions 0

[root@centos7 ~]#

1.2 查路由及网关

1
2
3
4
ip route
ip route show
route -n
netstat -rn

可简写成 ip r 等。

1
2
3
4
5
6
7
8
9
10
11
12
13
14
15
16
17
18
19
20
21
# ip route
[root@centos7 ~]# ip route
default via 192.168.10.2 dev ens33 proto static metric 100
192.168.10.0/24 dev ens33 proto kernel scope link src 192.168.10.10 metric 100
[root@centos7 ~]#

# route -n
[root@centos7 ~]# route -n
Kernel IP routing table
Destination Gateway Genmask Flags Metric Ref Use Iface
0.0.0.0 192.168.10.2 0.0.0.0 UG 100 0 0 ens33
192.168.10.0 0.0.0.0 255.255.255.0 U 100 0 0 ens33
[root@centos7 ~]#

# netstat -rn
[root@centos7 ~]# netstat -rn
Kernel IP routing table
Destination Gateway Genmask Flags MSS Window irtt Iface
0.0.0.0 192.168.10.2 0.0.0.0 UG 0 0 0 ens33
192.168.10.0 0.0.0.0 255.255.255.0 U 0 0 0 ens33
[root@centos7 ~]#

1.3 查DNS服务器

1
cat /etc/resolv.conf
1
2
3
4
5
[root@centos7 ~]# cat /etc/resolv.conf
# Generated by NetworkManager
search server.templaate
nameserver 1.1.1.1
[root@centos7 ~]#

Ubuntu 下也可以使用

1
resolvectl status
1
2
3
4
5
6
7
8
9
10
root@ubuntu24server:~# resolvectl status
Global
Protocols: -LLMNR -mDNS -DNSOverTLS DNSSEC=no/unsupported
resolv.conf mode: stub

Link 2 (ens33)
Current Scopes: DNS
Protocols: +DefaultRoute -LLMNR -mDNS -DNSOverTLS DNSSEC=no/unsupported
DNS Servers: 1.1.1.1 8.8.8.8
root@ubuntu24server:~#

二、NetworkManager(redhat)

NetworkManager 是 Redhat 系Linux 的网络管理守护进程,负责监控和配置系统网络。

配置文件在 /etc/sysconfig/network-scripts 下,同时衍生出 nmclinmtui 两种工具来对网络进行配置。

其中,nmcli 是命令行工具,nmtui 是文本图形化工具。本质都是对配置文件的修改。

2.1 nmcli

1
2
3
[root@centos7 ~]# nmcli 
agent connection device general help monitor networking radio
[root@centos7 ~]# nmcli

可以看到主要配置就两块内容,

  • device 网卡设备相关的配置
  • connection 逻辑地址相关的配置

2.1.1 device

1
2
nmcli device status
nmcli device show
1
2
3
4
5
6
7
8
9
10
11
12
13
14
15
16
17
18
19
20
21
22
23
24
25
26
27
28
29
30
31
32
33
34
35
36
37
[root@centos7 ~]# nmcli device status
DEVICE TYPE STATE CONNECTION
ens33 ethernet connected ens33
lo loopback unmanaged --
[root@centos7 ~]# nmcli device
connect delete disconnect help lldp modify monitor reapply set show status wifi
[root@centos7 ~]# nmcli device show
GENERAL.DEVICE: ens33
GENERAL.TYPE: ethernet
GENERAL.HWADDR: 00:0C:29:BC:5E:C7
GENERAL.MTU: 1500
GENERAL.STATE: 100 (connected)
GENERAL.CONNECTION: ens33
GENERAL.CON-PATH: /org/freedesktop/NetworkManager/ActiveConnection/12
WIRED-PROPERTIES.CARRIER: on
IP4.ADDRESS[1]: 192.168.10.10/24
IP4.GATEWAY: 192.168.10.2
IP4.ROUTE[1]: dst = 192.168.10.0/24, nh = 0.0.0.0, mt = 100
IP4.ROUTE[2]: dst = 0.0.0.0/0, nh = 192.168.10.2, mt = 100
IP4.DNS[1]: 1.1.1.1
IP6.ADDRESS[1]: fe80::6e66:1e1e:5c59:86dc/64
IP6.GATEWAY: --
IP6.ROUTE[1]: dst = fe80::/64, nh = ::, mt = 100
IP6.ROUTE[2]: dst = ff00::/8, nh = ::, mt = 256, table=255

GENERAL.DEVICE: lo
GENERAL.TYPE: loopback
GENERAL.HWADDR: 00:00:00:00:00:00
GENERAL.MTU: 65536
GENERAL.STATE: 10 (unmanaged)
GENERAL.CONNECTION: --
GENERAL.CON-PATH: --
IP4.ADDRESS[1]: 127.0.0.1/8
IP4.GATEWAY: --
IP6.ADDRESS[1]: ::1/128
IP6.GATEWAY: --
[root@centos7 ~]#

2.1.2 connection

1
2
3
[root@centos7 ~]# nmcli connection 
add clone delete down edit export help import load modify monitor reload show up
[root@centos7 ~]# nmcli connection

connection 可简写为 con ,主要的子选项

  • 增,add
  • 删,delete
  • 改,modify
  • 查,show
  • 开,up
  • 关,down
  1. 创建一个连接,命名为 zhuzhuxia ,常见的一些静态配置。
1
nmcli connection add con-name 连接名 type 连接类型 ipv4.method 方法 ipv4.addresses ip地址1,ip地址2 ipv4.gateway 网关 ipv4.dns dns1,dns2 ifname 网卡 
1
2
3
[root@centos7 ~]# nmcli connection add con-name zhuzhuxia type ethernet ipv4.method manual ipv4.addresses 192.168.10.10/24,192.168.10.109/24 ipv4.gateway 192.168.10.2 ipv4.dns 1.1.1.1,8.8.8.8 ifname ens33 autoconnect yes 
Connection 'zhuzhuxia' (74ffd674-2ca3-478d-a5dd-d8d7803d0e50) successfully added.
[root@centos7 ~]#
  1. 启用连接
1
nmcli connection up 连接名称 
1
2
3
4
5
6
7
8
9
10
11
12
13
14
15
16
17
18
19
20
21
22
[root@centos7 ~]# nmcli connection up 
ens33 filename help id path uuid zhuzhuxia

# 启用猪猪侠
[root@centos7 ~]# nmcli connection up zhuzhuxia
Connection successfully activated (D-Bus active path: /org/freedesktop/NetworkManager/ActiveConnection/18)
[root@centos7 ~]# ip addr
1: lo: <LOOPBACK,UP,LOWER_UP> mtu 65536 qdisc noqueue state UNKNOWN group default qlen 1000
link/loopback 00:00:00:00:00:00 brd 00:00:00:00:00:00
inet 127.0.0.1/8 scope host lo
valid_lft forever preferred_lft forever
inet6 ::1/128 scope host
valid_lft forever preferred_lft forever
2: ens33: <BROADCAST,MULTICAST,UP,LOWER_UP> mtu 1500 qdisc pfifo_fast state UP group default qlen 1000
link/ether 00:0c:29:bc:5e:c7 brd ff:ff:ff:ff:ff:ff
inet 192.168.10.10/24 brd 192.168.10.255 scope global noprefixroute ens33
valid_lft forever preferred_lft forever
inet 192.168.10.109/24 brd 192.168.10.255 scope global secondary noprefixroute ens33
valid_lft forever preferred_lft forever
inet6 fe80::f1b0:3c25:52f9:4811/64 scope link noprefixroute
valid_lft forever preferred_lft forever
[root@centos7 ~]#
  1. 修改一个连接的配置,已经激活的连接需要重新 down –> upreload 不会生效。
1
nmcli connection modify 连接名 配置项 参数
1
[root@centos7 ~]# nmcli connection modify zhuzhuxia ipv4.addresses 192.168.10.10/24,192.168.10.11nmcli connection up 连接名

2.2 nmtui

没什么可说的,easy。可视化页面配置即可。

nmtui界面

2.3 配置文件

直接修改 /etc/sysconfig/network-scripts 下的配置文件即可。

1
2
3
4
5
6
7
8
9
10
11
12
13
14
15
16
17
18
19
20
21
22
[root@centos7 ~]# cat /etc/sysconfig/network-scripts/ifcfg-ens33 
TYPE="Ethernet"
PROXY_METHOD="none"
BROWSER_ONLY="no"
BOOTPROTO="none"
DEFROUTE="yes"
IPV4_FAILURE_FATAL="no"
IPV6INIT="yes"
IPV6_AUTOCONF="yes"
IPV6_DEFROUTE="yes"
IPV6_FAILURE_FATAL="no"
IPV6_ADDR_GEN_MODE="stable-privacy"
NAME="ens33"
UUID="e10728d1-4a6e-4233-9aca-c44c04268b5d"
DEVICE="ens33"
ONBOOT="yes"
IPADDR="192.168.10.10"
PREFIX="24"
GATEWAY="192.168.10.2"
DNS1="1.1.1.1"
IPV6_PRIVACY="no"
[root@centos7 ~]#
  • IPADDR ip地址
  • PREFIX 子网掩码
  • GATEWAY 网关
  • DNS1 DNS服务器
  • BOOTPROTO dhcp、static、none
  • ONBOOT 开机自启

修改配置后需要重启网络

1
2
[root@centos7 ~]# systemctl restart network
[root@centos7 ~]#

三、netplan(ubuntu)

17.10 版本开始,引入 netplan 作为网络配置工具,底层使用 systemd-networkdNetwork-Managernetplan 使用yaml 配置文件来管理网络。配置文件在 /etc/netplan 下。

ubuntu 分为 Serevr 服务器版本、Desktop 桌面版本。

  • Server 版本使用 systemd-networkd 管理网络;

  • Desktop 版本使用 Network-Manager 管理网络。

总之 netplan 可以生成配置文件,交给底层服务,实现大一统。

3.1 配置文件

1
2
3
4
5
6
7
8
9
10
11
12
13
14
15
16
root@ubuntu24server:~# cat /etc/netplan/50-cloud-init.yaml 
network:
version: 2
ethernets:
ens33:
addresses:
- "192.168.10.20/24"
nameservers:
addresses:
- 1.1.1.1
- 8.8.8.8
search: []
routes:
- to: "default"
via: "192.168.10.2"
root@ubuntu24server:~#

静态ip较完整的配置

1
2
3
4
5
6
7
8
9
10
11
12
13
14
15
network:
version: 2
renderer: networkd
ethernets:
ens33:
dhcp4: no
addresses: [192.168.92.200/24]
routes:
- to: default
via: 192.168.92.2
nameservers:
addresses:
- 8.8.8.8
- 114.114.114.114
optional: true

3.2 启用

  1. 调试,如果有问题120秒后会回退。
1
netplan try
1
2
3
4
5
6
7
8
9
root@ubuntu24server:~# netplan try
Do you want to keep these settings?


Press ENTER before the timeout to accept the new configuration


Changes will revert in 115 seconds

  1. 直接应用
1
netplan apply

四、其它网络相关的命令

4.1 ping

1
ping 域名或IP
  • -c 发几次包,Linux默认一直发。windwos 不可用
  • -4 强制使用 ipv4
  • -6 强制使用 ipv6
  • -twindows 上一直发送

4.2ip 命令

ifconfig 已经标记为过时,已经被 ip 命令取代。

  1. 查看网络信息
1
ip addr
1
2
3
4
5
6
7
8
9
10
11
12
13
14
15
16
17
18
[root@centos7 ~]# ip addr
1: lo: <LOOPBACK,UP,LOWER_UP> mtu 65536 qdisc noqueue state UNKNOWN group default qlen 1000
link/loopback 00:00:00:00:00:00 brd 00:00:00:00:00:00
inet 127.0.0.1/8 scope host lo
valid_lft forever preferred_lft forever
inet6 ::1/128 scope host
valid_lft forever preferred_lft forever
2: ens33: <BROADCAST,MULTICAST,UP,LOWER_UP> mtu 1500 qdisc pfifo_fast state UP group default qlen 1000
link/ether 00:0c:29:bc:5e:c7 brd ff:ff:ff:ff:ff:ff
inet 192.168.10.10/24 brd 192.168.10.255 scope global noprefixroute ens33
valid_lft forever preferred_lft forever
inet 192.168.10.111/24 brd 192.168.10.255 scope global secondary noprefixroute ens33
valid_lft forever preferred_lft forever
inet 192.168.10.112/24 brd 192.168.10.255 scope global secondary ens33:1
valid_lft forever preferred_lft forever
inet6 fe80::f1b0:3c25:52f9:4811/64 scope link noprefixroute
valid_lft forever preferred_lft forever
[root@centos7 ~]#
  1. 启停网卡
1
2
ip link set 网卡 up
ip link set 网卡 down
1
2
3
4
5
6
7
8
9
10
11
12
13
14
15
16
17
18
19
20
21
22
23
24
25
26
27
28
[root@centos7 ~]# ip addr show lo
1: lo: <LOOPBACK,UP,LOWER_UP> mtu 65536 qdisc noqueue state UNKNOWN group default qlen 1000
link/loopback 00:00:00:00:00:00 brd 00:00:00:00:00:00
inet 127.0.0.1/8 scope host lo
valid_lft forever preferred_lft forever
inet6 ::1/128 scope host
valid_lft forever preferred_lft forever
[root@centos7 ~]#

# 停用网卡
[root@centos7 ~]# ip link set lo down
[root@centos7 ~]# ip addr show lo
1: lo: <LOOPBACK> mtu 65536 qdisc noqueue state DOWN group default qlen 1000
link/loopback 00:00:00:00:00:00 brd 00:00:00:00:00:00
inet 127.0.0.1/8 scope host lo
valid_lft forever preferred_lft forever
[root@centos7 ~]#

# 启用网卡
[root@centos7 ~]# ip link set lo up
[root@centos7 ~]# ip addr show lo
1: lo: <LOOPBACK,UP,LOWER_UP> mtu 65536 qdisc noqueue state UNKNOWN group default qlen 1000
link/loopback 00:00:00:00:00:00 brd 00:00:00:00:00:00
inet 127.0.0.1/8 scope host lo
valid_lft forever preferred_lft forever
inet6 ::1/128 scope host
valid_lft forever preferred_lft forever
[root@centos7 ~]#
  1. 设置临时 ip 地址,重启就会失效
1
ip addr add ip地址 dev 网卡
1
2
3
4
5
6
7
8
9
10
11
12
13
14
15
16
17
18
19
20
21
22
[root@centos7 ~]# ip addr show lo
1: lo: <LOOPBACK,UP,LOWER_UP> mtu 65536 qdisc noqueue state UNKNOWN group default qlen 1000
link/loopback 00:00:00:00:00:00 brd 00:00:00:00:00:00
inet 127.0.0.1/8 scope host lo
valid_lft forever preferred_lft forever
inet6 ::1/128 scope host
valid_lft forever preferred_lft forever
[root@centos7 ~]#

# 添加临时IP地址
[root@centos7 ~]# ip addr add 10.0.0.10/24 dev lo
[root@centos7 ~]#
[root@centos7 ~]# ip addr show lo
1: lo: <LOOPBACK,UP,LOWER_UP> mtu 65536 qdisc noqueue state UNKNOWN group default qlen 1000
link/loopback 00:00:00:00:00:00 brd 00:00:00:00:00:00
inet 127.0.0.1/8 scope host lo
valid_lft forever preferred_lft forever
inet 10.0.0.10/24 scope global lo
valid_lft forever preferred_lft forever
inet6 ::1/128 scope host
valid_lft forever preferred_lft forever
[root@centos7 ~]#

4.3 连接状态-netstat - ss

用于查看网络连接的命令。

1
netstat 选项
  • -l 显示监听的端口
  • -a 显示所有状态的端口
  • t 显示TCP 的连接
  • u 显示UDP 的连接
  • p 显示进程的名称
  • n 不对端口号进行解释,显示数字端口号
1
netstat -antp | head
1
2
3
4
5
6
7
8
9
10
11
[root@centos7 ~]# netstat -antp | head
Active Internet connections (servers and established)
Proto Recv-Q Send-Q Local Address Foreign Address State PID/Program name
tcp 0 0 0.0.0.0:111 0.0.0.0:* LISTEN 688/rpcbind
tcp 0 0 0.0.0.0:22 0.0.0.0:* LISTEN 942/sshd
tcp 0 0 127.0.0.1:25 0.0.0.0:* LISTEN 1064/master
tcp 0 36 192.168.10.10:22 192.168.10.1:3140 ESTABLISHED 1194/sshd: root@pts
tcp6 0 0 :::111 :::* LISTEN 688/rpcbind
tcp6 0 0 :::22 :::* LISTEN 942/sshd
tcp6 0 0 ::1:25 :::* LISTEN 1064/master
[root@centos7 ~]#

ss 占用内存更小,用法一样,显示不如 netstat 友好。

1
ss -antp | head
1
2
3
4
5
6
7
8
9
10
[root@centos7 ~]# ss -antp | head
State Recv-Q Send-Q Local Address:Port Peer Address:Port
LISTEN 0 128 *:111 *:* users:(("rpcbind",pid=688,fd=8))
LISTEN 0 128 *:22 *:* users:(("sshd",pid=942,fd=3))
LISTEN 0 100 127.0.0.1:25 *:* users:(("master",pid=1064,fd=13))
ESTAB 0 0 192.168.10.10:22 192.168.10.1:3140 users:(("sshd",pid=1194,fd=3))
LISTEN 0 128 [::]:111 [::]:* users:(("rpcbind",pid=688,fd=11))
LISTEN 0 128 [::]:22 [::]:* users:(("sshd",pid=942,fd=4))
LISTEN 0 100 [::1]:25 [::]:* users:(("master",pid=1064,fd=14))
[root@centos7 ~]#

4.4 域名解析-nslookup

4.4.1 使用

nslookup 是一个DNS 解析的命令,用于把域名解析为 IP地址。

安装

1
yum install -y bind-utils

使用

  1. 直接查询
1
nslookup 域名 DNS服务器
1
2
3
4
5
6
7
8
9
10
11
12
13
14
15
[root@centos7 ~]# nslookup bravexist.cn 1.1.1.1
Server: 1.1.1.1
Address: 1.1.1.1#53

Non-authoritative answer:
Name: bravexist.cn
Address: 104.21.67.121
Name: bravexist.cn
Address: 172.67.221.229
Name: bravexist.cn
Address: 2606:4700:3031::ac43:dde5
Name: bravexist.cn
Address: 2606:4700:3035::6815:4379

[root@centos7 ~]#
  1. 交互式界面查询
1
nslookup
1
2
3
4
5
6
7
8
9
10
11
12
13
14
15
[root@centos7 ~]# nslookup
> bravexist.cn
Server: 1.1.1.1
Address: 1.1.1.1#53

Non-authoritative answer:
Name: bravexist.cn
Address: 104.21.67.121
Name: bravexist.cn
Address: 172.67.221.229
Name: bravexist.cn
Address: 2606:4700:3031::ac43:dde5
Name: bravexist.cn
Address: 2606:4700:3035::6815:4379
>
  1. 查询权威DNS服务器,默认都不是权威DNS服务器应答
1
nslookup -type=解析类型 域名
1
2
3
4
5
6
7
8
9
10
11
12
13
14
15
16
17
18
19
20
21
22
23
24
25
26
27
28
# 查询权威服务器
[root@centos7 ~]# nslookup -type=ns bravexist.cn
Server: 1.1.1.1
Address: 1.1.1.1#53

Non-authoritative answer:
bravexist.cn nameserver = diva.ns.cloudflare.com.
bravexist.cn nameserver = james.ns.cloudflare.com.

Authoritative answers can be found from:

[root@centos7 ~]#

# 从权威DNS查询
[root@centos7 ~]# nslookup bravexist.cn diva.ns.cloudflare.com.
Server: diva.ns.cloudflare.com.
Address: 173.245.58.97#53

Name: bravexist.cn
Address: 104.21.67.121
Name: bravexist.cn
Address: 172.67.221.229
Name: bravexist.cn
Address: 2606:4700:3035::6815:4379
Name: bravexist.cn
Address: 2606:4700:3031::ac43:dde5

[root@centos7 ~]#

4.4.2同类命令-dig-host

  • dig
1
dig 域名
1
2
3
4
5
6
7
8
9
10
11
12
13
14
15
16
17
18
19
20
21
22
23
[root@centos7 ~]# dig bravexist.cn

; <<>> DiG 9.11.4-P2-RedHat-9.11.4-26.P2.el7_9.16 <<>> bravexist.cn
;; global options: +cmd
;; Got answer:
;; ->>HEADER<<- opcode: QUERY, status: NOERROR, id: 53809
;; flags: qr rd ra ad; QUERY: 1, ANSWER: 2, AUTHORITY: 0, ADDITIONAL: 1

;; OPT PSEUDOSECTION:
; EDNS: version: 0, flags:; udp: 1232
;; QUESTION SECTION:
;bravexist.cn. IN A

;; ANSWER SECTION:
bravexist.cn. 300 IN A 104.21.67.121
bravexist.cn. 300 IN A 172.67.221.229

;; Query time: 346 msec
;; SERVER: 1.1.1.1#53(1.1.1.1)
;; WHEN: Tue Oct 07 13:11:17 CST 2025
;; MSG SIZE rcvd: 73

[root@centos7 ~]#
  • host
1
host 域名
1
2
3
4
5
6
7
8
9
[root@centos7 ~]# host bravexist.cn
bravexist.cn has address 104.21.67.121
bravexist.cn has address 172.67.221.229
bravexist.cn has IPv6 address 2606:4700:3031::ac43:dde5
bravexist.cn has IPv6 address 2606:4700:3035::6815:4379
bravexist.cn mail is handled by 1 mx1.larksuite.com.
bravexist.cn mail is handled by 5 mx2.larksuite.com.
bravexist.cn mail is handled by 10 mx3.larksuite.com.
[root@centos7 ~]#

4.5路由追踪命令-traceroute

安装

1
yum install -y traceroute

使用

1
traceroute 域名或IP
1
2
3
4
5
6
7
8
9
10
11
12
13
14
15
16
17
18
19
20
21
22
23
24
25
26
27
28
29
30
31
32
33
[root@centos7 ~]# traceroute bravexist.cn
traceroute to bravexist.cn (104.21.67.121), 30 hops max, 60 byte packets
1 gateway (192.168.10.2) 0.081 ms 0.035 ms 0.086 ms
2 * * *
3 * * *
4 * * *
5 * * *
6 * * *
7 * * *
8 * * *
9 * * *
10 * * *
11 * * *
12 * * *
13 * * *
14 * * *
15 * * *
16 * * *
17 * * *
18 * * *
19 * * *
20 * * *
21 * * *
22 * * *
23 * * *
24 * * *
25 * * *
26 * * *
27 * * *
28 * * *
29 * * *
30 * * *
[root@centos7 ~]#

4.6 端口测试-telnet-nmap

4.6.1 安装

1
yum install nmap telnet -y

4.6.2 使用

telnet

telnet 因为是明文协议,早已经不安全,不推荐使用,但是起端口测试功能依旧很好用。

1
telnet ip或域名 端口号

能进去说明端口开放,不能进去可能被防火墙等中间设备拦截了,无法证明是关闭的。

  • 开放
1
2
3
4
[root@centos7 ~]# telnet bravexist.cn 80
Trying 104.21.67.121...
Connected to bravexist.cn.
Escape character is '^]'.
  • 关闭或被屏蔽
1
2
3
4
[root@centos7 ~]# telnet 192.168.10.10
Trying 192.168.10.10...
telnet: connect to address 192.168.10.10: Connection refused
[root@centos7 ~]#

nmap

nmap 是一款开源免费的软件,用于网络端口测试。这里只记录一下最基本的用法,详细用法有机会单独开一篇。

1
nmap 域名或IP

默认会探测常见的 1000个端口号。

1
2
3
4
5
6
7
8
9
10
11
12
13
14
15
16
17
[root@centos7 ~]# nmap bravexist.cn

Starting Nmap 6.40 ( http://nmap.org ) at 2025-10-07 13:44 CST
Nmap scan report for bravexist.cn (104.21.67.121)
Host is up (0.092s latency).
Other addresses for bravexist.cn (not scanned): 172.67.221.229
Not shown: 994 filtered ports
PORT STATE SERVICE
25/tcp open smtp
80/tcp open http
110/tcp open pop3
443/tcp open https
8080/tcp open http-proxy
8443/tcp open https-alt

Nmap done: 1 IP address (1 host up) scanned in 107.73 seconds
[root@centos7 ~]#

4.7 文件下载-wget-curl

4.7.1 wget

下载文件

1
wget 选项 链接
1
wget -O 自定义文件路径 链接
1
2
3
4
5
6
7
8
9
10
11
12
13
14
15
16
# 下载并重命名为 install.sh
[root@centos7 ~]# wget -O install.sh https://get.docker.com/
--2025-10-07 13:32:55-- https://get.docker.com/
Resolving get.docker.com (get.docker.com)... 13.249.126.19, 13.249.126.85, 13.249.126.92, ...
Connecting to get.docker.com (get.docker.com)|13.249.126.19|:443... connected.
HTTP request sent, awaiting response... 200 OK
Length: 21013 (21K) [text/plain]
Saving to: ‘install.sh’

100%[===================================================================================================================================================>] 21,013 --.-K/s in 0.01s

2025-10-07 13:32:56 (1.77 MB/s) - ‘install.sh’ saved [21013/21013]

[root@centos7 ~]# ls install.sh
install.sh
[root@centos7 ~]#

4.7.2 curl

curl 也非常常用,请求网页内容,获取HTTP响应报文。windows 中也可使用。

1
curl 选项 链接
1
2
3
4
5
curl 链接
curl -v 链接
curl -I 链接
curl -vI 链接
curl -o 自定义文件路径 链接
  • -v 显示请求、响应详细信息
  • -I 之查看响应头,不看响应内容
  • -o 保存为文件
1
2
3
4
5
6
7
8
9
10
11
12
13
14
15
16
17
18
19
20
21
22
23
24
25
26
27
28
29
30
31
32
33
34
35
36
37
38
39
40
41
42
43
44
45
46
47
48
49
50
51
52
53
54
55
56
57
58
59
60
61
62
63
64
65
66
67
68
69
70
71
72
73
# 请求简单的网页
[root@centos7 ~]# curl baidu.com
<html>
<meta http-equiv="refresh" content="0;url=http://www.baidu.com/">
</html>
[root@centos7 ~]#

# 查看请求的详细信息
[root@centos7 ~]# curl -v baidu.com
* About to connect() to baidu.com port 80 (#0)
* Trying 220.181.7.203...
* Connected to baidu.com (220.181.7.203) port 80 (#0)
> GET / HTTP/1.1
> User-Agent: curl/7.29.0
> Host: baidu.com
> Accept: */*
>
< HTTP/1.1 200 OK
< Content-Length: 81
< Content-Type: text/html
< Server: bfe
< Date: Tue, 07 Oct 2025 05:35:56 GMT
<
<html>
<meta http-equiv="refresh" content="0;url=http://www.baidu.com/">
</html>
* Connection #0 to host baidu.com left intact
[root@centos7 ~]#
[root@centos7 ~]#

# 只看响应头
[root@centos7 ~]# curl -I baidu.com
HTTP/1.1 200 OK
Content-Length: 81
Content-Type: text/html
Server: bfe
Date: Tue, 07 Oct 2025 05:36:07 GMT

[root@centos7 ~]#

# 查看详细请求信息和响应头
[root@centos7 ~]# curl -vI baidu.com
* About to connect() to baidu.com port 80 (#0)
* Trying 39.156.70.37...
* Connected to baidu.com (39.156.70.37) port 80 (#0)
> HEAD / HTTP/1.1
> User-Agent: curl/7.29.0
> Host: baidu.com
> Accept: */*
>
< HTTP/1.1 200 OK
HTTP/1.1 200 OK
< Content-Length: 81
Content-Length: 81
< Content-Type: text/html
Content-Type: text/html
< Server: bfe
Server: bfe
< Date: Tue, 07 Oct 2025 05:36:54 GMT
Date: Tue, 07 Oct 2025 05:36:54 GMT

<
* Connection #0 to host baidu.com left intact
[root@centos7 ~]#

# 下载文件
[root@centos7 ~]# curl -o baidu.html baidu.com
% Total % Received % Xferd Average Speed Time Time Time Current
Dload Upload Total Spent Left Speed
100 81 100 81 0 0 287 0 --:--:-- --:--:-- --:--:-- 288
[root@centos7 ~]# ls baidu.html -l
-rw-r--r-- 1 root root 81 Oct 7 13:37 baidu.html
[root@centos7 ~]#

五、封面图

封面图

磁盘分区

一直想搞这个,也是迟迟为动手,既然列入了今日计划,那就开始吧。

一、磁盘

1.1 分类

硬盘种类,浅分的话,只有两种,机械硬盘、固态硬盘。

细分的话,有太多的分类。固态分好多种,好多种颗粒。

机械硬盘没接触过,10年前家里的笔记本就是固态硬盘。

甚至还有很久之前的软盘,更是看到没看过。

1.2 基本概念

以后懂的时候再填充这一块内容吧。,不得不搞懂,不然分区数量为什么是4个主分区,我都无法理解。

  • 物理扇区,磁盘的物理属性,最小操作单元,以前磁盘是 512B ,新磁盘是4KB

  • 逻辑扇区,通俗意义的扇区,一般都说这个,512B

  • 分配单元大小,Windows格式化时看到的,是文件系统的最小操作单元

1
fsutil fsinfo ntfsinfo C:

这条命令可以看物理扇区、逻辑扇区 的大小。(需要管理员权限)

二、分区

分区,我的理解是,把硬盘分成不同的区域,重装系统时可以保留部分数据。也可以再不同的分区装上不同的操作系统。

2.1 分区表

分区表,记录分区的信息,从哪到哪是哪个分区。分为两种,MBR、GPT。

  • MBR,(Master Boot Recard)主引导记录,传统的,旧的分区方式。
  • GPT,(GUID Partition Table)分区表,新的分区方式。
对比 MBR GPT
分区数量 最多4个主分区 128个(操作系统限制)
最大支持磁盘容量 2T 9.4ZB
有无备份 无备份 分区表尾部有备份
安全性 无校验 有校验
兼容性 常配合BIOS 常配合UEFI
分区表占用空间 512B(一个扇区) 34个扇区+33个扇区

:UEFI是新版的BIOS,支持更多的功能。

2.1.1 MBR

1
2
3
4
5
6
7
8
9
10
11
12
13
flowchart LR
classDef region fill:#f8f9fa,stroke:#333,stroke-width:1px;
Boot["0x000 - 0x1BD<br/>(0 - 445) 446 字节<br/>引导代码 (Bootstrap)"]
P1["分区 1<br/>(0x1BE - 0x1CD)<br/>16 字节<br/>引导标志(1) 起始CHS(3) 类型(1) 结束CHS(3) 起始LBA(4) 扇区数(4)"]
P2["分区 2<br/>(0x1CE - 0x1DD)<br/>16 字节<br/>同上"]
P3["分区 3<br/>(0x1DE - 0x1ED)<br/>16 字节<br/>同上"]
P4["分区 4<br/>(0x1EE - 0x1FD)<br/>16 字节<br/>同上"]
Sig["0x1FE - 0x1FF<br/>(510 - 511) 2 字节<br/>启动签名 0x55AA"]

Boot --> P1 --> P2 --> P3 --> P4 --> Sig

class Boot,P1,P2,P3,P4,Sig region;

MBR演示图

MBR共占用 1个扇区。

  • 1-446 字节,引导程序。共446字节
  • 447-510 字节,分区表。共64字节。每个分区占用16字节。 最多有4个主分区。
  • 511-512 字节,启动标志,代表该扇区可以引导。共2字节。

2.1.2 GPT

1
2
3
4
5
6
7
8
9
10
11
12
13
14
15
16
17
18
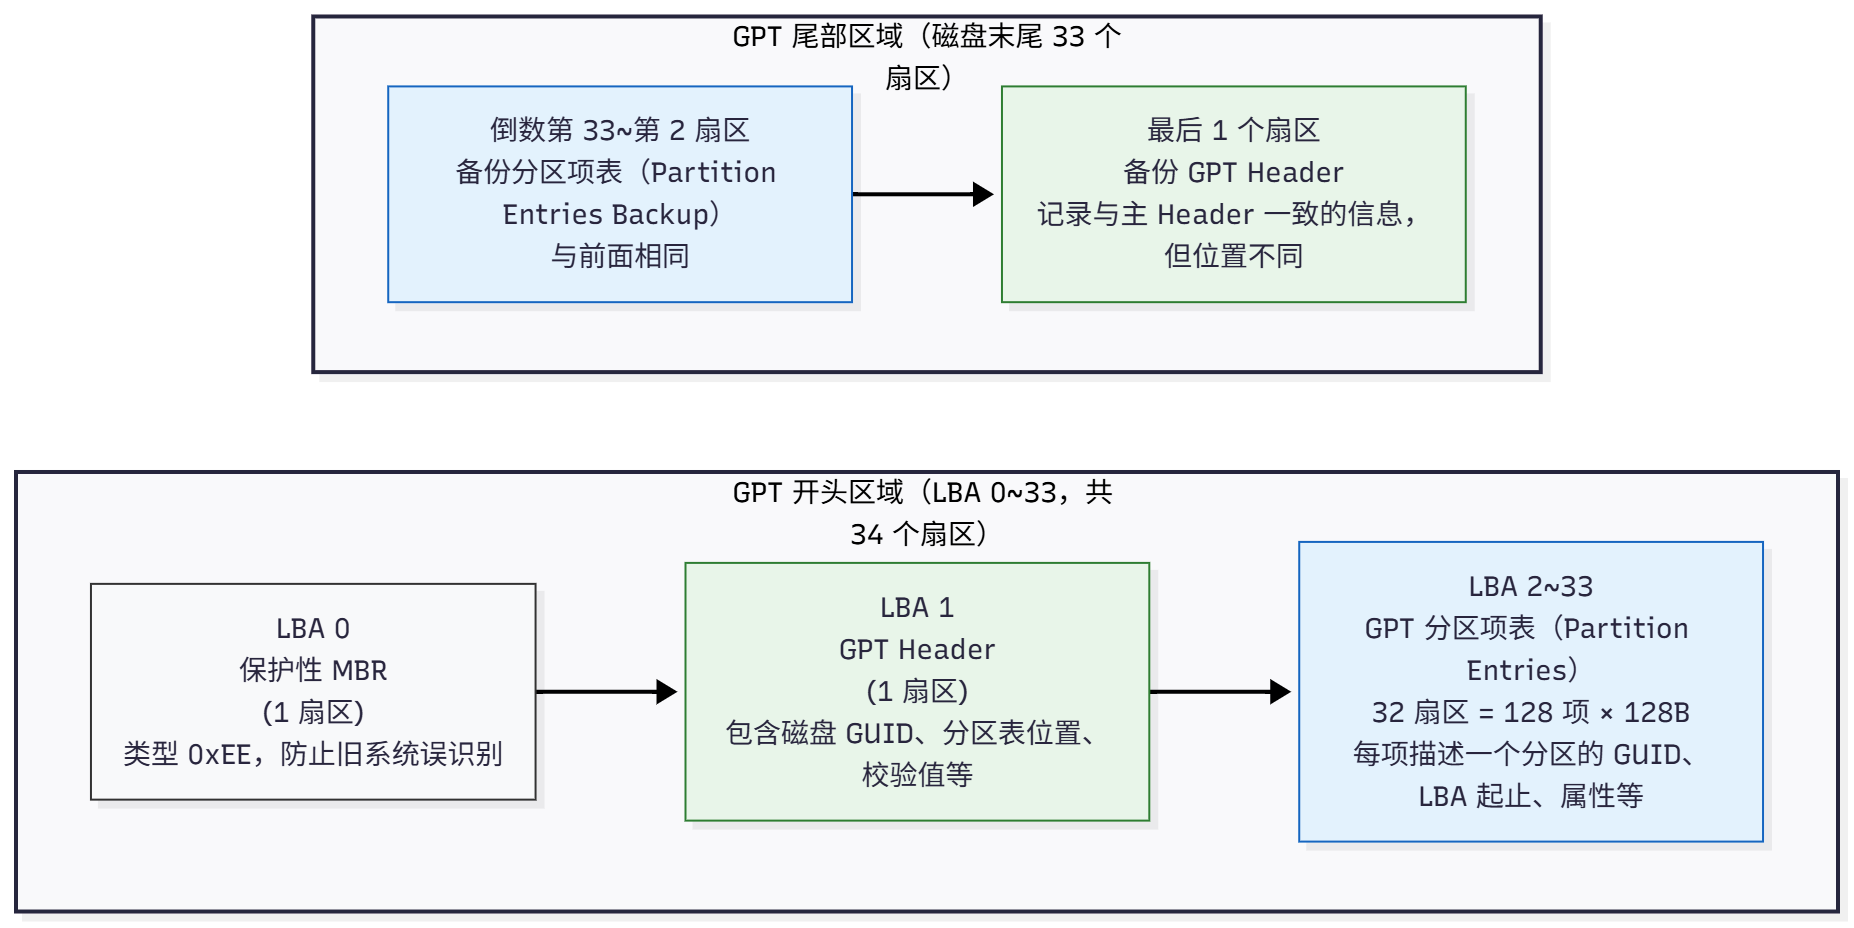
flowchart LR
classDef region fill:#f8f9fa,stroke:#333,stroke-width:1px;
classDef hdr fill:#e8f5e9,stroke:#2e7d32,stroke-width:1px;
classDef ent fill:#e3f2fd,stroke:#1565c0,stroke-width:1px;

subgraph GPT_Head["GPT 开头区域(LBA 0~33,共 34 个扇区)"]
direction LR
MBR["LBA 0<br/>保护性 MBR<br/>(1 扇区)<br/>类型 0xEE,防止旧系统误识别"]:::region -->
GPT_H["LBA 1<br/>GPT Header<br/>(1 扇区)<br/>包含磁盘 GUID、分区表位置、校验值等"]:::hdr -->
GPT_E["LBA 2~33<br/>GPT 分区项表(Partition Entries)<br/>32 扇区 = 128 项 × 128B<br/>每项描述一个分区的 GUID、LBA 起止、属性等"]:::ent
end

subgraph GPT_Tail["GPT 尾部区域(磁盘末尾 33 个扇区)"]
direction LR
GPT_E2["倒数第 33~第 2 扇区<br/>备份分区项表(Partition Entries Backup)<br/>与前面相同"]:::ent -->
GPT_H2["最后 1 个扇区<br/>备份 GPT Header<br/>记录与主 Header 一致的信息,但位置不同"]:::hdr
end

GPT演示图

GPT共占用 34+33个扇区。

  • 第一个扇区,兼容老系统,不要让旧系统识别为MBR
  • 第二个扇区,GPT表头,记录分区表位置、GUID、校验值等信息。
  • 第 3 - 34 个扇区,分区表。共 32 * 512B 字节,每个分区占用 128 字节。最多有 128个分区。

尾部有备份

  • 最后一个扇区,和开头区域的GPT 头一模一样。
  • 倒数第 2 - 33 个扇区,备份分区表,与开头的分区表一模一样。

2.2 特殊分区

2.2.1 EFI

MBR 把系统引导程序放到第一个扇区 446 字节。

GPT 把系统引导放到 EFI 的分区,主板上的 UEFI 可以发现这个分区。有的软件把这个分区叫做 ESP (EFI System Partition).

2.2.2 MSR

MSR(Microsoft Reserved Partition),微软保留分区。16M。

不存放数据,对用户不可见。为系统内部使用(如转换动态磁盘、创建卷快照等)保留空间。

2.3 分区软件

  • Windows 自带的,右键此电脑,管理,磁盘管理

  • DiskGenius ,Windows 软件,简称DG 中文官网

  • fdisk ,Linux 的分区软件,用于分MBR,新版 2.26+ 也可以操作GPT

  • gdisk ,Linux 的分区软件,只能分GPT

三、Linux分区练习

Linux 下一切皆文件,磁盘也会被映射为 /dev/sd[a-z]/dev/vsd[a-z] 的文件。

3.1 查看磁盘设备

1
2
lsblk
ls -ld /dev/sd*
1
2
3
4
5
6
7
8
9
10
11
12
13
14
15
16
17
18
19
root@ubuntu24template:~# lsblk
NAME MAJ:MIN RM SIZE RO TYPE MOUNTPOINTS
sda 8:0 0 20G 0 disk
├─sda1 8:1 0 1M 0 part
├─sda2 8:2 0 1.8G 0 part /boot
└─sda3 8:3 0 18.2G 0 part
└─ubuntu--vg-ubuntu--lv 252:0 0 10G 0 lvm /
sdb 8:16 0 20G 0 disk
sdc 8:32 0 20G 0 disk
sr0 11:0 1 3G 0 rom
root@ubuntu24template:~#
root@ubuntu24template:~# ls -l /dev/sd*
brw-rw---- 1 root disk 8, 0 Oct 7 17:41 /dev/sda
brw-rw---- 1 root disk 8, 1 Oct 7 17:41 /dev/sda1
brw-rw---- 1 root disk 8, 2 Oct 7 17:41 /dev/sda2
brw-rw---- 1 root disk 8, 3 Oct 7 17:41 /dev/sda3
brw-rw---- 1 root disk 8, 16 Oct 7 17:41 /dev/sdb
brw-rw---- 1 root disk 8, 32 Oct 7 17:41 /dev/sdc
root@ubuntu24template:~#

3.2 fdisk分区

3.2.1 工具分区

1
fdisk 磁盘设备文件
  • p 输入分区表
  • w 写入分区表
  • n 新建分区表
  • m 输入帮助文档
  • q 退出
  • g 创建GPT分区表,默认是MBR
  • d 删除分区

输出磁盘分区信息

1
2
3
4
5
6
7
8
9
10
11
12
13
14
15
16
17
18
19
root@ubuntu24template:~# fdisk /dev/sdb

Welcome to fdisk (util-linux 2.39.3).
Changes will remain in memory only, until you decide to write them.
Be careful before using the write command.

Device does not contain a recognized partition table.
Created a new DOS (MBR) disklabel with disk identifier 0x9fd7e3c8.

Command (m for help): p
Disk /dev/sdb: 20 GiB, 21474836480 bytes, 41943040 sectors
Disk model: VMware Virtual S
Units: sectors of 1 * 512 = 512 bytes
Sector size (logical/physical): 512 bytes / 512 bytes
I/O size (minimum/optimal): 512 bytes / 512 bytes
Disklabel type: dos
Disk identifier: 0x9fd7e3c8

Command (m for help):

新建分区并写入

1
2
3
4
5
6
7
8
9
10
11
12
13
14
15
16
17
18
19
20
21
22
23
24
25
26
27
28
29
30
31
Command (m for help): n
Partition type
p primary (0 primary, 0 extended, 4 free)
e extended (container for logical partitions)
Select (default p):

Using default response p.
Partition number (1-4, default 1):
First sector (2048-41943039, default 2048):
Last sector, +/-sectors or +/-size{K,M,G,T,P} (2048-41943039, default 41943039): +3G

Created a new partition 1 of type 'Linux' and of size 3 GiB.

Command (m for help): p
Disk /dev/sdb: 20 GiB, 21474836480 bytes, 41943040 sectors
Disk model: VMware Virtual S
Units: sectors of 1 * 512 = 512 bytes
Sector size (logical/physical): 512 bytes / 512 bytes
I/O size (minimum/optimal): 512 bytes / 512 bytes
Disklabel type: dos
Disk identifier: 0x9fd7e3c8

Device Boot Start End Sectors Size Id Type
/dev/sdb1 2048 6293503 6291456 3G 83 Linux

Command (m for help): w
The partition table has been altered.
Calling ioctl() to re-read partition table.
Syncing disks.

root@ubuntu24template:~#

分区结束,还不能直接写文件,需要格式化文件系统

1
2
3
4
5
6
7
8
9
10
11
12
13
14
15
# 查看文件系统
root@ubuntu24template:~# mkfs.
mkfs.bfs mkfs.btrfs mkfs.cramfs mkfs.ext2 mkfs.ext3 mkfs.ext4 mkfs.minix mkfs.xfs

# 格式化
root@ubuntu24template:~# mkfs.xfs /dev/sdb1
meta-data=/dev/sdb1 isize=512 agcount=4, agsize=196608 blks
= sectsz=512 attr=2, projid32bit=1
= crc=1 finobt=1, sparse=1, rmapbt=1
= reflink=1 bigtime=1 inobtcount=1 nrext64=0
data = bsize=4096 blocks=786432, imaxpct=25
= sunit=0 swidth=0 blks
naming =version 2 bsize=4096 ascii-ci=0, ftype=1
log =internal log bsize=4096 blocks=16384, version=2
= sectsz=512 sunit=0 blks, lazy-coun

3.2.2 挂载

此时系统显示不出来,还需要挂载,挂载分为临时挂载和永久挂载

临时挂载

1
mount 磁盘设备文件 挂载点
1
2
3
4
5
6
7
8
9
10
11
12
13
14
15
16
17
18
19
20
21
22
23
24
# 查看文件系统及挂载点
root@ubuntu24template:~# df -TH
Filesystem Type Size Used Avail Use% Mounted on
tmpfs tmpfs 406M 1.3M 405M 1% /run
/dev/mapper/ubuntu--vg-ubuntu--lv ext4 11G 4.7G 5.3G 47% /
tmpfs tmpfs 2.1G 0 2.1G 0% /dev/shm
tmpfs tmpfs 5.3M 0 5.3M 0% /run/lock
/dev/sda2 ext4 1.9G 104M 1.7G 7% /boot
tmpfs tmpfs 406M 13k 406M 1% /run/user/1000

# 临时挂载
root@ubuntu24template:~# mount /dev/sdb1 /mnt/

# 查看文件系统及挂载点
root@ubuntu24template:~# df -TH
Filesystem Type Size Used Avail Use% Mounted on
tmpfs tmpfs 406M 1.3M 405M 1% /run
/dev/mapper/ubuntu--vg-ubuntu--lv ext4 11G 4.7G 5.3G 47% /
tmpfs tmpfs 2.1G 0 2.1G 0% /dev/shm
tmpfs tmpfs 5.3M 0 5.3M 0% /run/lock
/dev/sda2 ext4 1.9G 104M 1.7G 7% /boot
tmpfs tmpfs 406M 13k 406M 1% /run/user/1000
/dev/sdb1 xfs 3.2G 95M 3.1G 3% /mnt
root@ubuntu24template:~#

取消挂载

1
umount 挂载点或挂载设备
1
2
3
4
5
6
7
8
9
10
11
12
13
14
15
16
17
18
19
20
21
22
23
24
25
26
# 查看挂载信息
root@ubuntu24template:~# df -TH
Filesystem Type Size Used Avail Use% Mounted on
tmpfs tmpfs 406M 1.3M 405M 1% /run
/dev/mapper/ubuntu--vg-ubuntu--lv ext4 11G 4.7G 5.3G 47% /
tmpfs tmpfs 2.1G 0 2.1G 0% /dev/shm
tmpfs tmpfs 5.3M 0 5.3M 0% /run/lock
/dev/sda2 ext4 1.9G 104M 1.7G 7% /boot
tmpfs tmpfs 406M 13k 406M 1% /run/user/1000
/dev/sdb1 xfs 3.2G 95M 3.1G 3% /mnt
root@ubuntu24template:~#

# 取消挂载
root@ubuntu24template:~# umount /mnt/
root@ubuntu24template:~#

# 查看挂载信息
root@ubuntu24template:~# df -TH
Filesystem Type Size Used Avail Use% Mounted on
tmpfs tmpfs 406M 1.3M 405M 1% /run
/dev/mapper/ubuntu--vg-ubuntu--lv ext4 11G 4.7G 5.3G 47% /
tmpfs tmpfs 2.1G 0 2.1G 0% /dev/shm
tmpfs tmpfs 5.3M 0 5.3M 0% /run/lock
/dev/sda2 ext4 1.9G 104M 1.7G 7% /boot
tmpfs tmpfs 406M 13k 406M 1% /run/user/1000
root@ubuntu24template:~#

永久挂载,写入 /etc/fstab

1
设备文件或UUID	挂载点	文件系统	挂载选项	0 	1
  • 挂载选项一般使用 defaults
  • 0 不备份
  • 1 开机自检
1
/dev/sdb1 /mnt xfs defaults 0 1

刷新挂载

1
mount -a
1
2
3
4
5
6
7
8
9
10
11
12
13
14
15
16
17
18
19
20
21
22
23
24
25
26
27
28
root@ubuntu24template:~# df -hT
Filesystem Type Size Used Avail Use% Mounted on
tmpfs tmpfs 387M 1.3M 386M 1% /run
/dev/mapper/ubuntu--vg-ubuntu--lv ext4 9.8G 4.4G 5.0G 47% /
tmpfs tmpfs 1.9G 0 1.9G 0% /dev/shm
tmpfs tmpfs 5.0M 0 5.0M 0% /run/lock
/dev/sda2 ext4 1.8G 99M 1.6G 7% /boot
tmpfs tmpfs 387M 12K 387M 1% /run/user/1000
root@ubuntu24template:~#

# 挂载全部
root@ubuntu24template:~# mount -a
mount: (hint) your fstab has been modified, but systemd still uses
the old version; use 'systemctl daemon-reload' to reload.
root@ubuntu24template:~# systemctl daemon-reload
root@ubuntu24template:~#

# 查看挂载信息
root@ubuntu24template:~# df -hT
Filesystem Type Size Used Avail Use% Mounted on
tmpfs tmpfs 387M 1.3M 386M 1% /run
/dev/mapper/ubuntu--vg-ubuntu--lv ext4 9.8G 4.4G 5.0G 47% /
tmpfs tmpfs 1.9G 0 1.9G 0% /dev/shm
tmpfs tmpfs 5.0M 0 5.0M 0% /run/lock
/dev/sda2 ext4 1.8G 99M 1.6G 7% /boot
tmpfs tmpfs 387M 12K 387M 1% /run/user/1000
/dev/sdb1 xfs 3.0G 90M 2.9G 3% /mnt
root@ubuntu24template:~#

3.3 gdisk 分区

用法一模一样·。不赘述了。

1
gdisk 磁盘文件

输入分区信息

1
2
3
4
5
6
7
8
9
10
11
12
13
14
15
16
17
18
19
20
21
22
23
24
25
root@ubuntu24template:~# gdisk /dev/sdc
GPT fdisk (gdisk) version 1.0.10

Partition table scan:
MBR: not present
BSD: not present
APM: not present
GPT: not present

Creating new GPT entries in memory.

Command (? for help): p
Disk /dev/sdc: 41943040 sectors, 20.0 GiB
Model: VMware Virtual S
Sector size (logical/physical): 512/512 bytes
Disk identifier (GUID): 5245C6ED-5E19-43EE-A677-ADAAB55040E0
Partition table holds up to 128 entries
Main partition table begins at sector 2 and ends at sector 33
First usable sector is 34, last usable sector is 41943006
Partitions will be aligned on 2048-sector boundaries
Total free space is 41942973 sectors (20.0 GiB)

Number Start (sector) End (sector) Size Code Name

Command (? for help):

清除分区表

1
2
3
4
5
6
7
gdisk 设备

# 进入专家模式
x

# 擦除
z

四、逻辑卷LVM

逻辑卷LVM

4.1 基本概念

逻辑卷分区较传统分区有更高程度的自定义。可动态调整空间、跨磁盘分区等。

本质是做了几层抽象层。

  • PV ,物理卷,将物理设备或分区 映射为PV。
  • VG,卷组,多个PV构成卷组。
  • LV,逻辑卷,从VG中分区,作为分区使用。
  • PE,LVM最小管理单元,默认4MB

4.2 操作配置

基本的流程,准备5个小实验

1
2
3
4
5
6
7
8
9
# 添加硬盘、创建物理卷PV,创建卷组VG,从VG中分区得到LV,格式化,挂载。

# 扩容LV(VG剩余空间足够),文件系统扩容,

# 新添加PV,扩容VG,扩容LV(VG剩余空间不足),文件系统扩容,

# 从VG中去PV(PV未占用,直接去)

# 从VG中去PV(PV占用,先迁移)

4.2.1 实验一(逻辑卷创建)

流程,虚拟机新添加4块硬盘,这里用2块,后面扩容时加一块,删除时也用一块迁移数据。

4.2.1.1 查看磁盘设备

这里有新情况,加硬盘没注意,sd* 变成 nvme0n*

1
2
3
lsblk
dh -hT
ls -la /dev/nvme0n*
1
2
3
4
5
6
7
8
9
10
11
12
13
14
15
16
17
18
19
20
21
22
23
24
25
26
27
28
29
30
31
32
33
34
35
36
# 法一
[root@centos9 ~]# lsblk
NAME MAJ:MIN RM SIZE RO TYPE MOUNTPOINTS
sr0 11:0 1 8.1G 0 rom
nvme0n1 259:0 0 20G 0 disk
├─nvme0n1p1 259:1 0 1G 0 part /boot
└─nvme0n1p2 259:2 0 19G 0 part
├─cs-root 253:0 0 17G 0 lvm /
└─cs-swap 253:1 0 2G 0 lvm [SWAP]
nvme0n2 259:3 0 20G 0 disk
nvme0n3 259:4 0 20G 0 disk
nvme0n4 259:5 0 20G 0 disk
nvme0n5 259:6 0 20G 0 disk
[root@centos9 ~]#

# 法二
[root@centos9 ~]# df -hT
Filesystem Type Size Used Avail Use% Mounted on
devtmpfs devtmpfs 853M 0 853M 0% /dev
tmpfs tmpfs 873M 0 873M 0% /dev/shm
tmpfs tmpfs 349M 5.1M 344M 2% /run
/dev/mapper/cs-root xfs 17G 1.1G 16G 7% /
/dev/nvme0n1p1 xfs 1014M 198M 817M 20% /boot
tmpfs tmpfs 175M 0 175M 0% /run/user/1000
[root@centos9 ~]#

# 法三
[root@centos9 ~]# ls -la /dev/nvme0n*
brw-rw----. 1 root disk 259, 0 Oct 10 10:41 /dev/nvme0n1
brw-rw----. 1 root disk 259, 1 Oct 10 10:41 /dev/nvme0n1p1
brw-rw----. 1 root disk 259, 2 Oct 10 10:41 /dev/nvme0n1p2
brw-rw----. 1 root disk 259, 3 Oct 10 10:41 /dev/nvme0n2
brw-rw----. 1 root disk 259, 4 Oct 10 10:41 /dev/nvme0n3
brw-rw----. 1 root disk 259, 5 Oct 10 10:41 /dev/nvme0n4
brw-rw----. 1 root disk 259, 6 Oct 10 10:41 /dev/nvme0n5
[root@centos9 ~]#
4.2.1.2 创建PV、VG、LV
1
2
3
4
5
6
7
pvcreate 物理设备或分区1 物理设备或分区2 ..

vgcreate 卷组名 物理卷1 物理卷2 ...
vgcreate 卷组名 物理卷1 物理卷2 ... -s PE大小

lvcreate -n 逻辑卷名 -L 分配存储大小 卷组名
lvcreate -n 逻辑卷名 -l PE数量 卷组名
1
2
3
4
5
6
7
8
9
# 参考sd*
pvcreate /dev/sd{a..d}

vgcreate vg1 /dev/sda /dev/sdb
vgcreate vg1 /dev/sda /dev/sdb -s 16M

# 创建LV
lvcreate -n lv1 -L 30G vg1
lvcreate -n lv1 -l 1024 vg1
1
2
3
4
5
6
7
8
9
10
11
12
13
14
15
16
17
18
19
20
21
22
23
24
# 创建PV
[root@centos9 ~]# pvcreate /dev/nvme0n{2,3}
Physical volume "/dev/nvme0n2" successfully created.
Physical volume "/dev/nvme0n3" successfully created.
[root@centos9 ~]#

# 创建VG
[root@centos9 ~]# pvs
PV VG Fmt Attr PSize PFree
/dev/nvme0n1p2 cs lvm2 a-- <19.00g 0
/dev/nvme0n2 lvm2 --- 20.00g 20.00g
/dev/nvme0n3 lvm2 --- 20.00g 20.00g
[root@centos9 ~]# vgcreate vg1 /dev/nvme0n2 /dev/nvme0n3
Volume group "vg1" successfully created
[root@centos9 ~]#

# 创建LV
[root@centos9 ~]# vgs
VG #PV #LV #SN Attr VSize VFree
cs 1 2 0 wz--n- <19.00g 0
vg1 2 0 0 wz--n- 39.99g 39.99g
[root@centos9 ~]# lvcreate -n lv1 -L 30G vg1
Logical volume "lv1" created.
[root@centos9 ~]#
4.2.1.3 查看PV、VG、LV
1
2
3
4
5
6
7
8
9
10
11
pvs
pvscan
pvdisplay

vgs
vgscan
vgdisplay

lvs
lvscan
lvdisplay

PV

1
2
3
4
5
6
7
8
9
10
11
12
13
14
15
16
17
18
19
20
21
22
23
24
25
26
27
28
29
30
31
32
33
34
35
36
37
38
39
40
41
42
43
44
45
46
47
[root@centos9 ~]# pvs
PV VG Fmt Attr PSize PFree
/dev/nvme0n1p2 cs lvm2 a-- <19.00g 0
/dev/nvme0n2 vg1 lvm2 a-- <20.00g 0
/dev/nvme0n3 vg1 lvm2 a-- <20.00g 9.99g
[root@centos9 ~]#
[root@centos9 ~]# pvscan
PV /dev/nvme0n2 VG vg1 lvm2 [<20.00 GiB / 0 free]
PV /dev/nvme0n3 VG vg1 lvm2 [<20.00 GiB / 9.99 GiB free]
PV /dev/nvme0n1p2 VG cs lvm2 [<19.00 GiB / 0 free]
Total: 3 [<58.99 GiB] / in use: 3 [<58.99 GiB] / in no VG: 0 [0 ]
[root@centos9 ~]#
[root@centos9 ~]# pvdisplay
--- Physical volume ---
PV Name /dev/nvme0n2
VG Name vg1
PV Size 20.00 GiB / not usable 4.00 MiB
Allocatable yes (but full)
PE Size 4.00 MiB
Total PE 5119
Free PE 0
Allocated PE 5119
PV UUID njsifN-6O4l-DmGX-DPcp-iXiL-DHm3-Zs9jmz

--- Physical volume ---
PV Name /dev/nvme0n3
VG Name vg1
PV Size 20.00 GiB / not usable 4.00 MiB
Allocatable yes
PE Size 4.00 MiB
Total PE 5119
Free PE 2558
Allocated PE 2561
PV UUID 5qnblz-L7At-Gezi-f3on-mrmS-Cgzt-Lsnws4

--- Physical volume ---
PV Name /dev/nvme0n1p2
VG Name cs
PV Size <19.00 GiB / not usable 3.00 MiB
Allocatable yes (but full)
PE Size 4.00 MiB
Total PE 4863
Free PE 0
Allocated PE 4863
PV UUID JdMs5E-9Csl-gjSQ-MOHw-1L7m-Z8zX-EpHQRH

[root@centos9 ~]#

VG

1
2
3
4
5
6
7
8
9
10
11
12
13
14
15
16
17
18
19
20
21
22
23
24
25
26
27
28
29
30
31
32
33
34
35
36
37
38
39
40
41
42
43
44
45
46
47
48
49
50
51
[root@centos9 ~]# vgs
VG #PV #LV #SN Attr VSize VFree
cs 1 2 0 wz--n- <19.00g 0
vg1 2 1 0 wz--n- 39.99g 9.99g
[root@centos9 ~]# vgscan
Found volume group "vg1" using metadata type lvm2
Found volume group "cs" using metadata type lvm2
[root@centos9 ~]# vgdisplay
--- Volume group ---
VG Name vg1
System ID
Format lvm2
Metadata Areas 2
Metadata Sequence No 2
VG Access read/write
VG Status resizable
MAX LV 0
Cur LV 1
Open LV 0
Max PV 0
Cur PV 2
Act PV 2
VG Size 39.99 GiB
PE Size 4.00 MiB
Total PE 10238
Alloc PE / Size 7680 / 30.00 GiB
Free PE / Size 2558 / 9.99 GiB
VG UUID X9duoj-3Ev2-1HL3-XOX7-Wt7g-YPWy-kn80yf

--- Volume group ---
VG Name cs
System ID
Format lvm2
Metadata Areas 1
Metadata Sequence No 3
VG Access read/write
VG Status resizable
MAX LV 0
Cur LV 2
Open LV 2
Max PV 0
Cur PV 1
Act PV 1
VG Size <19.00 GiB
PE Size 4.00 MiB
Total PE 4863
Alloc PE / Size 4863 / <19.00 GiB
Free PE / Size 0 / 0
VG UUID lOJaWr-4Iid-YfK0-fQTp-LN9a-lNf1-PqL8ET

[root@centos9 ~]#
4.2.1.4 格式化
1
mkfs.文件系统 逻辑卷
1
mkfs.xfs /dev/vg1/lv1
1
2
3
4
5
6
7
8
9
10
11
12
[root@centos9 ~]# mkfs.xfs /dev/vg1/lv1
meta-data=/dev/vg1/lv1 isize=512 agcount=4, agsize=1966080 blks
= sectsz=512 attr=2, projid32bit=1
= crc=1 finobt=1, sparse=1, rmapbt=0
= reflink=1 bigtime=1 inobtcount=1
data = bsize=4096 blocks=7864320, imaxpct=25
= sunit=0 swidth=0 blks
naming =version 2 bsize=4096 ascii-ci=0, ftype=1
log =internal log bsize=4096 blocks=3840, version=2
= sectsz=512 sunit=0 blks, lazy-count=1
realtime =none extsz=4096 blocks=0, rtextents=0
[root@centos9 ~]#
4.2.1.5 临时挂载
1
2
mkdir /mnt/lv1
mount /dev/vg1/lv1 /mnt/lv1
1
2
3
4
5
6
7
8
9
10
11
12
[root@centos9 ~]# mkdir /mnt/lv1
[root@centos9 ~]# mount /dev/vg1/lv1 /mnt/lv1
[root@centos9 ~]# df -hT
Filesystem Type Size Used Avail Use% Mounted on
devtmpfs devtmpfs 853M 0 853M 0% /dev
tmpfs tmpfs 873M 0 873M 0% /dev/shm
tmpfs tmpfs 349M 5.2M 344M 2% /run
/dev/mapper/cs-root xfs 17G 1.2G 16G 7% /
/dev/nvme0n1p1 xfs 1014M 198M 817M 20% /boot
tmpfs tmpfs 175M 0 175M 0% /run/user/1000
/dev/mapper/vg1-lv1 ext4 30G 24K 28G 1% /mnt/lv1
[root@centos9 ~]#

4.2.2 实验二(扩容LV)

流程,查看VG剩余空间,扩容

4.2.2.1 查看VG剩余空间

发现还剩10G,可以扩。

1
vgdisplay vg1
1
2
3
4
5
6
7
8
9
10
11
12
13
14
15
16
17
18
19
20
21
22
23
[root@centos9 ~]# vgdisplay vg1
--- Volume group ---
VG Name vg1
System ID
Format lvm2
Metadata Areas 2
Metadata Sequence No 2
VG Access read/write
VG Status resizable
MAX LV 0
Cur LV 1
Open LV 1
Max PV 0
Cur PV 2
Act PV 2
VG Size 39.99 GiB
PE Size 4.00 MiB
Total PE 10238
Alloc PE / Size 7680 / 30.00 GiB
Free PE / Size 2558 / 9.99 GiB
VG UUID X9duoj-3Ev2-1HL3-XOX7-Wt7g-YPWy-kn80yf

[root@centos9 ~]#
4.2.2.2 扩容LV
1
2
3
4
5
6
7
lvextend -L 32G 逻辑卷
lvextend -L +2G 逻辑卷

lvextend -l PE数量 逻辑卷
lvextend -l +PE数量 逻辑卷

lvextend -L +100%FREE 逻辑卷
  • 法一,扩容,2G
1
2
3
4
5
6
7
8
9
10
11
12
13
14
15
16
17
18
19
20
21
22
23
24
25
26
27
28
29
30
31
# 新设置空间的大小必须比存在的大
[root@centos9 ~]# lvextend -L 2G /dev/vg1/lv1
New size given (512 extents) not larger than existing size (9216 extents)
[root@centos9 ~]#

# 添加2G
[root@centos9 ~]# lvextend -L +2G /dev/vg1/lv1
Size of logical volume vg1/lv1 changed from 30.00 GiB (7680 extents) to 32.00 GiB (8192 extents).
Logical volume vg1/lv1 successfully resized.
[root@centos9 ~]#

# 查看逻辑卷
[root@centos9 ~]# lvdisplay /dev/vg1/lv1
--- Logical volume ---
LV Path /dev/vg1/lv1
LV Name lv1
VG Name vg1
LV UUID 5yz2dh-5xWY-CCiV-6SOQ-y98Q-XqLg-wQW4k0
LV Write Access read/write
LV Creation host, time centos9.template, 2025-10-10 11:00:30 +0800
LV Status available
# open 1
LV Size 32.00 GiB
Current LE 8192
Segments 2
Allocation inherit
Read ahead sectors auto
- currently set to 256
Block device 253:2

[root@centos9 ~]#
  • 法二,扩容,1024个PE,4G
1
2
3
4
5
6
7
8
9
10
11
12
13
14
15
16
17
18
19
20
21
22
23
24
25
26
27
28
29
30
31
# 这里指定的PE数量必须比之前的空间大
[root@centos9 ~]# lvextend -l 1024 /dev/vg1/lv1
New size given (1024 extents) not larger than existing size (9216 extents)
[root@centos9 ~]#

# 添加1024个PE
[root@centos9 ~]# lvextend -l +1024 /dev/vg1/lv1
Size of logical volume vg1/lv1 changed from 32.00 GiB (8192 extents) to 36.00 GiB (9216 extents).
Logical volume vg1/lv1 successfully resized.
[root@centos9 ~]#

# 查看逻辑卷
[root@centos9 ~]# lvdisplay /dev/vg1/lv1
--- Logical volume ---
LV Path /dev/vg1/lv1
LV Name lv1
VG Name vg1
LV UUID 5yz2dh-5xWY-CCiV-6SOQ-y98Q-XqLg-wQW4k0
LV Write Access read/write
LV Creation host, time centos9.template, 2025-10-10 11:00:30 +0800
LV Status available
# open 1
LV Size 36.00 GiB
Current LE 9216
Segments 2
Allocation inherit
Read ahead sectors auto
- currently set to 256
Block device 253:2

[root@centos9 ~]#
  • 法三,扩容,剩余空间的100%,3.99G
1
2
3
4
5
6
7
8
9
10
11
12
13
14
15
16
17
18
19
20
21
22
23
[root@centos9 ~]# lvextend -l +100%FREE /dev/vg1/lv1 
Size of logical volume vg1/lv1 changed from 36.00 GiB (9216 extents) to 39.99 GiB (10238 extents).
Logical volume vg1/lv1 successfully resized.
[root@centos9 ~]#
[root@centos9 ~]# lvdisplay /dev/vg1/lv1
--- Logical volume ---
LV Path /dev/vg1/lv1
LV Name lv1
VG Name vg1
LV UUID 5yz2dh-5xWY-CCiV-6SOQ-y98Q-XqLg-wQW4k0
LV Write Access read/write
LV Creation host, time centos9.template, 2025-10-10 11:00:30 +0800
LV Status available
# open 1
LV Size 39.99 GiB
Current LE 10238
Segments 2
Allocation inherit
Read ahead sectors auto
- currently set to 256
Block device 253:2

[root@centos9 ~]#
4.2.2.3 文件系统扩容
1
2
3
4
5
# ext 文件系统
resize2fs /dev/vg1/lv1

# xfs 文件系统
xfs_growfs /dev/vg1/lv1
1
2
3
4
5
6
7
8
9
10
11
12
13
14
15
16
17
18
19
20
21
22
23
24
25
26
27
28
29
30
31
32
# 查看分区大小 30G
[root@centos9 ~]# df -hT
Filesystem Type Size Used Avail Use% Mounted on
devtmpfs devtmpfs 853M 0 853M 0% /dev
tmpfs tmpfs 873M 0 873M 0% /dev/shm
tmpfs tmpfs 349M 5.2M 344M 2% /run
/dev/mapper/cs-root xfs 17G 1.2G 16G 7% /
/dev/nvme0n1p1 xfs 1014M 198M 817M 20% /boot
tmpfs tmpfs 175M 0 175M 0% /run/user/1000
/dev/mapper/vg1-lv1 ext4 30G 24K 28G 1% /mnt/lv1
[root@centos9 ~]#

# 扩容文件系统
[root@centos9 ~]# resize2fs /dev/vg1/lv1
resize2fs 1.46.5 (30-Dec-2021)
Filesystem at /dev/vg1/lv1 is mounted on /mnt/lv1; on-line resizing required
old_desc_blocks = 4, new_desc_blocks = 5
The filesystem on /dev/vg1/lv1 is now 10483712 (4k) blocks long.

[root@centos9 ~]#

# 查看分区大小,40G
[root@centos9 ~]# df -hT
Filesystem Type Size Used Avail Use% Mounted on
devtmpfs devtmpfs 853M 0 853M 0% /dev
tmpfs tmpfs 873M 0 873M 0% /dev/shm
tmpfs tmpfs 349M 5.2M 344M 2% /run
/dev/mapper/cs-root xfs 17G 1.2G 16G 7% /
/dev/nvme0n1p1 xfs 1014M 198M 817M 20% /boot
tmpfs tmpfs 175M 0 175M 0% /run/user/1000
/dev/mapper/vg1-lv1 ext4 40G 48M 38G 1% /mnt/lv1
[root@centos9 ~]#

4.2.3 实验三(扩容VG-LV)

流程,查看VG剩余空间,发现不足,先扩容PV,再扩容VG,再扩容LV

4.2.3.1 查看VG-PV

发现无剩余空间

1
2
vgdisplay vg1
pvs
1
2
3
4
5
6
7
8
9
10
11
12
13
14
15
16
17
18
19
20
21
22
23
24
25
26
27
28
29
30
31
32
# 查看vg1详细信息
[root@centos9 ~]# vgdisplay vg1
--- Volume group ---
VG Name vg1
System ID
Format lvm2
Metadata Areas 2
Metadata Sequence No 5
VG Access read/write
VG Status resizable
MAX LV 0
Cur LV 1
Open LV 1
Max PV 0
Cur PV 2
Act PV 2
VG Size 39.99 GiB
PE Size 4.00 MiB
Total PE 10238
Alloc PE / Size 10238 / 39.99 GiB
Free PE / Size 0 / 0
VG UUID X9duoj-3Ev2-1HL3-XOX7-Wt7g-YPWy-kn80yf

[root@centos9 ~]#

# 发现无可用PV
[root@centos9 ~]# pvs
PV VG Fmt Attr PSize PFree
/dev/nvme0n1p2 cs lvm2 a-- <19.00g 0
/dev/nvme0n2 vg1 lvm2 a-- <20.00g 0
/dev/nvme0n3 vg1 lvm2 a-- <20.00g 0
[root@centos9 ~]#
4.2.3.2 扩容PV-VG
1
vgextend 卷组名 物理卷1 物理卷2
1
2
3
4
5
6
7
8
9
# 扩容PV
[root@centos9 ~]# pvcreate /dev/nvme0n4
Physical volume "/dev/nvme0n4" successfully created.
[root@centos9 ~]#

# 扩容VG
[root@centos9 ~]# vgextend vg1 /dev/nvme0n4
Volume group "vg1" successfully extended
[root@centos9 ~]#
4.2.3.3 扩容LV(同实验二)
1
lvextend -L/l 扩容空间 逻辑卷路径
1
2
3
4
5
# 扩容1G,256个PE
[root@centos9 ~]# lvextend -l +256 /dev/vg1/lv1
Size of logical volume vg1/lv1 changed from 39.99 GiB (10238 extents) to 40.99 GiB (10494 extents).
Logical volume vg1/lv1 successfully resized.
[root@centos9 ~]#
4.2.3.4 文件系统扩容
1
resize2fs 逻辑卷路径
1
2
3
4
5
6
7
[root@centos9 ~]# resize2fs /dev/vg1/lv1 
resize2fs 1.46.5 (30-Dec-2021)
Filesystem at /dev/vg1/lv1 is mounted on /mnt/lv1; on-line resizing required
old_desc_blocks = 5, new_desc_blocks = 6
The filesystem on /dev/vg1/lv1 is now 10745856 (4k) blocks long.

[root@centos9 ~]#

4.2.4 实验四(删除PV)

流程,查看PV,如果空间未被使用,则可直接删除PV。

4.2.4.1 查看PV
1
2
3
4
5
6
7
[root@centos9 ~]# pvs
PV VG Fmt Attr PSize PFree
/dev/nvme0n1p2 cs lvm2 a-- <19.00g 0
/dev/nvme0n2 vg1 lvm2 a-- <20.00g 0
/dev/nvme0n3 vg1 lvm2 a-- <20.00g 0
/dev/nvme0n4 vg1 lvm2 a-- <20.00g <20.00g
[root@centos9 ~]#
4.2.4.2 从VG中删除PV
1
vgreduce 卷组 物理卷路径
1
2
3
[root@centos9 ~]# vgreduce vg1 /dev/nvme0n4
Removed "/dev/nvme0n4" from volume group "vg1"
[root@centos9 ~]#
4.2.4.3 删除PV
1
pvremove 物理卷路径
1
2
3
[root@centos9 ~]# pvremove /dev/nvme0n4
Labels on physical volume "/dev/nvme0n4" successfully wiped.
[root@centos9 ~]#

4.2.5 实验五(迁移删除PV)

流程,查看PV,如果空间被使用,需要先迁移PV中的数据,再删除PV。

准备添加硬盘nvme0n5 ,迁移 nvme0n2nvme0n5 然后删除 nvme0n2

4.2.5.1 查看PV
1
pvs
1
2
3
4
5
6
[root@centos9 ~]# pvs
PV VG Fmt Attr PSize PFree
/dev/nvme0n1p2 cs lvm2 a-- <19.00g 0
/dev/nvme0n2 vg1 lvm2 a-- <20.00g 0
/dev/nvme0n3 vg1 lvm2 a-- <20.00g 0
[root@centos9 ~]#
4.2.5.2 添加PV
1
2
pvcreate 磁盘路径
vgextend 卷组名 物理卷名称
1
2
3
4
5
6
7
8
9
10
[root@centos9 ~]# pvcreate /dev/nvme0n5
Physical volume "/dev/nvme0n5" successfully created.
[root@centos9 ~]# vgextend vg1 /dev/nvme0n5
Volume group "vg1" successfully extended
[root@centos9 ~]#
[root@centos9 ~]# vgs
VG #PV #LV #SN Attr VSize VFree
cs 1 2 0 wz--n- <19.00g 0
vg1 3 1 0 wz--n- <59.99g <20.00g
[root@centos9 ~]#
4.2.5.3 迁移

nvme0n2 -> nvme0n5

1
pvmove 物理卷1 物理卷2
  • 物理卷1 是源
  • 物理卷2 是目标
1
2
3
4
5
6
7
8
9
10
11
12
13
14
15
16
17
18
[root@centos9 ~]# pvs
PV VG Fmt Attr PSize PFree
/dev/nvme0n1p2 cs lvm2 a-- <19.00g 0
/dev/nvme0n2 vg1 lvm2 a-- <20.00g 0
/dev/nvme0n3 vg1 lvm2 a-- <20.00g 0
/dev/nvme0n5 vg1 lvm2 a-- <20.00g <20.00g
[root@centos9 ~]#
[root@centos9 ~]# pvmove /dev/nvme0n2 /dev/nvme0n5
/dev/nvme0n2: Moved: 1.13%
/dev/nvme0n2: Moved: 100.00%
[root@centos9 ~]#
[root@centos9 ~]# pvs
PV VG Fmt Attr PSize PFree
/dev/nvme0n1p2 cs lvm2 a-- <19.00g 0
/dev/nvme0n2 vg1 lvm2 a-- <20.00g <20.00g
/dev/nvme0n3 vg1 lvm2 a-- <20.00g 0
/dev/nvme0n5 vg1 lvm2 a-- <20.00g 0
[root@centos9 ~]#
4.2.5.4 从VG中删除PV
1
vgreduce 卷组 物理卷路径
1
2
3
[root@centos9 ~]# vgreduce vg1 /dev/nvme0n2
Removed "/dev/nvme0n2" from volume group "vg1"
[root@centos9 ~]#
4.2.5.5 删除PV
1
pvremove 物理卷路径
1
2
3
[root@centos9 ~]# pvremove /dev/nvme0n2
Labels on physical volume "/dev/nvme0n2" successfully wiped.
[root@centos9 ~]#

五、封面图

封面图

Linux权限管理

记录一下Linux权限相关的内容,基本文件权限、扩展文件权限、特殊文件权限。

一、基本文件权限

1.1 基本文件权限概述

1
2
3
4
5
6
7
8
[root@centos7 ~]# ll
total 544
-rw------- 1 root root 1492 2025-09-28 16:07 anaconda-ks.cfg
drwxr-xr-x 2 root root 38 2025-10-05 14:04 dir1
-rw-r--r-- 1 root root 575 2025-10-05 13:38 init.sh
-rw-r--r-- 1 root root 543132 2021-01-18 21:09 nginx.rpm
-rw------- 1 root root 3471 2025-10-04 22:59 sshd_config
[root@centos7 ~]#
1
2
3
4
5
6
7
8
9
10
11
drwxr-xr-x 2 root root     38 2025-10-05 14:04 dir1
│ │ | | │ │ │ │ │ └ 文件名
│ │ | | │ │ │ │ └ 修改时间
│ │ | | │ │ │ └ 文件大小(字节)
│ │ | | │ │ └ 所属组
│ │ | | │ └ 所属用户
│ │ | | └ 硬链接数
│ | | └ 权限(rwx、其他人)
│ | └ 权限(rwx、属组)
│ └ 权限(rwx、属主)
└ 文件类型(- 文件, d 目录, l 链接 …)

基本文件权限一共占9位,对属主、属组、其他人分别有 r w x 三种权限。

文件 文件夹 二进制数字 十进制数字
r 可读 可列出文件列表 100 4
w 可写 可删除、创建文件 010 2
x 可执行 可进入 001 1

1.2 基本文件权限的修改

  1. 字符型方式修改.
1
chmod 操作对象、操作符、权限 文件
1
2
3
4
5
6
7
8
9
chmod u+x 文件
chmod g-x 文件
chmod o+r 文件
chmod a+x 文件
chmod +x 文件
chmod u=r--,g=r--,o=--- 文件
chmod u=rwx 文件
chmod ug=rw- 文件
chmod a=r-- 文件
  • a 代表所有人(操作对象)
  • u 代表属主(操作对象)
  • g 代表属组(操作对象)
  • o 代表其他人(操作对象)
  • + 添加权限(操作符)
  • - 减去权限(操作符)
  • = 赋值给权限(操作符)
  • r 可读、可列出文件列表
  • w 可写、可增删文件
  • x 可执行、可进入文件夹
1
2
3
4
5
6
7
8
9
10
11
12
13
# 增加权限前
[root@centos7 ~]# ls -l anaconda-ks.cfg
-rw------- 1 root root 1492 Sep 28 16:07 anaconda-ks.cfg
[root@centos7 ~]#

# 增加权限x
[root@centos7 ~]# chmod +x anaconda-ks.cfg
[root@centos7 ~]#

# 增加权限后
[root@centos7 ~]# ls -l anaconda-ks.cfg
-rwx--x--x 1 root root 1492 Sep 28 16:07 anaconda-ks.cfg
[root@centos7 ~]#

对这部分内容很熟悉了,并且配置很灵活,案例太繁琐,跳过了。。。

注意

  • 逗号 , 前后没有空格
  • 等于号 = 前后没有空格

1.3 属主、属组的修改

  1. 修改属主、数组
1
2
chown 属主:属组 文件 
chown 属主.属组 文件
1
2
3
4
5
6
7
8
9
10
11
# 修改前
[root@centos7 ~]# ls -l anaconda-ks.cfg
-rw-rw-r-- 1 root root 1492 Sep 28 16:07 anaconda-ks.cfg

# 修改属主、属组 root ----> qiankong
[root@centos7 ~]# chown qiankong:qiankong anaconda-ks.cfg

# 修改后
[root@centos7 ~]# ls -l anaconda-ks.cfg
-rw-rw-r-- 1 qiankong qiankong 1492 Sep 28 16:07 anaconda-ks.cfg
[root@centos7 ~]#
  1. 修改属组
1
chgrp 属组 文件
1
2
3
4
5
6
7
8
9
10
11
# 修改前
[root@centos7 ~]# ls -l anaconda-ks.cfg
-rw-rw-r-- 1 root root 1492 Sep 28 16:07 anaconda-ks.cfg

# 修改属组 root ----> qiankong
[root@centos7 ~]# chgrp qiankong anaconda-ks.cfg

# 修改后
[root@centos7 ~]# ls -l anaconda-ks.cfg
-rw-rw-r-- 1 root qiankong 1492 Sep 28 16:07 anaconda-ks.cfg
[root@centos7 ~]# =

chgrp 只能修改属组,不如 chown 好用。

二、扩展文件权限

也有一些扩展权限,可以做到一些特殊的功能。

说明 用途
a 只能追加 日志文件
i 不可修改 关键系统文件
A 不更新访问时间 读取频繁的文件,加快磁盘IO
c 压缩存储 占用空间较大的文件

2.1 查看文件的扩展权限

1
lsattr 文件
1
2
3
[root@centos7 ~]# lsattr anaconda-ks.cfg 
---------------- anaconda-ks.cfg
[root@centos7 ~]#

2.2 修改文件的扩展权限

1
2
3
4
5
# 添加权限
chattr +权限符 文件

# 去掉权限
chattr -权限符 文件

2.3 特殊属性示范

2.3.1 仅可追加 a

1
2
3
4
5
6
7
8
9
10
11
12
13
14
15
16
17
18
19
20
21
22
23
24
25
26
27
# 新建一个文件,可以追加写,可以覆盖写
[root@centos7 ~]# touch filea
[root@centos7 ~]# lsattr filea
---------------- filea
[root@centos7 ~]#
[root@centos7 ~]# echo "111" > filea
[root@centos7 ~]# echo "111" >> filea
[root@centos7 ~]#

# 添加扩展权限a
[root@centos7 ~]# chattr +a filea
[root@centos7 ~]# lsattr filea
-----a---------- filea
[root@centos7 ~]#

# 添加扩展权限a后,无法覆盖写
[root@centos7 ~]# echo "111" > filea
-bash: filea: Operation not permitted
[root@centos7 ~]#

# 添加扩展权限a后,可以追加写
[root@centos7 ~]# echo "111" >> filea
[root@centos7 ~]# cat filea
111
111
111
[root@centos7 ~]#

2.3.2 不可修改 i

1
2
3
4
5
6
7
8
9
10
11
12
13
14
15
16
17
18
19
20
# 创建普通文件,可写
[root@centos7 ~]# touch filei
[root@centos7 ~]# lsattr filei
---------------- filei
[root@centos7 ~]# echo helloworld > filei
[root@centos7 ~]# echo helloworld >> filei
[root@centos7 ~]#

# 添加扩展权限i
[root@centos7 ~]# chattr +i filei
[root@centos7 ~]# lsattr filei
----i----------- filei
[root@centos7 ~]#

# 添加扩展权限i后,不可写
[root@centos7 ~]# echo hello > filei
-bash: filei: Permission denied
[root@centos7 ~]# echo hello >> filei
-bash: filei: Permission denied
[root@centos7 ~]#

2.3.3 不更新访问时间 A

1
2
3
4
5
6
7
8
9
10
11
12
13
14
15
16
17
18
19
20
21
22
23
24
25
26
27
28
29
30
31
32
33
34
35
36
37
38
39
40
41
42
43
44
45
46
47
48
49
50
51
52
# 创建文件,使用cat,发现访问时间会变化
[root@centos7 ~]# touch fileA
[root@centos7 ~]# lsattr fileA
---------------- fileA
[root@centos7 ~]# stat fileA
File: ‘fileA’
Size: 0 Blocks: 0 IO Block: 4096 regular empty file
Device: fd00h/64768d Inode: 67193657 Links: 1
Access: (0644/-rw-r--r--) Uid: ( 0/ root) Gid: ( 0/ root)
Access: 2025-10-06 16:53:43.337163277 +0800
Modify: 2025-10-06 16:53:43.337163277 +0800
Change: 2025-10-06 16:53:43.337163277 +0800
Birth: -
[root@centos7 ~]# cat fileA
[root@centos7 ~]# stat fileA
File: ‘fileA’
Size: 0 Blocks: 0 IO Block: 4096 regular empty file
Device: fd00h/64768d Inode: 67193657 Links: 1
Access: (0644/-rw-r--r--) Uid: ( 0/ root) Gid: ( 0/ root)
Access: 2025-10-06 16:54:10.056163550 +0800
Modify: 2025-10-06 16:53:43.337163277 +0800
Change: 2025-10-06 16:53:43.337163277 +0800
Birth: -
[root@centos7 ~]#

# 添加扩展权限 A
[root@centos7 ~]# chattr +A fileA
[root@centos7 ~]# lsattr fileA
-------A-------- fileA


# 使用cat 查看文件,发现确实不改变访问时间
[root@centos7 ~]# stat fileA
File: ‘fileA’
Size: 0 Blocks: 0 IO Block: 4096 regular empty file
Device: fd00h/64768d Inode: 67193657 Links: 1
Access: (0644/-rw-r--r--) Uid: ( 0/ root) Gid: ( 0/ root)
Access: 2025-10-06 16:54:10.056163550 +0800
Modify: 2025-10-06 16:53:43.337163277 +0800
Change: 2025-10-06 16:54:30.810163763 +0800
Birth: -
[root@centos7 ~]# cat fileA
[root@centos7 ~]# stat fileA
File: ‘fileA’
Size: 0 Blocks: 0 IO Block: 4096 regular empty file
Device: fd00h/64768d Inode: 67193657 Links: 1
Access: (0644/-rw-r--r--) Uid: ( 0/ root) Gid: ( 0/ root)
Access: 2025-10-06 16:54:10.056163550 +0800
Modify: 2025-10-06 16:53:43.337163277 +0800
Change: 2025-10-06 16:54:30.810163763 +0800
Birth: -
[root@centos7 ~]#

2.3.4 压缩存储 c

1
2
3
4
5
6
7
[root@centos7 ~]# chattr +c bigfile 
chattr: Operation not supported while setting flags on bigfile

[root@centos7 ~]# df -hT |grep xfs
/dev/mapper/centos_centos7-root xfs 37G 2.3G 35G 6% /
/dev/sda1 xfs 1014M 138M 877M 14% /boot
[root@centos7 ~]#

发现不支持,c 属性属于早期 ext2/ext3 的实验功能,现代 ext4 也不默认启用。

三、特殊权限

Linux上还存在一些特殊权限,SUID、SGID、SBIT。

用途 十进制 符号
SUID 针对文件,文件执行时拥有属主的权限 4 s/S
SGID 针对文件夹,新建的文件继承目录的属组 2 s/S
SBIT 针对文件夹,只有文件所有者、目录所有者、root可以删除文件 1 t/T

符号位会占用 x 的位置,所以会使用大小写来区分是否有可执行权限。

  • 小写,代表有x
  • 大写,代表没有x

3.1 SUID

1
2
3
4
5
# 添加SUID权限
chmod u+s 文件

# 删除SUID权限
chmod u-s 文件
1
2
3
4
5
6
7
8
9
10
11
12
# 添加SUID权限前
[root@centos7 ~]# ls -l /usr/bin/cat
-rwxr-xr-x. 1 root root 54080 Aug 20 2019 /usr/bin/cat
[root@centos7 ~]#

# 添加SUID权限
[root@centos7 ~]# chmod u+s /usr/bin/cat

# 添加SUID权限后
[root@centos7 ~]# ls -l /usr/bin/cat
-rwsr-xr-x. 1 root root 54080 Aug 20 2019 /usr/bin/cat
[root@centos7 ~]#
1
2
3
4
5
6
7
8
9
10
11
12
13
14
15
16
17
18
19
20
21
22
23
24
25
26
27
28
29
30
31
32
33
34
35
36
37
38
# cat 没有SUID时
[qiankong@centos7 ~]$ cat /etc/shadow
cat: /etc/shadow: Permission denied
[qiankong@centos7 ~]$

# cat 有SUID时
[qiankong@centos7 ~]$ cat /etc/shadow
root:$6$C3KUOBmSuydyrnip$XatlE2BFuX6dqoWZLqg1qTrfTN00jtE01Q3PNR8NaouRUzcxnAP2XTNLwd8gKfQ9TeUG6nuKZU2lCNFxPWXzt.::0:99999:7:::
bin:*:18353:0:99999:7:::
daemon:*:18353:0:99999:7:::
adm:*:18353:0:99999:7:::
lp:*:18353:0:99999:7:::
sync:*:18353:0:99999:7:::
shutdown:*:18353:0:99999:7:::
halt:*:18353:0:99999:7:::
mail:*:18353:0:99999:7:::
operator:*:18353:0:99999:7:::
games:*:18353:0:99999:7:::
ftp:*:18353:0:99999:7:::
nobody:*:18353:0:99999:7:::
systemd-network:!!:20359::::::
dbus:!!:20359::::::
polkitd:!!:20359::::::
sshd:!!:20359::::::
postfix:!!:20359::::::
yangge:$6$z8733B2J$LghANwcyLmksdeJsTqgGE6OTEYrvwdsDilFViIQuL3T4J49Br6tOMW.3O1g6ZS04DncFzCRMXumKnCAjJ1y7o/:20359:0:99999:7:::
rpc:!!:20361:0:99999:7:::
rpcuser:!!:20361::::::
nfsnobody:!!:20361::::::
apache:!!:20364::::::
test004:!!:20367:0:99999:7:::
test005:!!:20367:0:99999:7:::
test006:!!:20367:0:99999:7:::
test007:!!:20367:0:99999:7:::
test008:!!:20367:0:99999:7:::
test009:!!:20367:0:99999:7:::
qiankong:$6$vBwPmyiQ$lWaSgzxCjsVEp5xtycyYEE1iJj5povL3g0jOr/FigbOo1aGBJwQ7yoB869lNwvzF/a.sj1/4Y4Dfyh7eLA8Wp0:20367:0:99999:7::165765:
[qiankong@centos7 ~]$

验证大小写,对应 x 的情况。

1
2
3
4
5
6
7
8
9
10
11
12
# 开始是小写s
[root@centos7 ~]# ls -l /usr/bin/cat
-rwsr-xr-x. 1 root root 54080 Aug 20 2019 /usr/bin/cat
[root@centos7 ~]#

# 去掉x 权限
[root@centos7 ~]# chmod u-x /usr/bin/cat

# 变成大写S
[root@centos7 ~]# ls -l /usr/bin/cat
-rwSr-xr-x. 1 root root 54080 Aug 20 2019 /usr/bin/cat
[root@centos7 ~]#

3.2 SGID

1
2
3
4
5
# 添加SGID权限
chmod g+s 文件夹

# 删除SUID权限
chmod g-s 文件夹
1
2
3
4
5
6
7
8
9
10
11
12
13
14
15
16
17
18
19
20
21
22
23
24
25
26
27
# 创建文件夹、修改属组
[root@centos7 ~]# mkdir dir1
[root@centos7 ~]# chown :OPS dir1/
[root@centos7 ~]# ls -ld dir1/
drwxr-xr-x 2 root OPS 6 Oct 6 17:39 dir1/

# 创建的新文件没有属组
[root@centos7 ~]# touch dir1/file{1..3}
[root@centos7 ~]# ls -l dir1/file{1..3}
-rw-r--r-- 1 root root 0 Oct 6 17:39 dir1/file1
-rw-r--r-- 1 root root 0 Oct 6 17:39 dir1/file2
-rw-r--r-- 1 root root 0 Oct 6 17:39 dir1/file3
[root@centos7 ~]#

# 添加SGID权限
[root@centos7 ~]# chmod g+s dir1/
[root@centos7 ~]# ls -ld dir1/
drwxr-sr-x 2 root OPS 45 Oct 6 17:39 dir1/
[root@centos7 ~]#

# 创建的新文件继承了属组
[root@centos7 ~]# touch dir1/file{4..6}
[root@centos7 ~]# ls -l dir1/file{4..6}
-rw-r--r-- 1 root OPS 0 Oct 6 17:39 dir1/file4
-rw-r--r-- 1 root OPS 0 Oct 6 17:39 dir1/file5
-rw-r--r-- 1 root OPS 0 Oct 6 17:39 dir1/file6
[root@centos7 ~]#

3.3 SBIT

准备环境

1
2
3
4
5
6
7
8
9
10
11
12
13
14
15
16
# 新建两个用户
[root@centos7 ~]# useradd alice
[root@centos7 ~]# useradd bob
[root@centos7 ~]#

# 加入同一个IT组
[root@centos7 ~]# gpasswd -a alice IT
Adding user alice to group IT
[root@centos7 ~]# gpasswd -a bob IT
Adding user bob to group IT
[root@centos7 ~]#

# 创建一个IT组的文件夹
[root@centos7 ~]# mkdir /opt/ITshare
[root@centos7 ~]# chown :IT /opt/ITshare/
[root@centos7 ~]#

在共享目录下,没有SBIT权限,用户可删除其余用户的文件。

1
2
3
4
5
6
7
8
9
10
11
12
13
14
15
16
17
18
19
20
21
22
23
24
25
26
27
28
# ,设置组内成员可w
[root@centos7 ~]# ls -ld /opt/ITshare/
drwxr-xr-x 2 root IT 6 Oct 6 17:47 /opt/ITshare/
[root@centos7 ~]# chmod g+w /opt/ITshare/
[root@centos7 ~]# ls -ld /opt/ITshare/
drwxrwxr-x 2 root IT 6 Oct 6 17:47 /opt/ITshare/
[root@centos7 ~]#

# 使用alice用户创建文件
[root@centos7 ~]# su alice
[alice@centos7 root]$ cd /opt/ITshare/
[alice@centos7 ITshare]$ touch alice.txt
[alice@centos7 ITshare]$

# 切换到bob,发现可以删除alice的文件
[root@centos7 ~]# su bob
[bob@centos7 root]$ cd /opt/ITshare/
[bob@centos7 ITshare]$ ls -l
total 0
-rw-rw-r-- 1 alice alice 0 Oct 6 17:51 alice.txt
[bob@centos7 ITshare]$
[bob@centos7 ITshare]$ rm alice.txt
rm: remove write-protected regular empty file ‘alice.txt’? y
[bob@centos7 ITshare]$ ls -la
total 0
drwxrwxr-x 2 root IT 6 Oct 6 17:52 .
drwxr-xr-x. 5 root root 51 Oct 6 17:47 ..
[bob@centos7 ITshare]$

在共享目录下,有SBIT权限,用户仅可删除自己的文件。

1
2
3
4
5
6
7
8
9
10
11
12
13
14
15
16
17
18
19
20
21
22
23
24
25
# 设置SBIT权限
[root@centos7 ~]# ls -ld /opt/ITshare/
drwxrwxr-x 2 root IT 6 Oct 6 17:52 /opt/ITshare/
[root@centos7 ~]# chmod o+t /opt/ITshare/
[root@centos7 ~]# ls -ld /opt/ITshare/
drwxrwxr-t 2 root IT 6 Oct 6 17:52 /opt/ITshare/
[root@centos7 ~]#

# 切换到alice,创建新文件
[root@centos7 ~]# su alice
[alice@centos7 root]$ cd /opt/ITshare/
[alice@centos7 ITshare]$ touch alice.txt
[alice@centos7 ITshare]$

# 切换到bob,发现不可以删除alice的文件
[root@centos7 ~]# su bob
[bob@centos7 root]$ cd /opt/ITshare/
[bob@centos7 ITshare]$ ls -l
total 0
-rw-rw-r-- 1 alice alice 0 Oct 6 17:56 alice.txt
[bob@centos7 ITshare]$
[bob@centos7 ITshare]$ rm alice.txt
rm: remove write-protected regular empty file ‘alice.txt’? y
rm: cannot remove ‘alice.txt’: Operation not permitted
[bob@centos7 ITshare]$

四、封面图

封面图

0%